
Pattern Reviews, Sewing Hacks, Tips & Free Patterns
Sewing Blog Besties

Handmade Christmas Gifts in No Time
Sew some handmade gifts this Christmas. Your friends and family will love them and cherish everything you make.

The holidays are here and it's time to whip up those handmade gifts. Eeep! Hopefully, you started sewing for the holidays back in the summer but, if you're on team procrastinator, I got you. These are all quick sewing ideas and range from baby to grandpa.
Below you will find some tutorial links and free patterns. Although, I've created this list to get you brainstorming and ideas flowing. Less talking and more making.
Get ready, get set, sew!
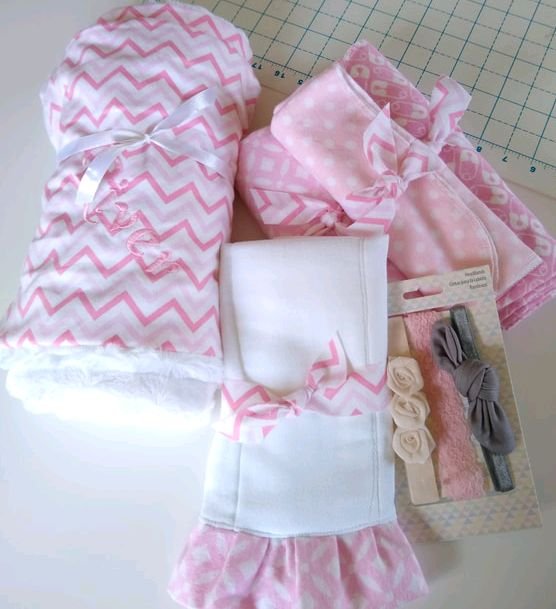
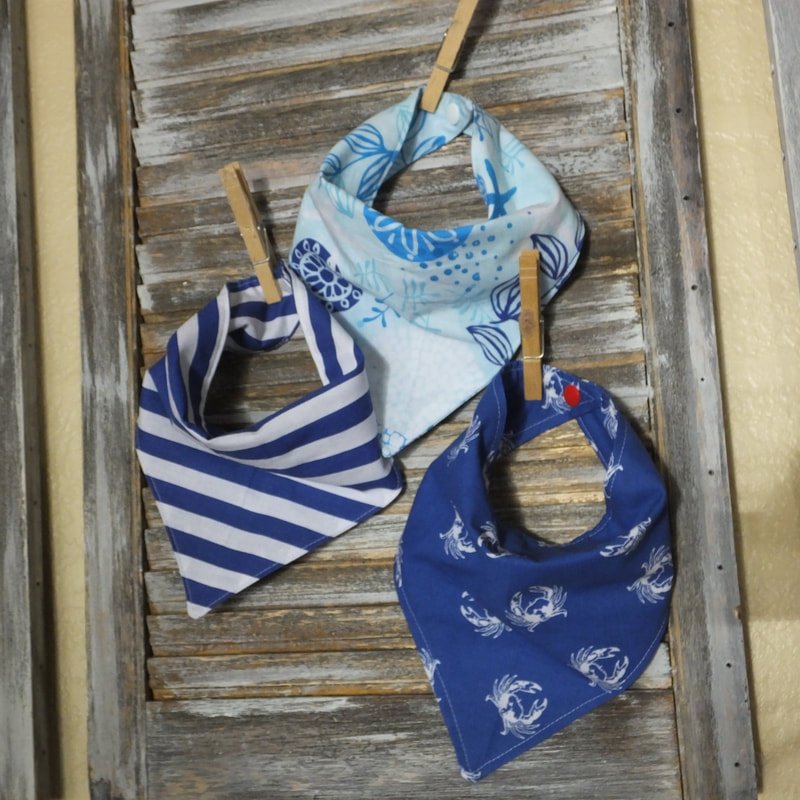
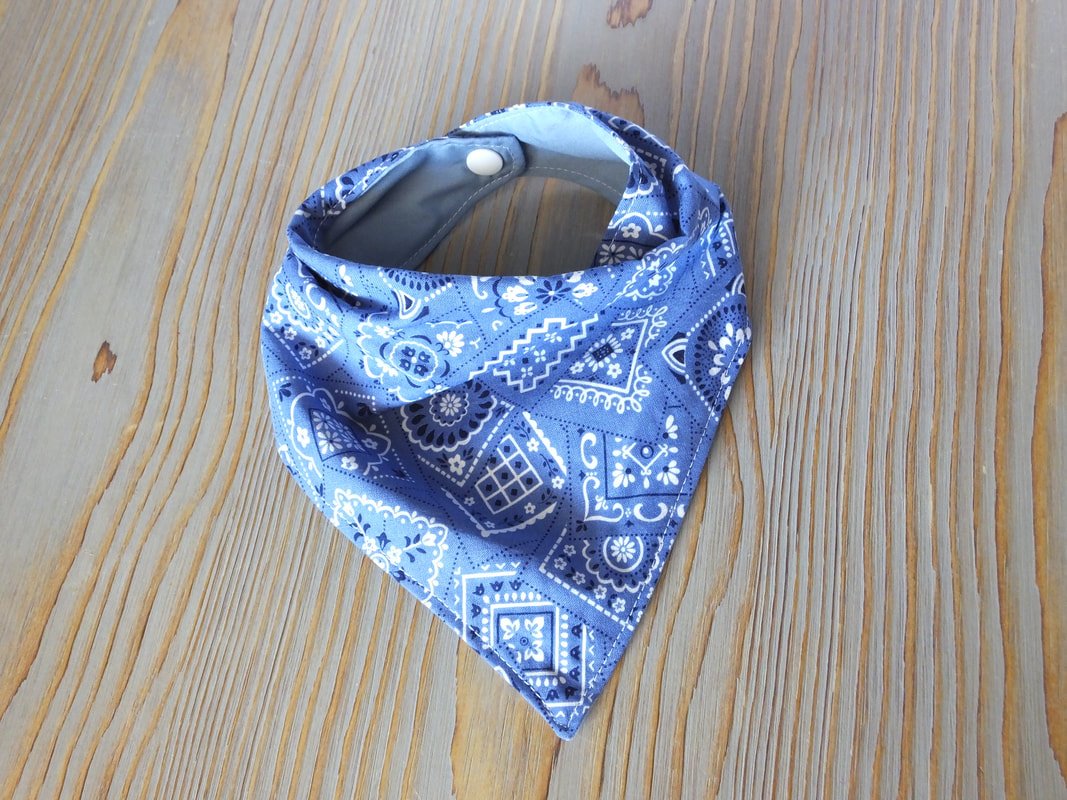
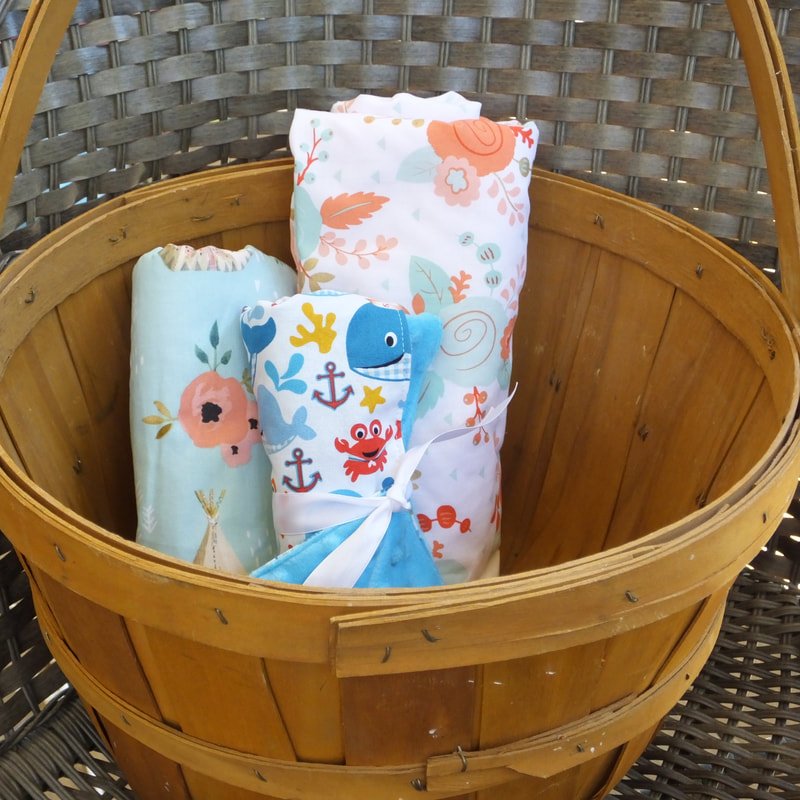
Baby Items
There's always someone who's having a baby. You can whip up a bib, burp cloth, and blanket in about 30 minutes. All you need is some fabric and a snap or velcro for the bib fastener. Read my baby items post here.
There are tons of free bib patterns you can find online. Or make a bandana-style bib.
Here's a super easy burp cloth tutorial. Hint: it's just a rectangle.
For an easy blanket, cut one square yard of flannel and one of cotton fabric. Sew them RST, leaving a gap for turning out. Topstitch the opening closed, and you're done. Sew easy!
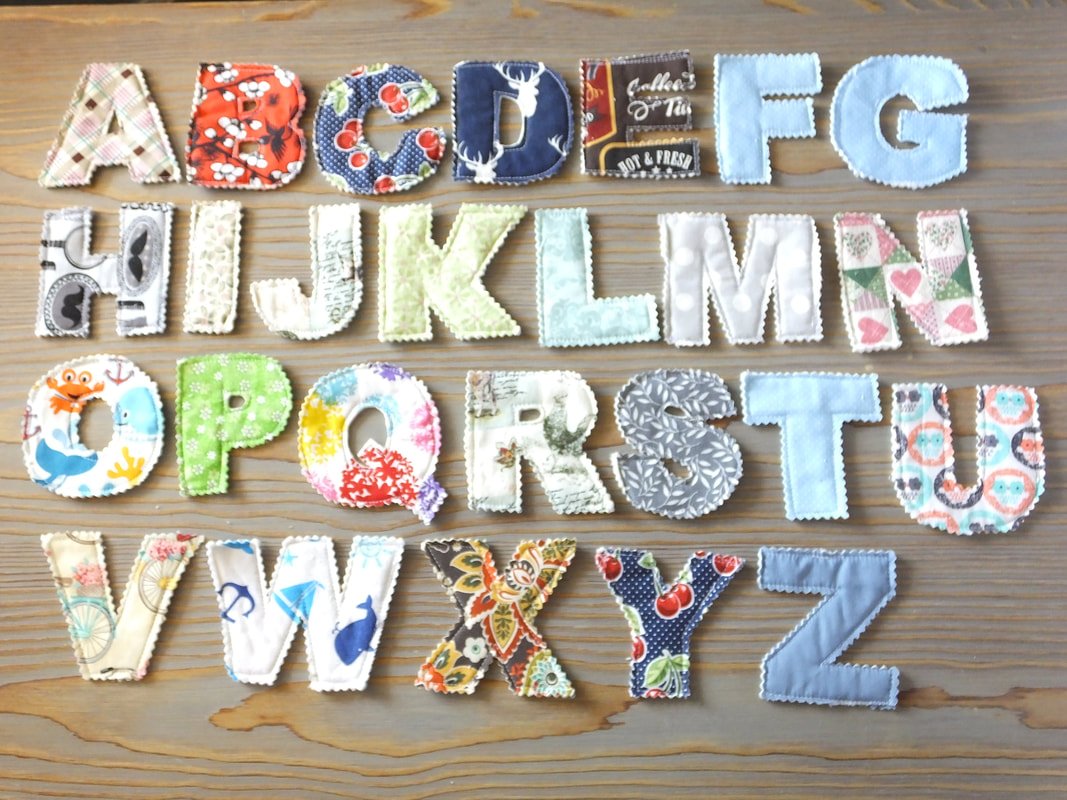
If you have more time, you can make a fabric alphabet set, baby outfit, fabric book, or sleeper bag. You could even add an easy-to-sew teether, pacifier clip, or mittens. Pinterest is your friend. LOL
Fabric letters are a fun gift idea too. Print out a boxy font A-Z and use as a template. 2 layers of fabric and add a layer of fleece in between to add some bulk. Sew around and cut with pinky shears.
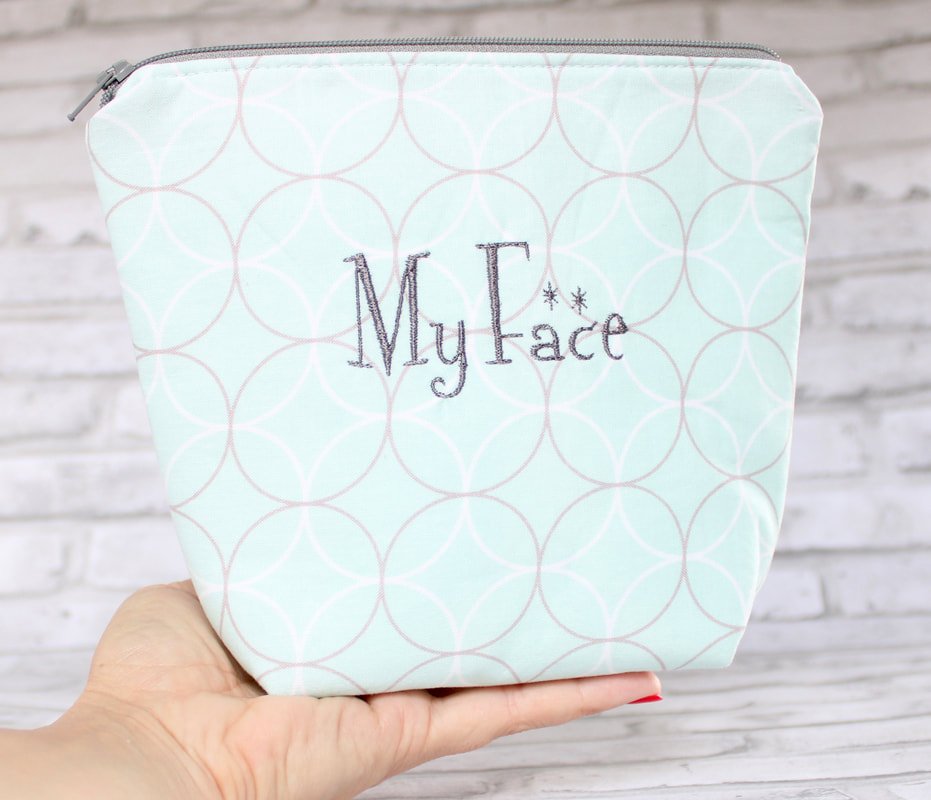
Toiletry Bags
Do you have a zipper and some scrap fabric? Sew a zipper pouch in less than 30 minutes. Follow this tutorial for an easy refresher on zipper installation for a makeup bag. Make them as big or little as you want.
Teens love these. Little kids love these. Everyone needs a zip bag for something. They work great for tools too. I’ve sewn a few for my husband’s random things he wanted to protect from rolling around inside the toolbox.

Keychains
Sew a quick keychain following Melly Sews tutorial. Grab some lip balms, lotions, and hand creams to complete a gift set. This is perfect for the babysitter, pre-teen, teacher, or neighbor. Heck, even Dad uses lip balm.
All you need is a scrap of fabric and a metal keyring. If you have a pack of key rings, batch-sew a few of these for gifts. Lip balm holders for everyone!!
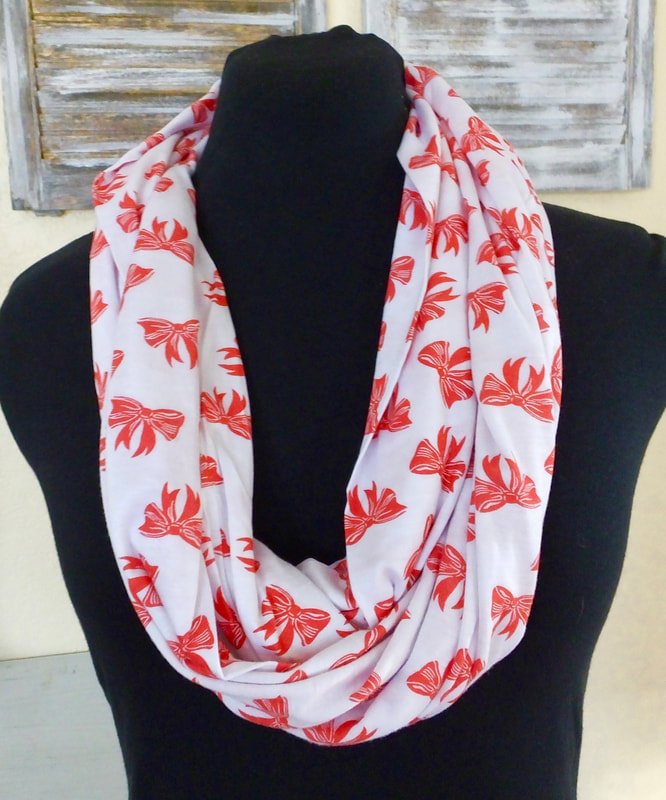
Infinity Scarf
Have a yard of 60" wide stretch knit fabric? You can make one with soft flannel or even crushed velvet for a luxurious scarf. They make great gifts for moms, aunts, teachers, etc. This length creates a single-loop scarf.
Cut the yard in half, lengthwise. You can make 2 scarves from one yard.
Grab one piece and fold RST. Sew the long side. Use a ballpoint needle, zigzag stitch, and 1/2" seam allowance.
Reach your arm through and grab the other end, keeping RST (right sides together) pull the ends together, matching seams.
Sew around the seams, leaving a 2"-3" opening for turning. Then, hand-stitch the opening closed. Wah-la!
Use for hand warmers, aches and pains, or freeze to use as an ice pack.
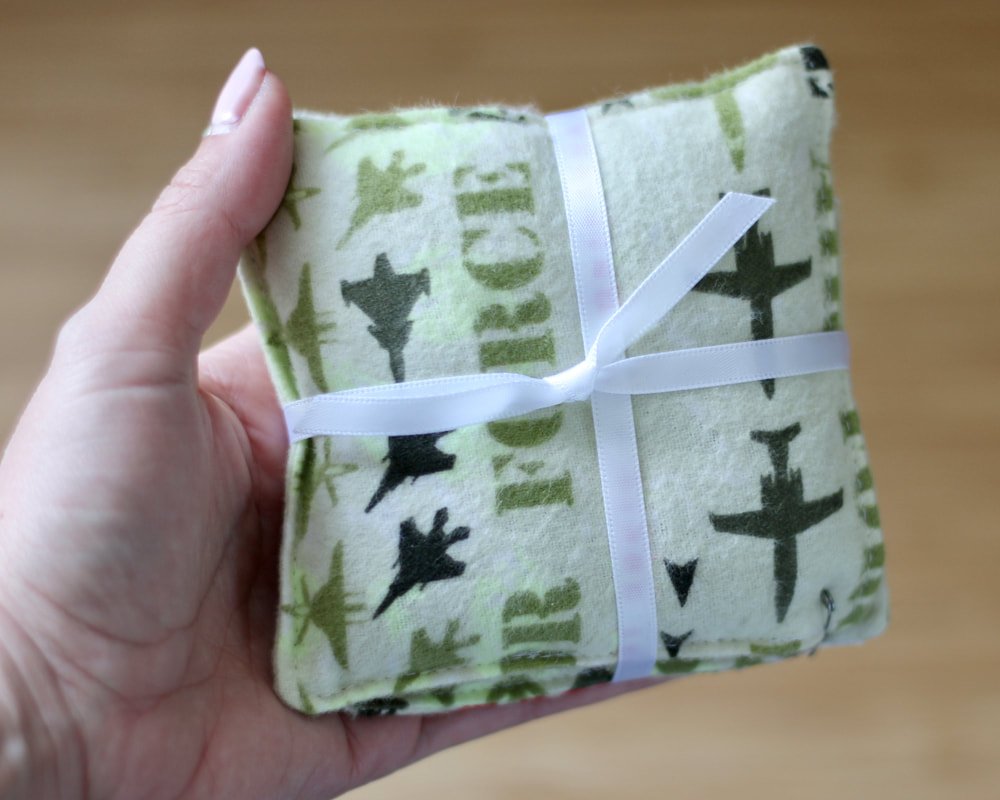
Rice Bags
Your family members all spend lots of time on laptops, phones, and other devices. Their sore muscles could use a little TLC. This is another scrap-busting gift idea. Yay!!
Cut squares or rectangle pieces from cotton fabric in any size you'd like. Add a 1/4" seam allowance.
Sew the pieces right sides together. **Use cotton thread if you plan on microwaving these.
Leave a 2" gap for turning out.
Fill with rice, flaxseed, or corn. Topstitch around the whole bag, watching out for kernels.
Store in the freezer and use on tired eyes. Microwave for 20-second increments until you've reached the desired temperature, for sore muscles. These make great hand warmers for chilly walks, too.

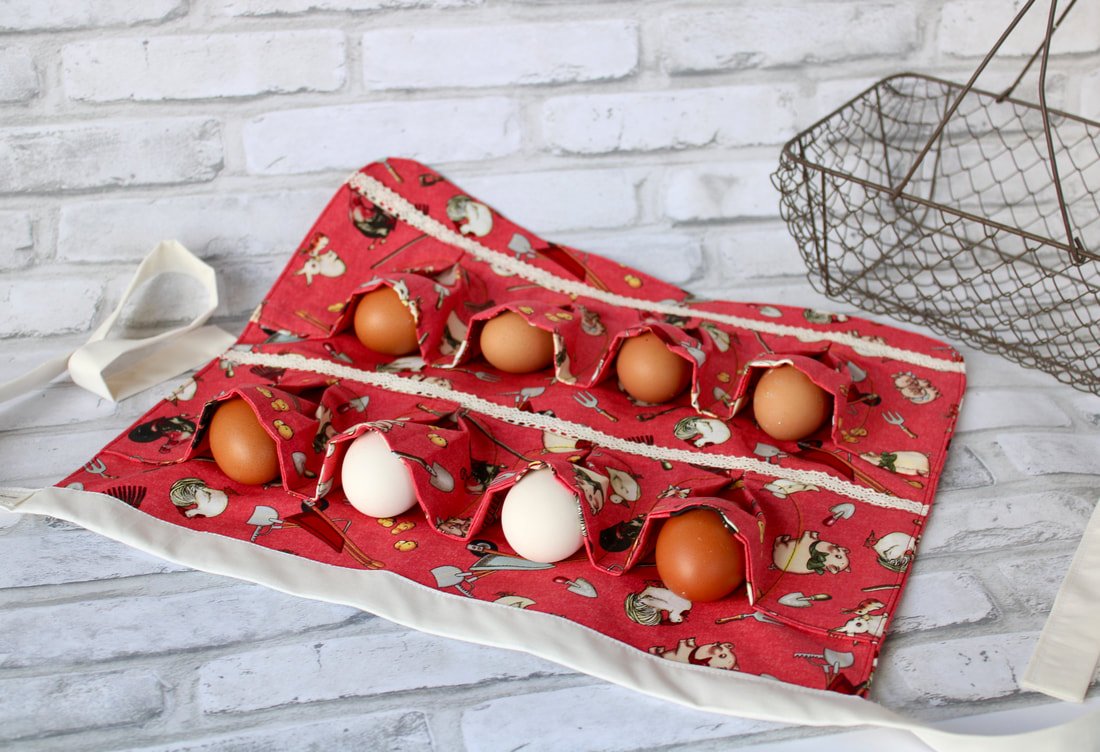
Aprons
Have a baker or chef in the family? Pick a pattern style from the links below. Pick an apron that matches his or her needs. Each highlighted link leads you to a different FREE pattern.
Aprons make nice gifts for little ones and adults. They are completely customizable. Add ruffles. Make the straps longer or shorter. Sew on some extra pockets.
Some Different Styles:
Make a simple rectangle style with pockets and make a tool apron for the person who fixes everything. The littlest mechanic would love one filled with plastic tools. Leather would work for a metal worker. Canvas can work for wood or other jobs.
Have a gardener in the family? They could use one as well. Aprons can be so diverse with a tweak here and there. A half apron works great for gardening. Make sure to add lots of pockets.
Egg Gathering aprons are a Godsend to folks with ducks or chickens.
Aprons usually take one yard or more of fabric so, this might require a trip to your local craft store. Oh darn! You need extra white thread anyway, make a fun trip out of it. ;)
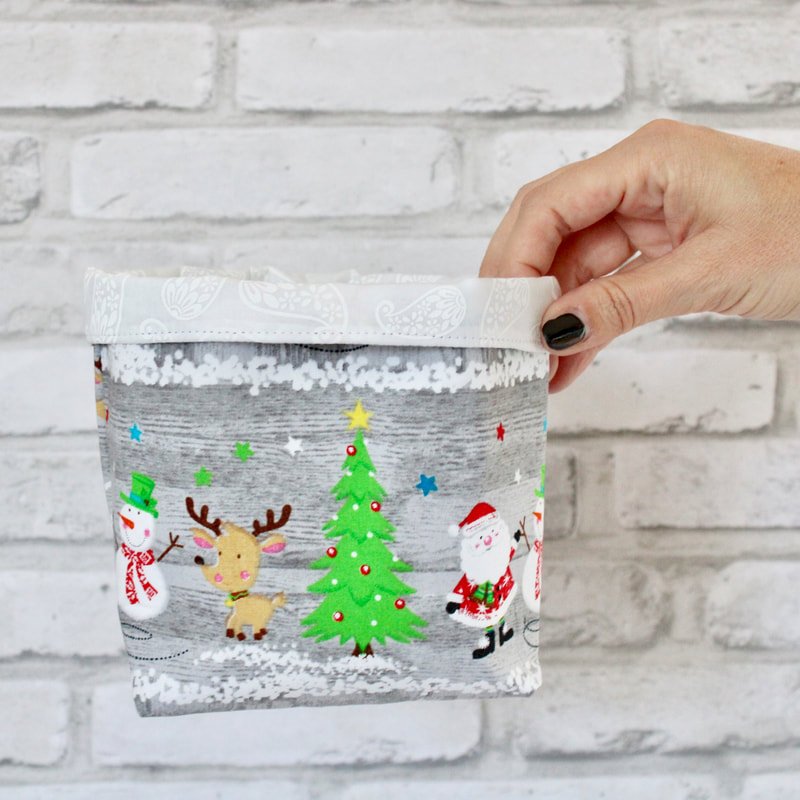
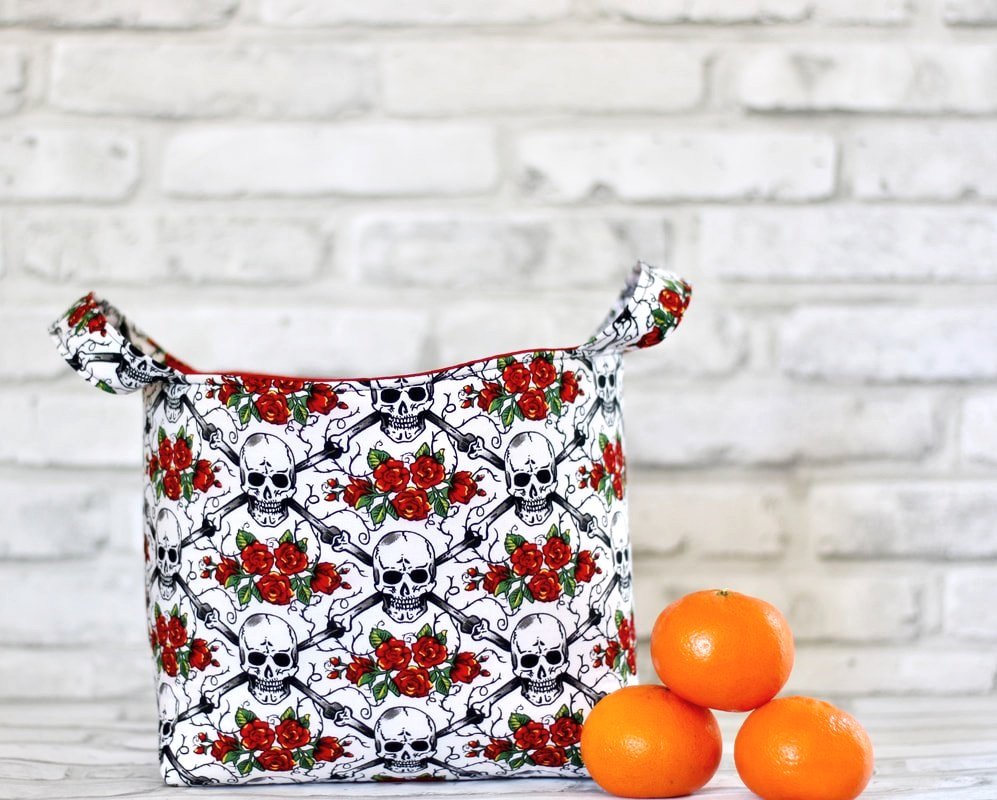
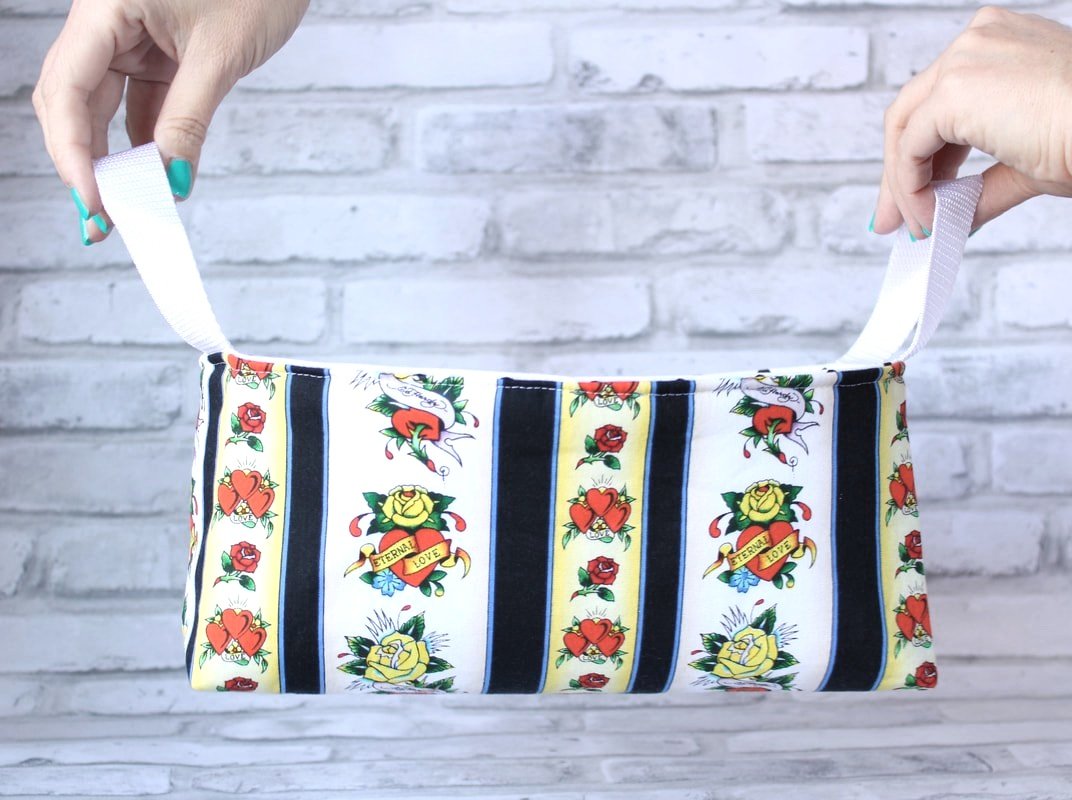
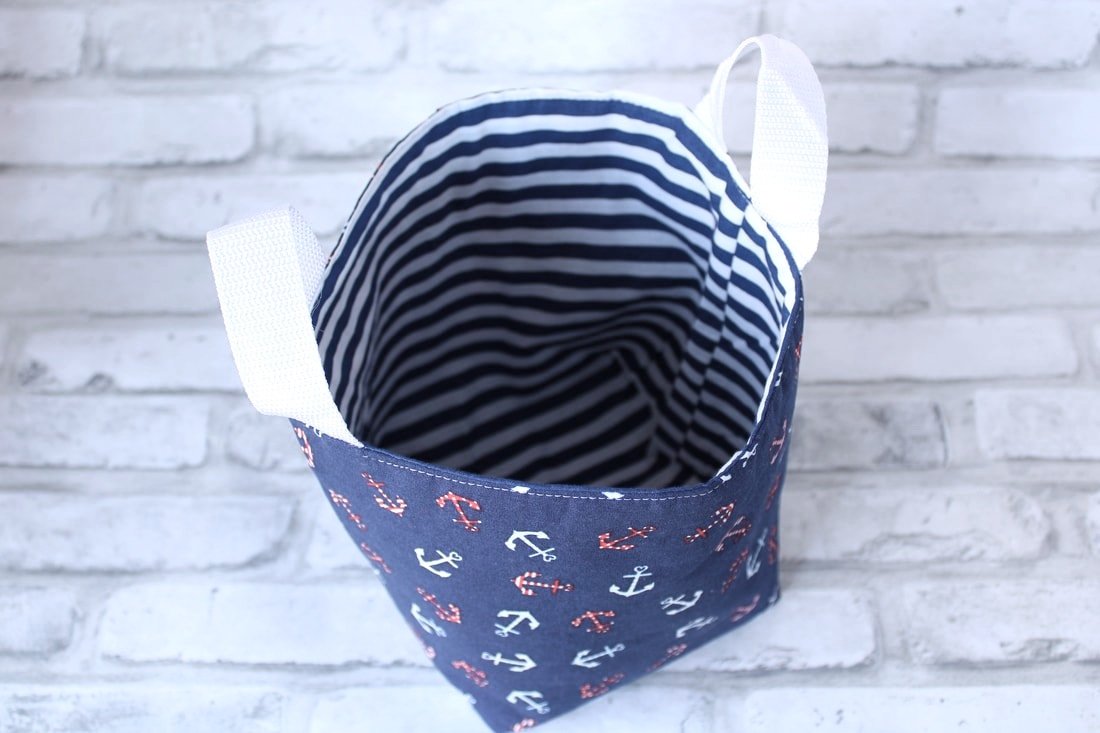
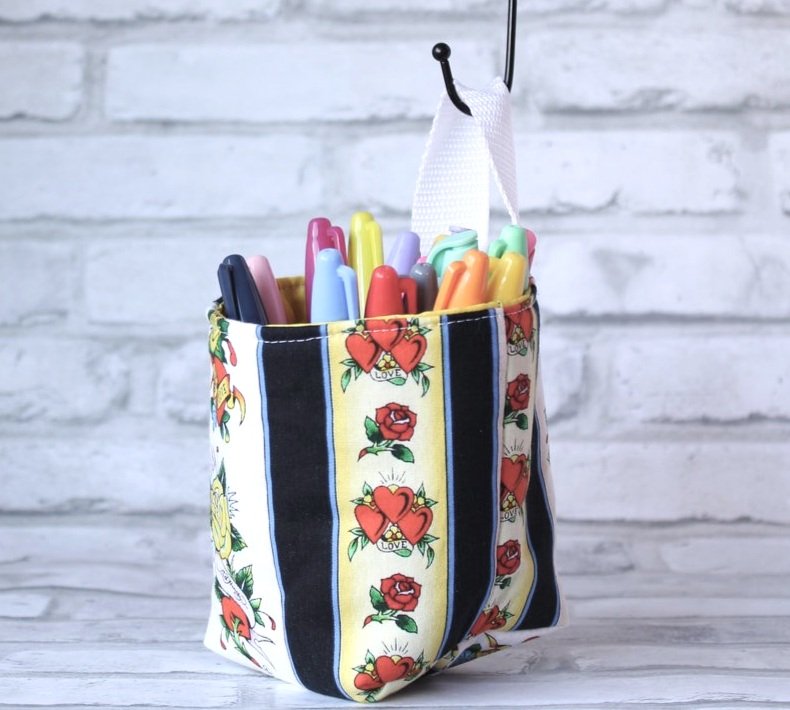
Home Decor Baskets
"A place for everything and everything in its place."
-Benjamin Franklin
We all have stuff. Lots of stuff. And the stuff needs a home. Fabric baskets make great homes for stuff! They're easy to make and versatile in size.
Here's what you'll need:
Fabric for the outside and fabric for the lining
Interfacing: I like fusible foam for bigger sizes, fusible fleece for smaller sizes and stiff interfacing works well enough for medium sizes if you don't have foam. *If you don't have interfacing but, have denim or canvas, use that as the lining. It acts as an interfacing. I've done this a few times in a pinch and loved the end result. It works in small to medium sizes. You could make a large blanket basket but, it won't stand up on its own. It will be floppy.
Decide on the size you need or just wing it. Use a template to make boxed corners or box them after the side seams are sewn.
Add handles for carrying or a loop to hang the basket.
I don't have a particular pattern to share with you because I usually wing it on sizing. But, here is my favorite tutorial on assembly.
These are great for small toys, stuffed animals, kitchen and pantry items, craft rooms, makeup, bathroom counter organization, and keeping socks organized inside dresser drawers. The sky is the limit!
More Ideas
These things shouldn't take more than 30-45 minutes to make. You're not going for a blue ribbon here. You're going for Handmade in a Hurry!
Box bag for Dad's toiletries
PJ pants for kids are easy
Kitchen towels
Cloth napkins (set of 4 or 6)
Table runner
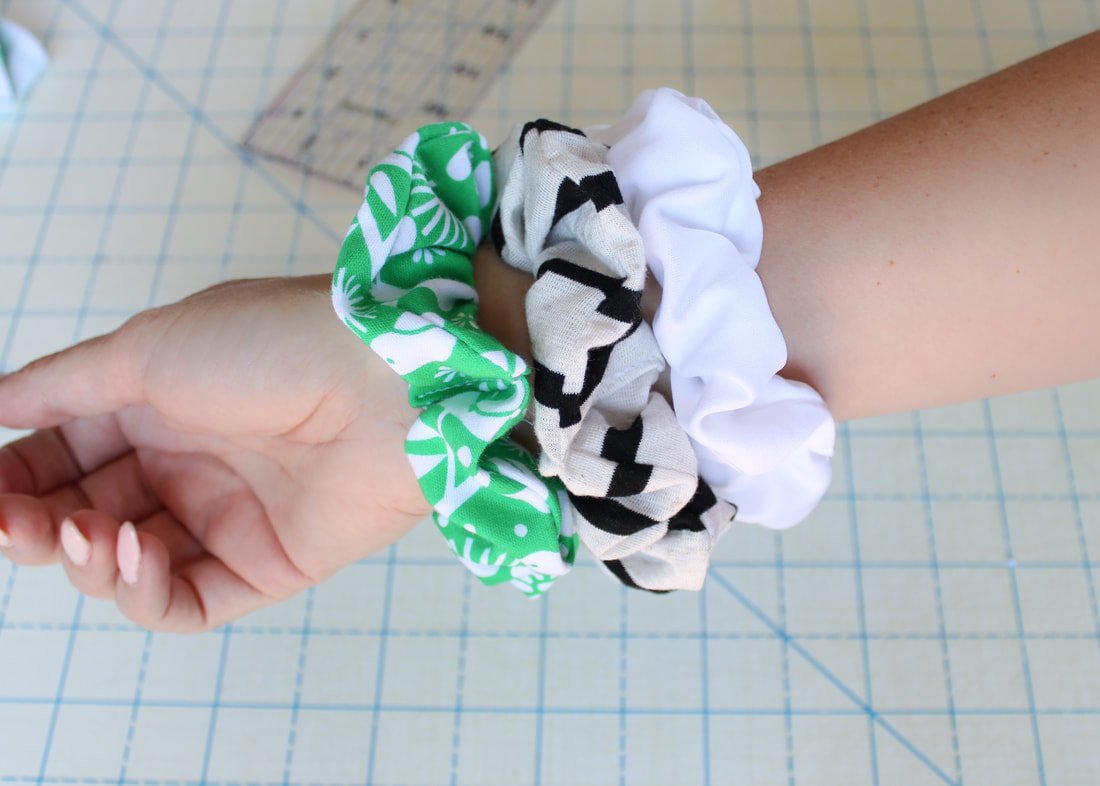
Hair Scrunchies
Apple watchband scrunchie
Eye mask
Head scarf ( follow my tutorial)
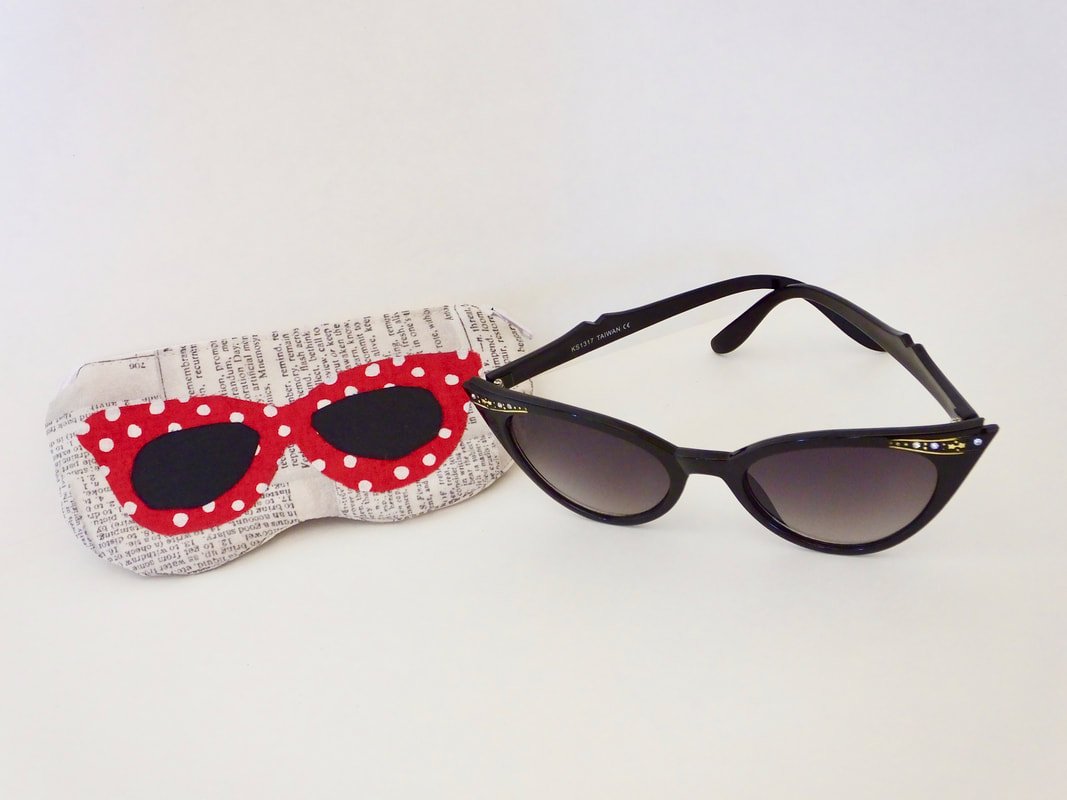
Glasses Case
Gifts for pets
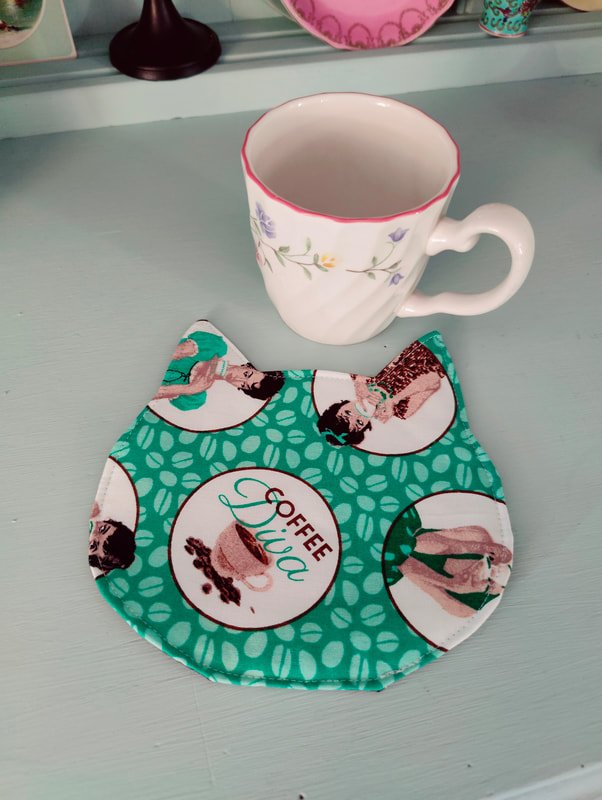
Mug rugs or a set of coasters
Stuffed animals or pillow animals


This is a Bonbon Pet by Dana, I made using her pattern.
Embroidery Machine Gifts
If you have an embroidery machine, you can buy towels, shirts, bags, etc., and personalize them. It's handmade in a hurry! I usually keep a few tea towels or makeup bags lying around to create a quick gift. People love personalized items. And, having your name on something is always fun.
Here are a few ideas:
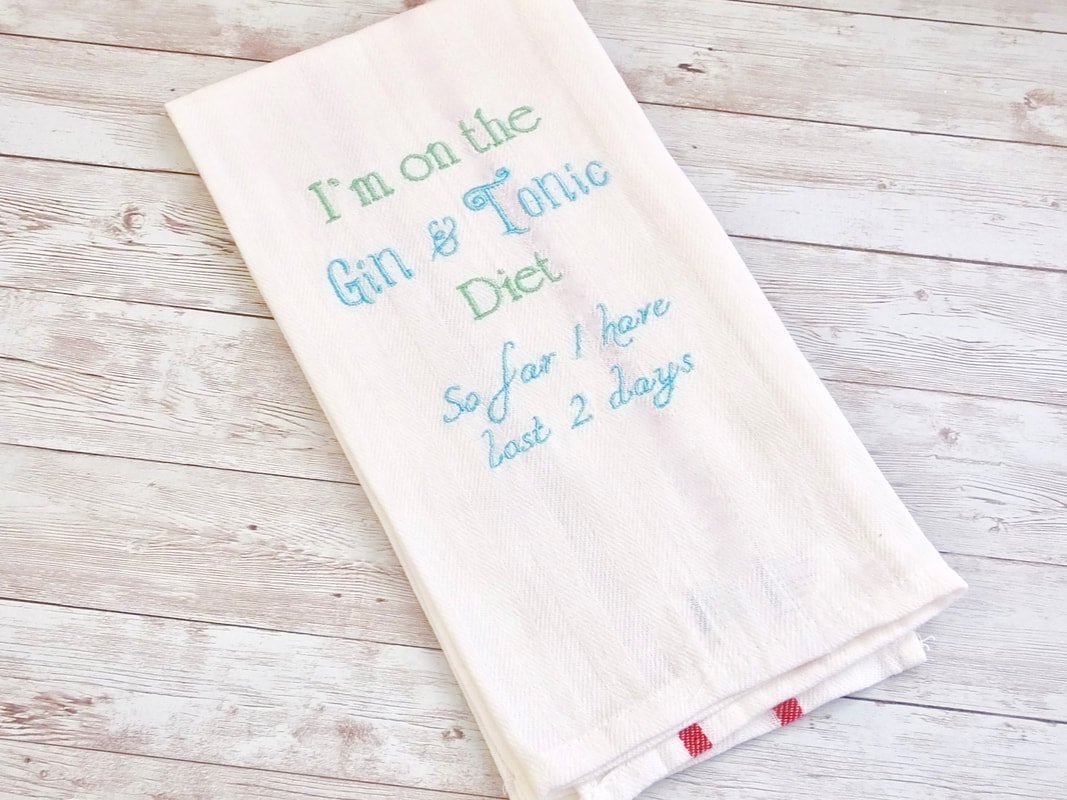
Tea towels with funny sayings, bible quotes, holiday designs, family last name, etc.
Purchase large makeup bags and embroider the recipient's name or makeup designs on the front.
Personalize luggage tags. Or, the actual luggage.
Bathroom towels with funny sayings or monograms.
Purchase an inexpensive blanket and embroider the family name on it.
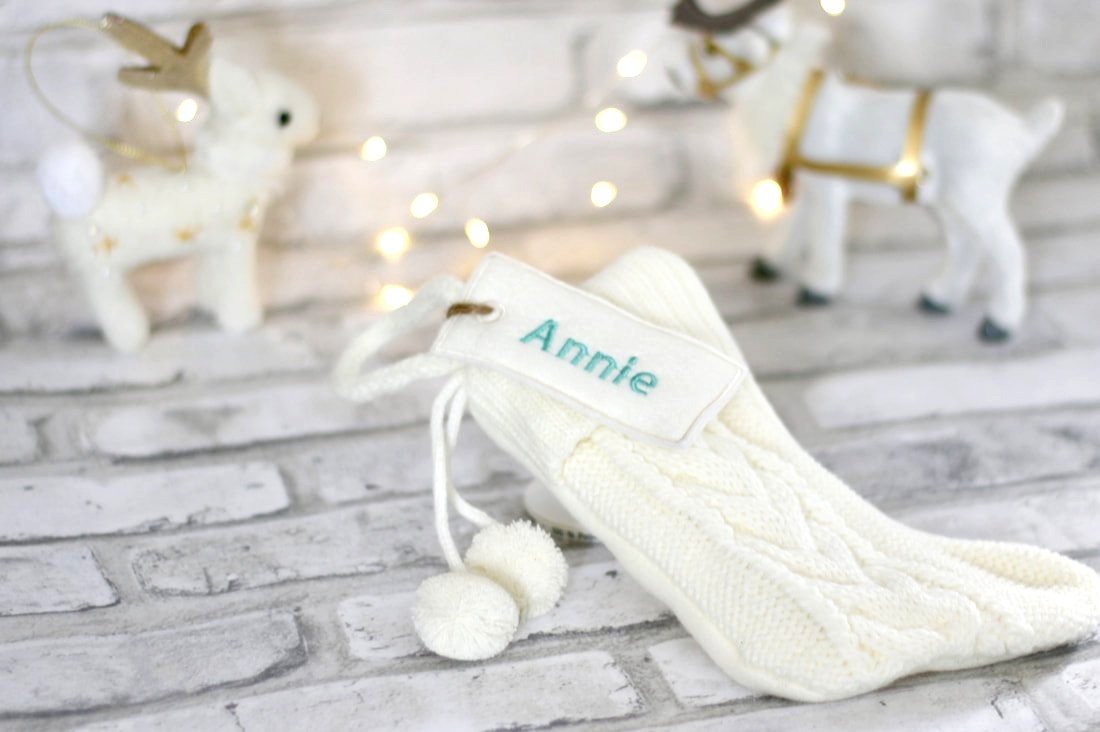
Buy stockings and add names to them.
Buy small stockings and create a name file to add to the mini stocking. We are doing this for our homeschool teacher this year.
Pillows are easy as well. Buy a pillow cover and embroider a design on it.
Toilet paper! Yes, you can embroider a funny design on a roll of toilet paper. It's easy and makes a great gift for the joker in the family.
The possibilities are endless here. I like to set up my embroidery machine to stitch out a design while I'm busy sewing other things. I'll usually make a Saturday out of gift making- a few days before Christmas. Ha! As I said, I'm team procrastinator. Face-palm!
The trick to sewing quickly is to not overthink it. Just cut and sew. Put on happy music or a fun podcast, and you'll whip out handmade gifts in no time. Make sure to eat something! Food gives you energy. ;)
Are you going to make some of these gift ideas? Share in the comments what you plan on making or other ideas that aren't on the list. We all need quick sewing gifts we can make.
Happy Holidays,
Annette

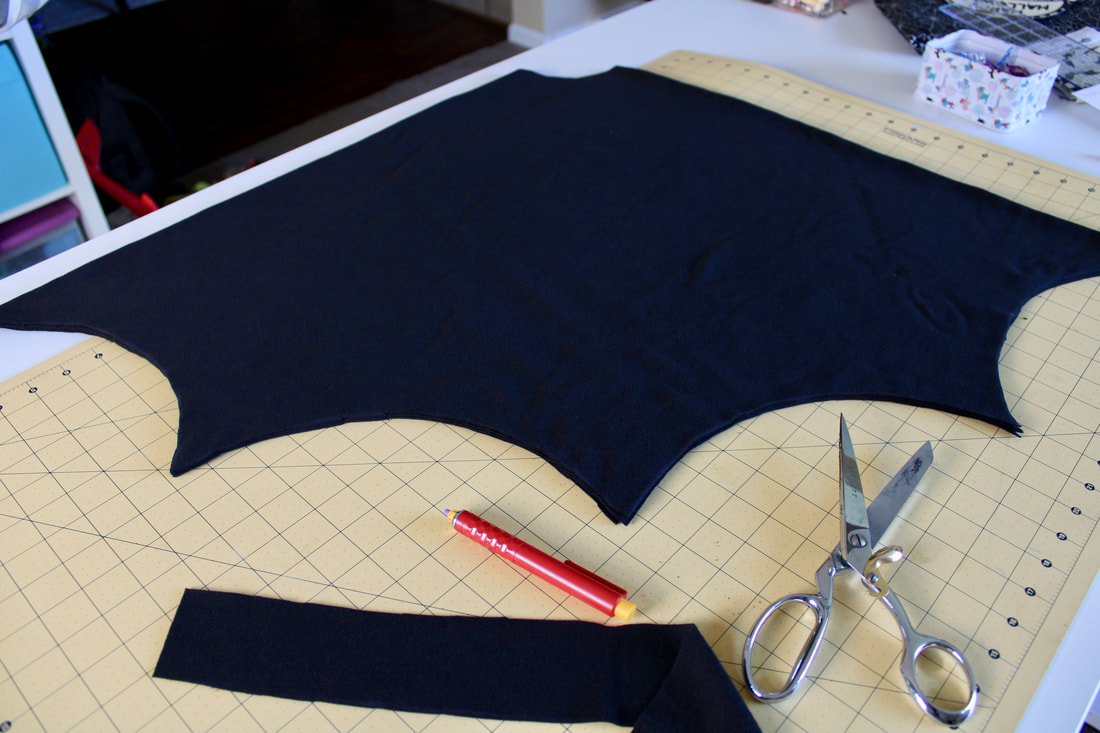
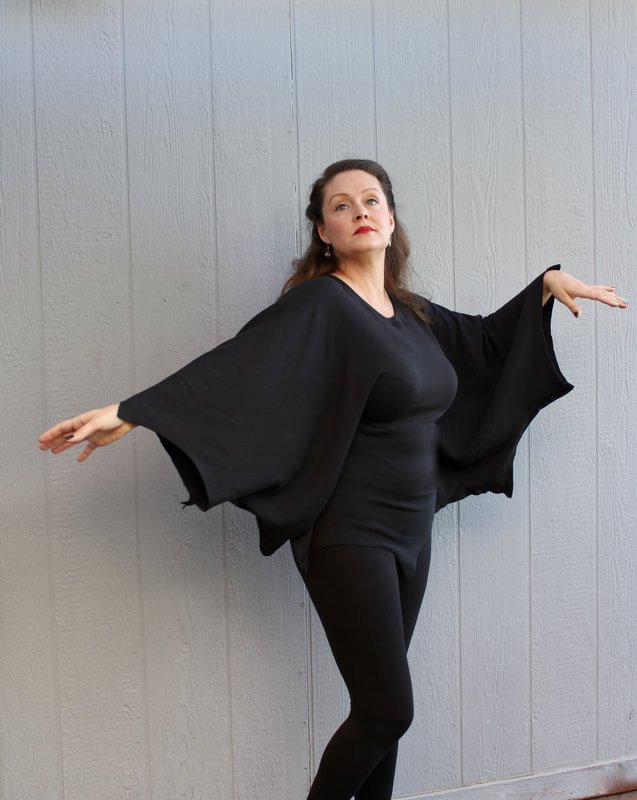
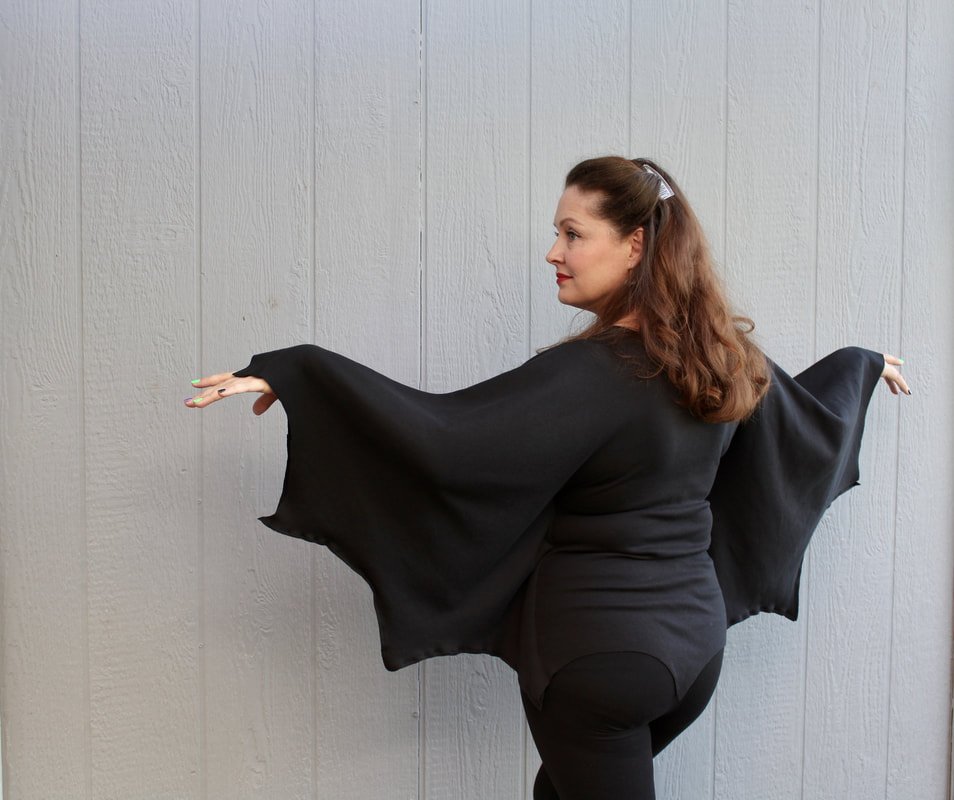
Bat Wing Top
Sew a Bat wing top for adults or kids. Free DIY Halloween costume. This makes such a cute and easy costume. Add ears and you’ll go batty too!
Halloween is almost here! Do you know what that means? Halloween project time. Whether you plan on sewing costumes, home decor, spooky gifts, or something else, it's time to dust off the sewing machine.
It's finally October, which is Halloween month. We start decorating around mid-September and my whole house is transformed into a "haunted mansion". Halloween is my most favorite holiday ever!! After Thanksgiving of course, because... mashed potatoes and pumpkin pie. Yum!
This is a fun top that you can make in a jiffy. You can wear it at home or around town, to the office, or trick or treating with your little ones. I recently made it and had to share it! It's too dang cute to keep it a secret.

Quick, grab the FREE Gone Batty top from Patterns for Pirates here. Then, click here for the sewing tutorial. It's the cutest!! Talk about a last-minute costume that's appropriate for work and/or school. You can wear it as an everyday top as well. It comes in one size that fits most, so no fussy fitting issues to worry about. All the wins with this one! Yes, please!!
I've had a long history of bats through caving experiences and I've grown to love them most of all. Bats are my favorite Halloween creature. When I saw this pattern last year (why did I wait so long??) I had to have it. Umm... a shirt with bat wings, yes, please! Bonus, you could even sew white topstitching thread to make it a spiderweb instead, if you wanted. Ooh maybe that'll be next year's project.
Supply List
P4P Gone Batty PDF pattern
1 5/8 yard of Knit fabric
Sewing machine with zigzag stitch
Sewing supplies and notions
Halloween music playing in the background (this is a must)
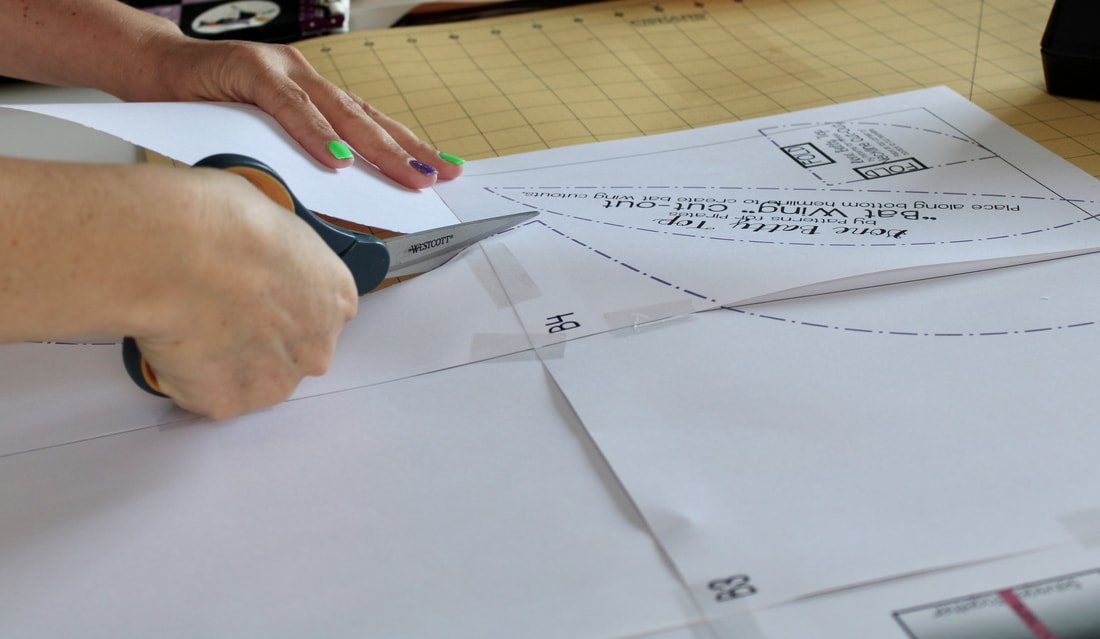
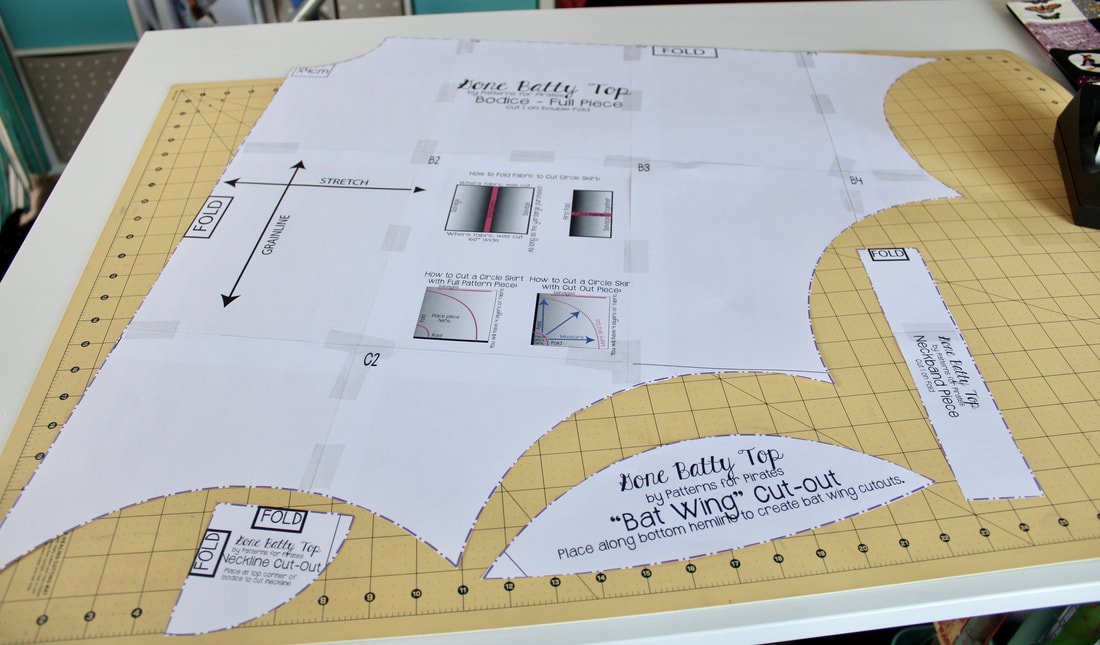
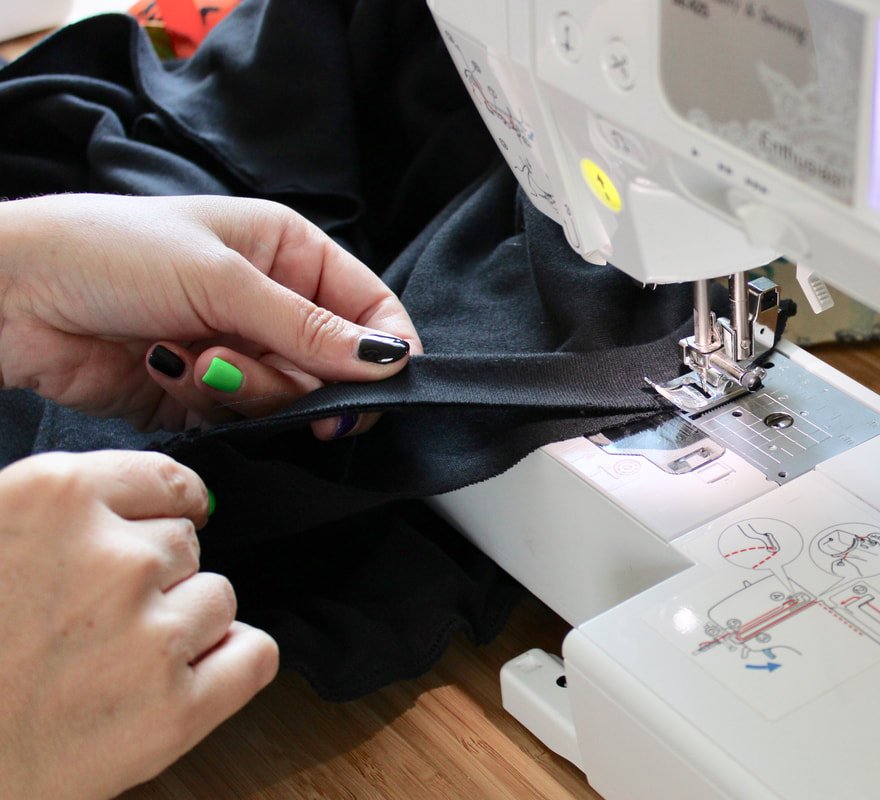
Put your PDF pattern pages together matching the letters at the ends. Tape the pages together and then cut out the pattern shape. Make sure your knit fabric is washed. Knit shrinks. Toss it in the wash on a quick wash setting and warm water. Dry your fabric on a warm setting too. Get all the shrinkage out of the way first.
The top is cut out like a circle skirt. You fold your fabric in half and then, in half again. You can use the whole pattern or use the cut-out shapes to make the "wings" along the hem. Sounds simple, right? It is!

I did the full size PDF. It taped together nicely. No issues.
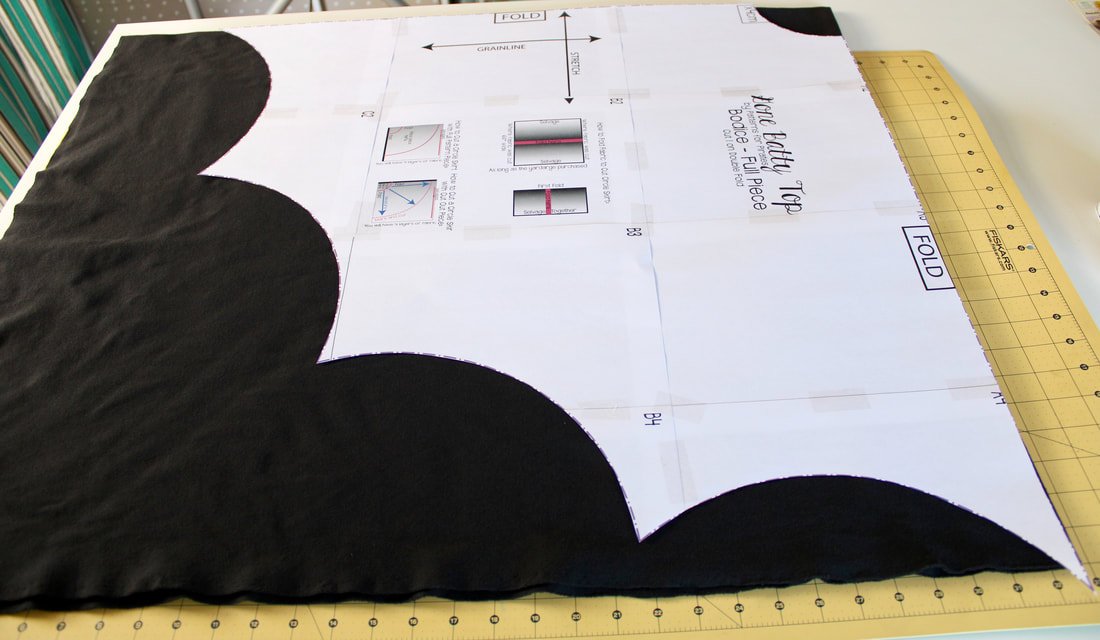
So, I ran into a teeny-weeny problem. The knit I bought was 60" wide. Well, after I washed it, it shrank about 2". In the above photo on the left, you can see the pattern runs off the fabric. I traced that scallop to the end of the fabric. See... ya gotta make sure you wash your knit. It shrinks like crazy.

Time to Sew
The pattern instructions have you take your high hip measurement and divide it by 4. I got 9". You find the center line and draw a line out to the side from that.
Then, you make an angled line 12" up from that line. There weren't any exact measurement points for these, so you eyeball it.
Now, this is where I urge you to use a chalk marker and baste where your stitch lines are supposed to be. I found out the hard way, the top would not fit me according to these loose measurements. I was blessed in the bust department and couldn't get the top over my body. LOL! After unpicking black thread on knit fabric for 30+ minutes, I wanted to share this little piece of advice with you.
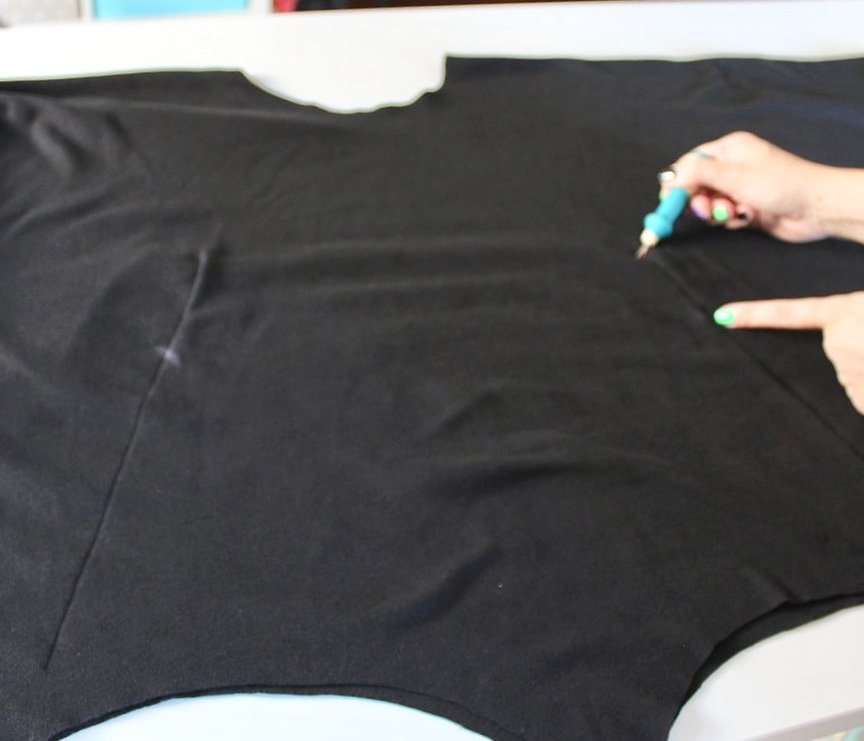
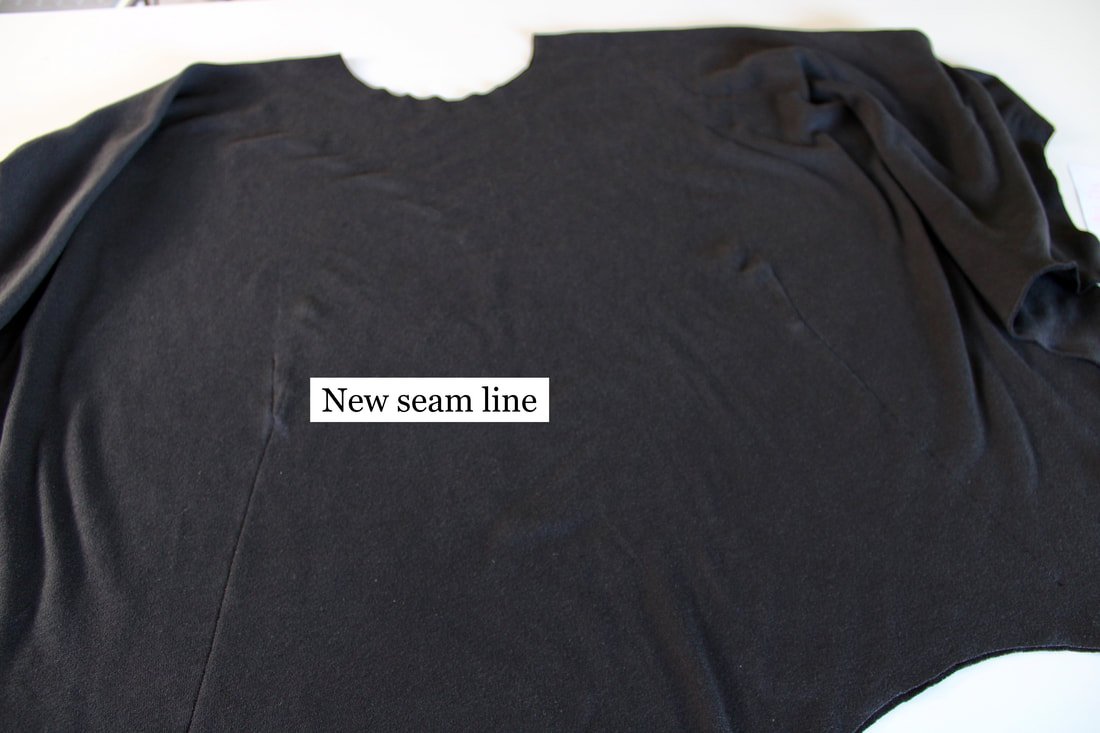
Sorry about the blurry photo, but this is how much I had to unpick. I re-drew the line and tapered it out about 1 inch. This gave me 4 extra inches total and ended up fitting perfectly.
You can see the slightly angled-out seam. This is the side seam and I needed more room than the instructions gave.
The instructions have you use the stretch stitch, which is the one that looks like a lightning bolt.
I urge you to baste your side seams first. That stretch stitch is a pain in the butt to unpick. Especially when using the same color thread on knit fabric.
Save your eyeballs, please!
After you've tried it on and it fits correctly in all the right places, go back and use the stretch stitch to sew your side seams.
Then, sew the rest according to the directions. I used the stretch stitch for this too.
Onto the neckband:
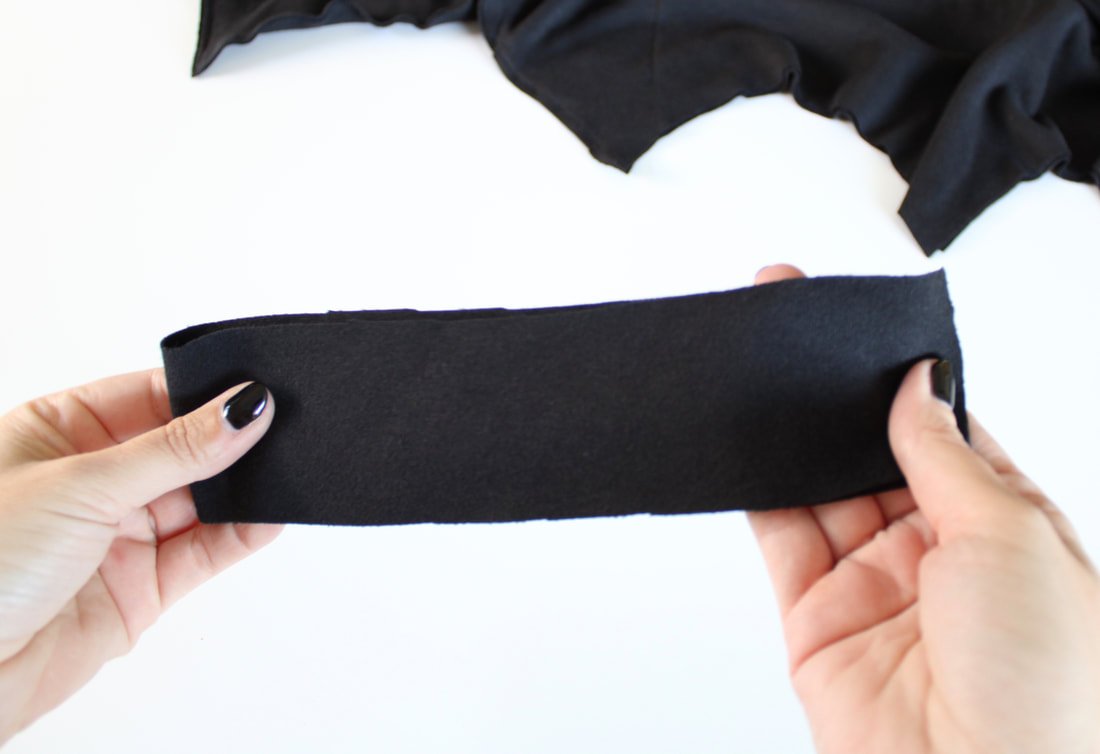
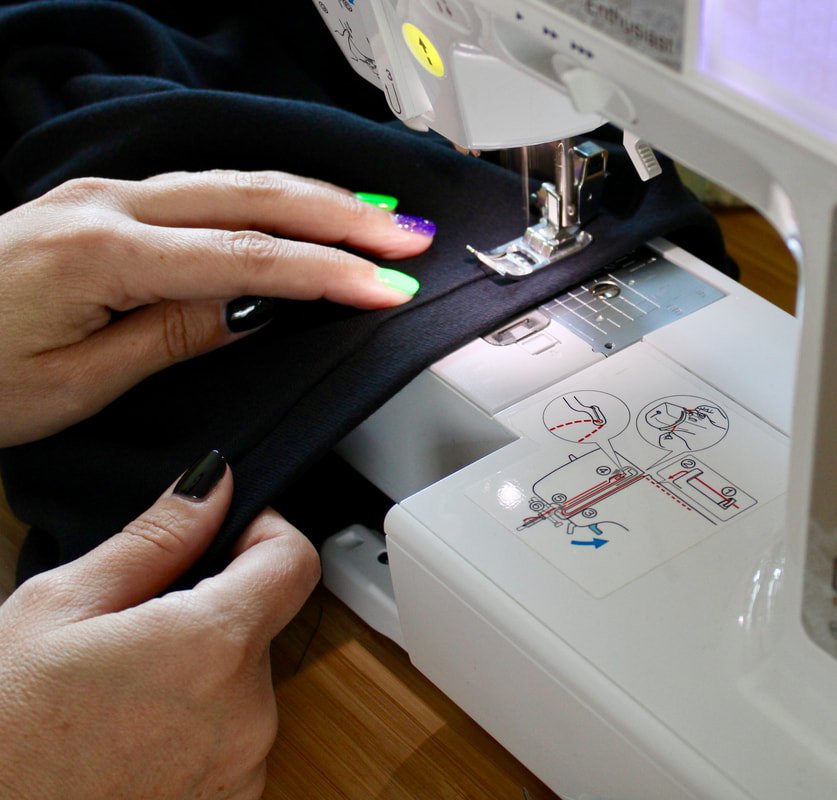
I don't remember reading the instructions anymore after this part. Oops! But, I went ahead and topstitched the neckband onto the top. I like the finish it gives. Use a regular zigzag stitch to do this if you'd like.

It had some rippling but, the iron took it out after a good press.
I had so much fun making this top. And way more fun taking my photos!! I had fun music playing and danced around in my batwing top. I think I'll live in this for the month of October! I love, love, love it!!! I was channeling my inner ghoul.


So, what do you think? Are you itching to make one?
If you need more Halloween sewing inspiration, make Trick or Treat bags or DIY your own Halloween home decor. I also made a Fall circle bag. It was a little fail, but cute nonetheless.
See ya later, I've gone Batty!!

Sew Custom Fit Leggings
Sew a pair of custom fitting leggings for yourself or your little one. This is simple pattern drafting.

Do you love wearing leggings? How about sewing your own leggings? Yes, no, maybe? We are 100% team leggings in this house. I don't buy my youngest daughter any other kind of pants. Heck, they are even my go-to pants (read: secret pajama pants) to wear out of the house. So, if you aren't on board with making your own leggings yet, you will be after reading this. At least, I hope you will.
If you're not interested in making leggings for yourself, scroll down to the bottom. I share a tutorial I use for making little kid leggings.

If you've been dying to make leggings that actually fit your body, look no further. Grab this FREE pattern to get started. You'll be cozy and cute in no time. Lately, simple patterns have been more my jam. Take all your measurements and write them down on paper.
I measured my waist, hip, knee, calve, thigh, and ankle widths. The sizing put me into a size Large waist, Medium hips, and narrowed down to an X-Small in the ankle department. I love my weird body. Buying leggings from the store is never fun because they are baggy in all the wrong places. You might be the exact opposite. We're going to make these leg prisons according to your own measurements. Wooo!!
My original plan was to follow a tutorial and draft my own pair. Well, my brain couldn't do all the math. So, in the end, I found this pattern that worked perfectly for me! Let's get started.

What You’ll Need
Just over a yard of knit fabric
Thread
Measuring tape
Stretch or ball-point needle
Twin needle (optional for leg hem)
1 inch thick elastic for the waistband (I prefer non-roll)
Sewing machine that can do a Zigzag stitch
Serger (optional)
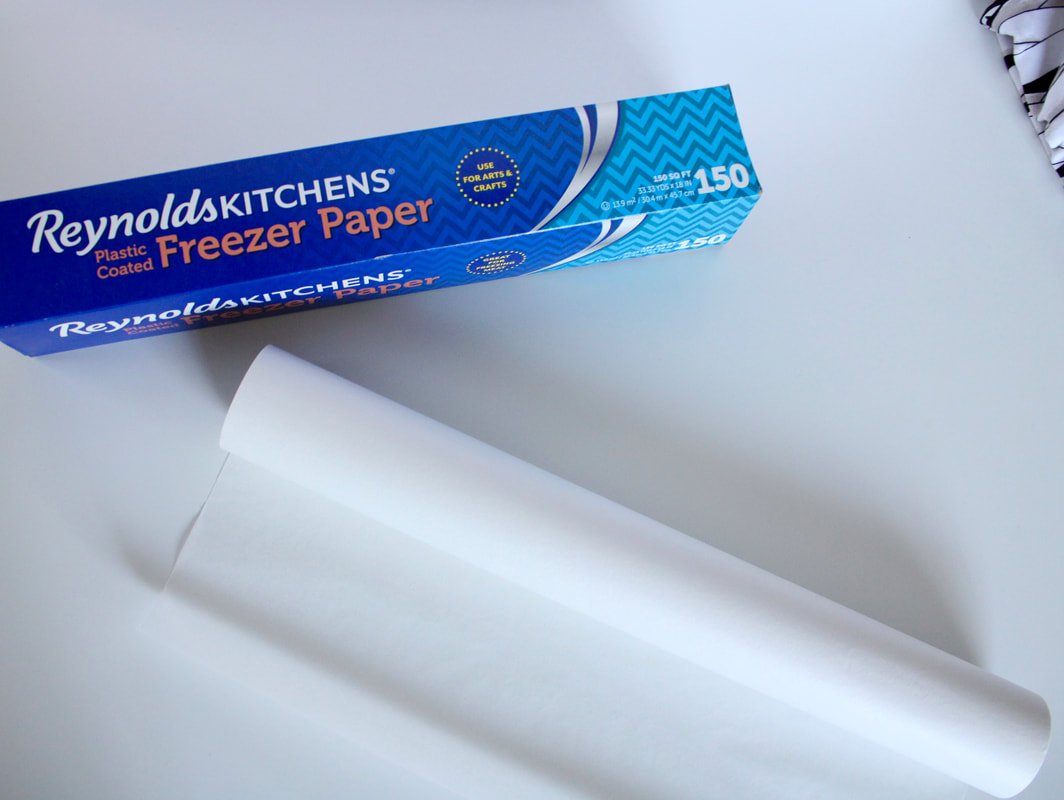
Roll of tracing paper, medical paper, or freezer paper (my preferred paper for tracing)
Pencil and pens for tracing
Seam ripper because, let's be honest...
Tape for taping pattern pieces together
Printer to print out the PDF pages
All the other sewing notions you usually use ;)
Pattern Set-up
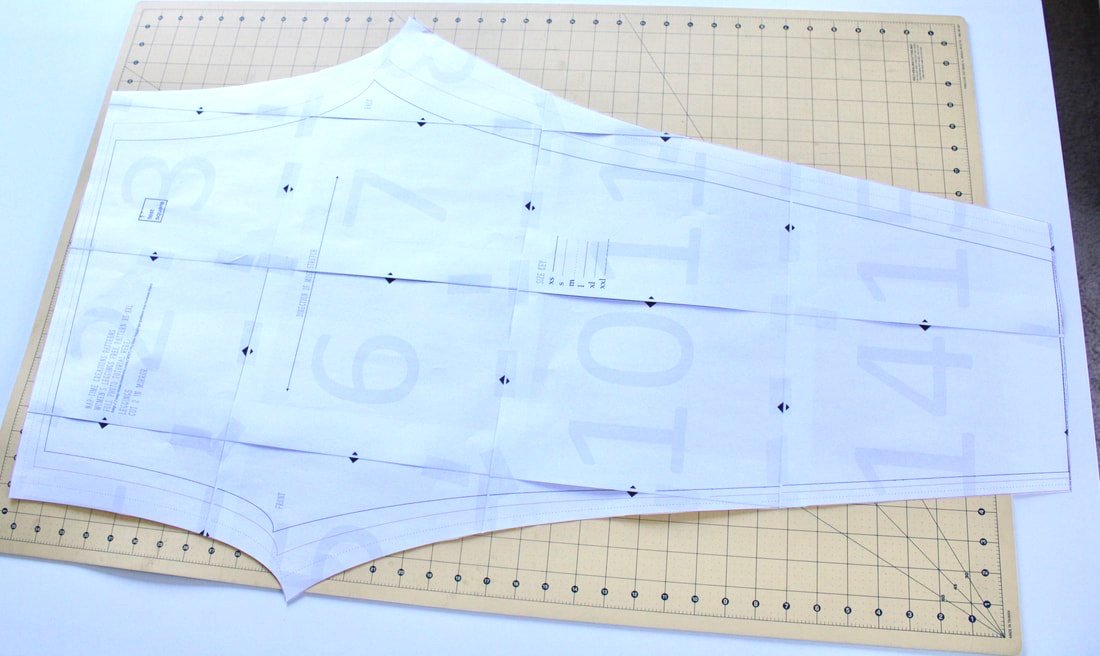
Click here for the FREE pattern. You will add to cart but, it is a free PDF. After you "purchase" you will be able to print out the pattern.
Match the lines and arrows, then tape everything together to form your pattern. Figure out where your measurements lie in the legging pattern size range. You might have to grade between sizes. Grading is easy and doesn't take any extra time. You simply blend the sizes to fit your unique body shape.
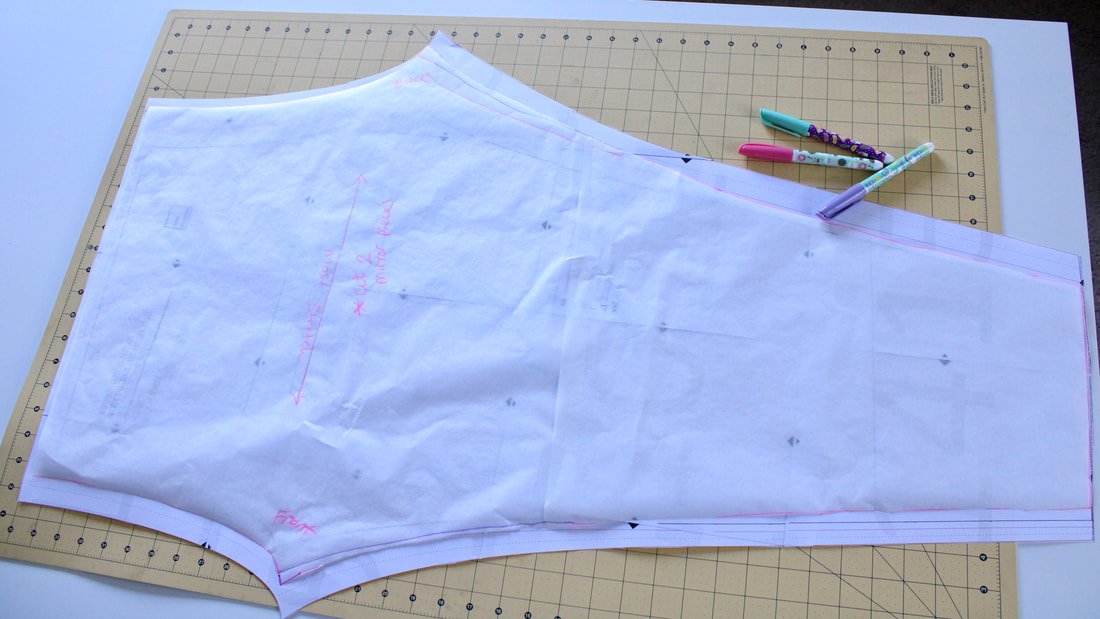
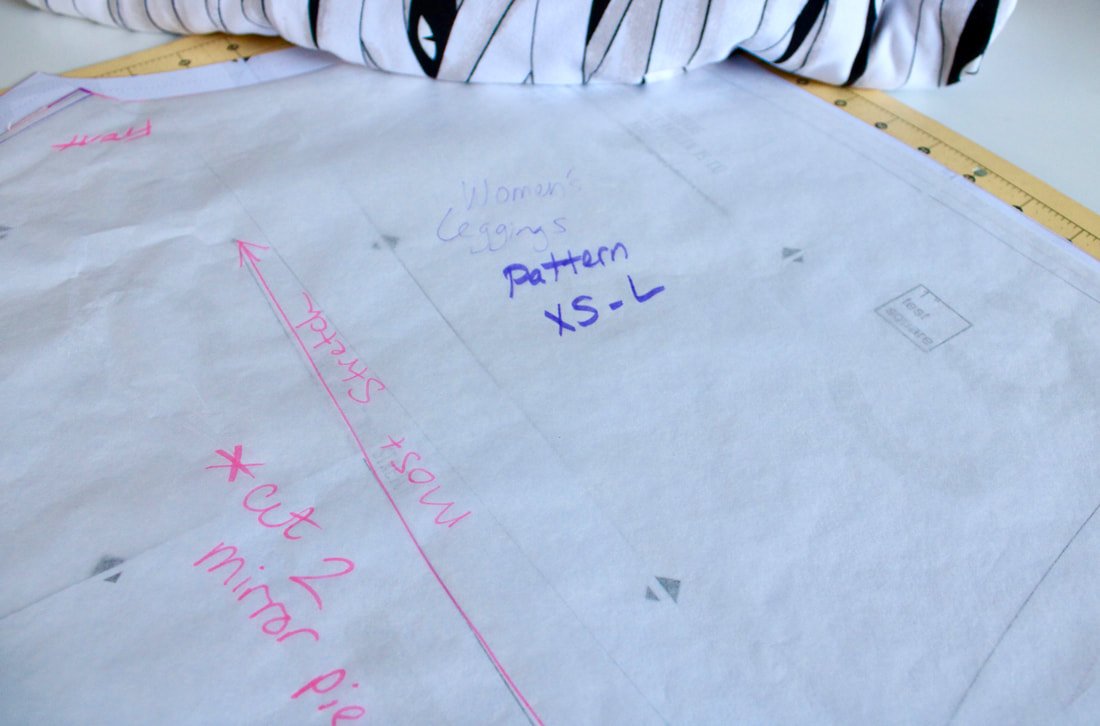
You can use a highlighter or other light colored marker to grade your sizing, directly onto the pattern. Or, Take your tracing paper and lay it over the pattern. Trace your new pattern size. Doing this saves the PDF for future use or if you decide to make a smaller or larger size for a friend.
I suggest making a muslin before cutting into your beloved fabric. If you have stretch fabric you're not in love with, use that. you want to get the length correct too. If you're taller or shorter, you will need to make adjustments accordingly.
Sewing the Leggings
Sew each inner seam with right sides together. You can use your sewing machine or serger for this.
Then, take one leg and turn it right side out. Place your arm back through and feed the leg through the other leg, making sure right sides are touching. Straighten the leg, matching the seams together. You're going to sew the large "U" shape crotch seam from one side to the other. Use pins or clips to keep the layers from shifting around. You can use the sewing machine or serger for this as well. After the crotch seam is sewn, pull out the legs.
If done correctly, it should look like a pair of pants. If not, grab that seam ripper because something went wrong. Uh-oh!
Perfecting the length
Try them on. They should fit nicely.
If they fit too snugly, use your seam ripper to let out the seam in the snug areas.
If they fit too loose, go back over those spots with the sewing machine to make them fit more snug.
If the length is too long, you can shorten them at the ankle hems. If you want them to have a lower rise, shorten the waist. If you need more length, add those inches to the pattern.
All you have to do is sew the hems at the ankles and put in your elastic waistband. Comfy and super simple.
Hopefully, you found the PDF pattern easy to print out, tape together, and use. I will be making more leggings for myself soon.
I LOOOVE leggings!! And, now they will fit my funky shaped bottom half of my body. Hahaha!!!
Will you be making leggings for yourself? If not, keep reading. I include a tutorial for making leggings for a little one.

Leggings for Little Ones
Maybe leggings still aren't your cup of tea. But, they are great for kids.
Follow this fun tutorial on how to make a pair for a child. My youngest daughter wears leggings every day. They are the only leg prisons she allows in her dresser. When we go camping, she may or may not wear the one pair of jeans we keep in our RV for her. Yep, she's that committed. Ha!
What You Need
The tutorial
Elastic for the waistband
1 Yard of knit fabric
Sewing machine or serger
Thread
Ballpoint needle
All the regular notions
A small child ;)
You use a pair of leggings that already fit or are too short. You trace off the pattern based on that pair of leggings. Add length if needed. Sewing them is the same as the adult pair I made. Easy-peasy. I've made quite a few pairs for my daughter. She loves them. Mom-win!

So, that's it. Go make some new leggings for yourself and everyone around you. Hooray for comfy pants!!
Check out my Batwing top here. It's fun and makes a quick costume! Oh, and it's perfect for those chilly October evenings.
Thanks for hanging out today and happy cozy sewing,
Annette

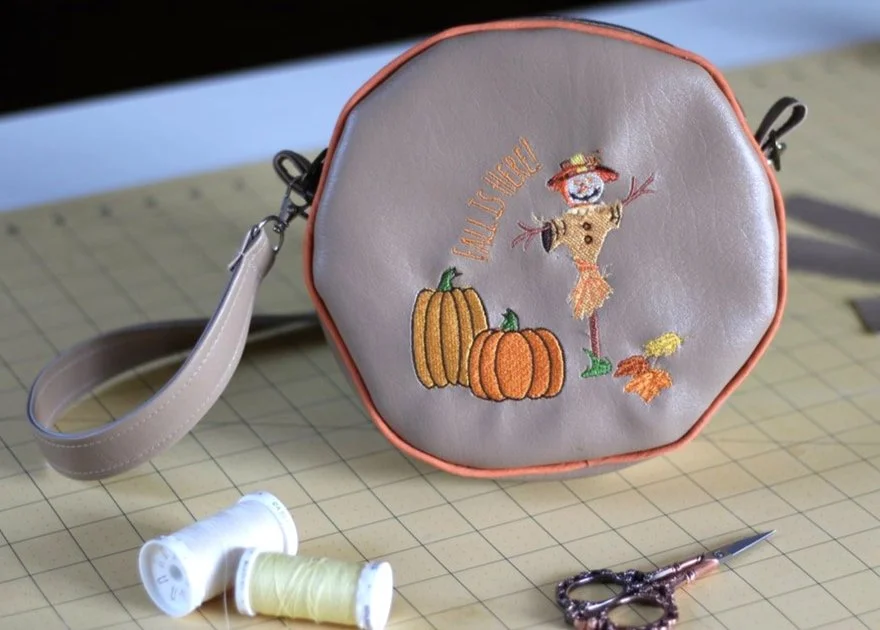
Sew a Circle-Shaped Bag
Sew a circle shape bag for fall or any other season. You could even turn this into a hip or sling bag. DIY bag making project.

The air is crisp and the leaves are sprinkling the ground as I type. Apple picking season is among us. I tried to hold on to summer but, there's no escaping it. Fall is here. Yay! I am ready, bring on my favorite season.
My creative side has been lacking lately so, I wanted to try something new. Usually, I only share patterns that I love or have created myself. But, I wanted to shake things up around here. So, I'm sharing one of my sewing fails. Yes, a fail. A major sewing fail. Face-palm.
Here's the circle bag.

I wanted to try my hand at something new for the upcoming season. I saw a circle bag in a shop and knew I wanted to make one. I had light brown vinyl and planned on using it for a cute Autumnal bag. After scouring the interwebs for a free pattern, I settled on what I thought was a good one. Welp, the pattern was not great. I don't want to throw anyone under the bus so, I'm not saying where I got the pattern. But it was "meh" at best.
I knew from the beginning this was going to be an experiment. Yay for experiments! I created a fall-themed embroidery file to place on the front, just in case the purse turned out cute. I didn't want a boring brown circle bag.
The embroidery design has leaves, pumpkins, and a scarecrow. Fun! Although, the scarecrow was a little wonky.... don't look too close. ;)
Following the instructions, I gathered everything that was needed and cut out the pieces. I embroidered on the front circle only, that's the only area everyone will see. I used mismatched hardware for the strap (it's what I had on hand) and I used a brown zipper. Fall bag, here I come!

The seam ripper was using a lot. I horribly sewed a piece of fabric to cover the embroidery. Next time, I’ll just leave it alone.
Putting The Purse Together
The pattern didn't call for a stabilizer, which I thought was odd. But, hey, I've never made a circle bag before so, I forged on.
You start with the zipper and long fabric strips that get sewn to the zipper tape. I didn't get a photo of this part.
Then, you take the bottom bag piece and sew it to the zipper at the short ends. This makes a long loop that connects at the zipper ends.
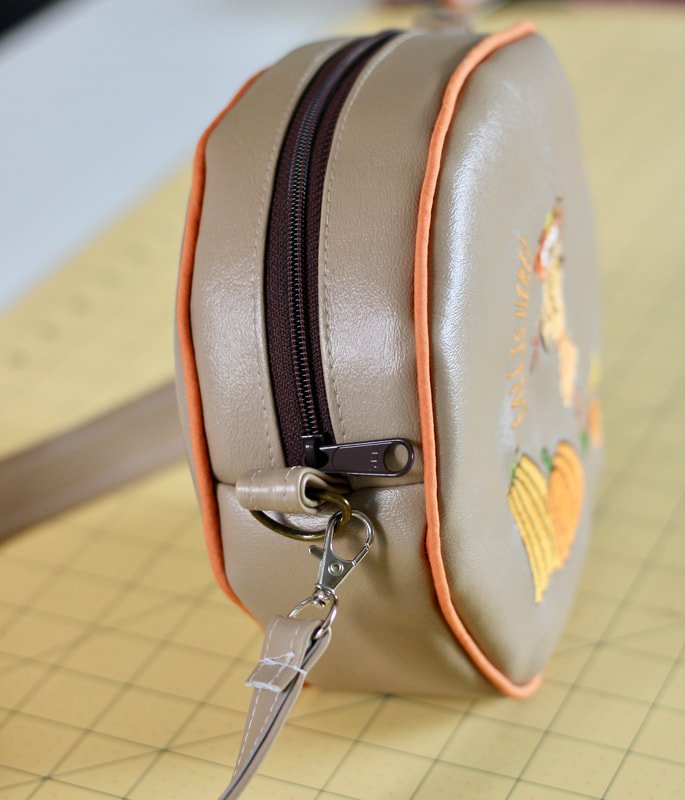
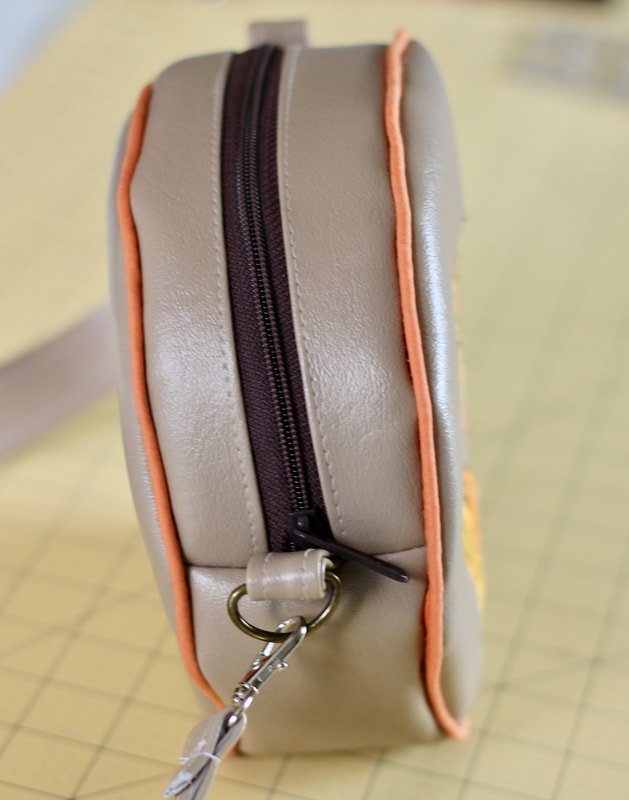
You're then going to take a circle piece and clip the heck out of it, to your piping. I just used pre-made piping from the craft store. You can find it next to the bias tape. The instructions didn't include piping but, long story short... you need piping in a circle bag. ;)

I used my zipper foot to sew closely around the perimeter of the bag. You have to work with the vinyl during this part. I found it easier to use tons of clips and pull as you go. I didn't use as many clips during the first round and it was more fiddly to work with.

Using the zipper foot helped to get closer to the piping.

Clip the edges.
After both circles are sewn on, turn the bag out and cry. Ask yourself why it isn't round and perfect like the picture. Retrace your steps and check if you missed something. Nope. You did it all. You followed the directions perfectly. The bag just wants to be rude and un-round. Major face-palm moment.
Carry on to the long shoulder strap anyway. Attach the hardware and add the strap. This part is easy. And, you're done!
It was an easy bag to make, but so disheartening. Why isn't it a perfectly round shape? I think it's because this is a 2020 bag. That's the only logical explanation. This bag, along with all of 2020, stinks. LOL
So, what was learned from this experience?
Piping is your friend and foam interfacing should have been used. Vinyl and faux leather are stiff, but they benefit from something added.
I will use this bag throughout the Fall season because it's cute. It's not perfect by any means and I'm somewhat embarrassed to show it to you. But, as sewists, we know there are wins and sewing fails.
The circle bag has not defeated me though. I've accepted the challenge and will conquer this bag! Stay tuned for a pattern that will be free to you and will work! I'm creating and experimenting as you read this.
Have you ever made a circle bag? Was it amazing and round? Or whackadoo and rude like mine?
Please, share any tips, tricks, or fails in the comment section. We're all in this together! LOL
If you'd like a quick pattern that is a no-fail one, click here. You're welcome.
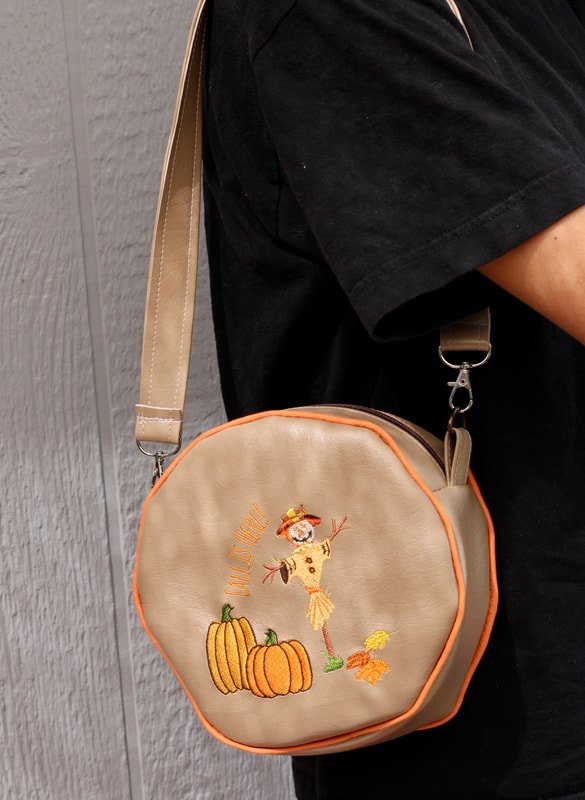
Ugly or not, I’ll still use the bag. Maybe.
Happy fall sewing ya’ll,
Annette

Halloween Sewing Projects
Sew your own Halloween home decor pillows or trick or treat bags. It’s easy to do.

Once upon a time, there was a not-so-old lady who bought some fabric she didn't have any plans for. She saw it online and had to have some. No clue what she'd sew with the fabric, she bought it anyway.
That's the tale of every sewist at one time or another, right? We buy fabric without a clue what we'll use it for. We just love fabric. Give us aallll the fabric!!
Here are some spooky things you can make with your new or old Halloween fabric. Disclaimer: they're not really spooky. ;)
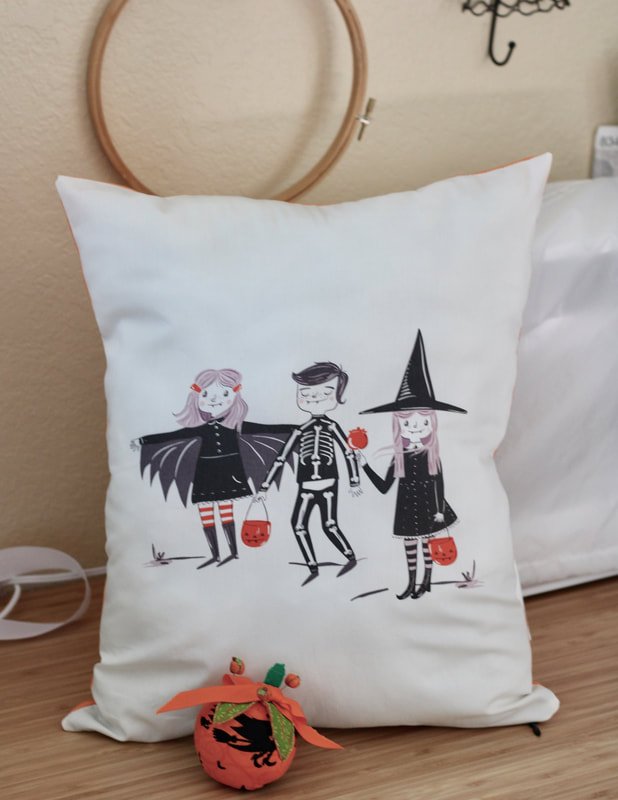
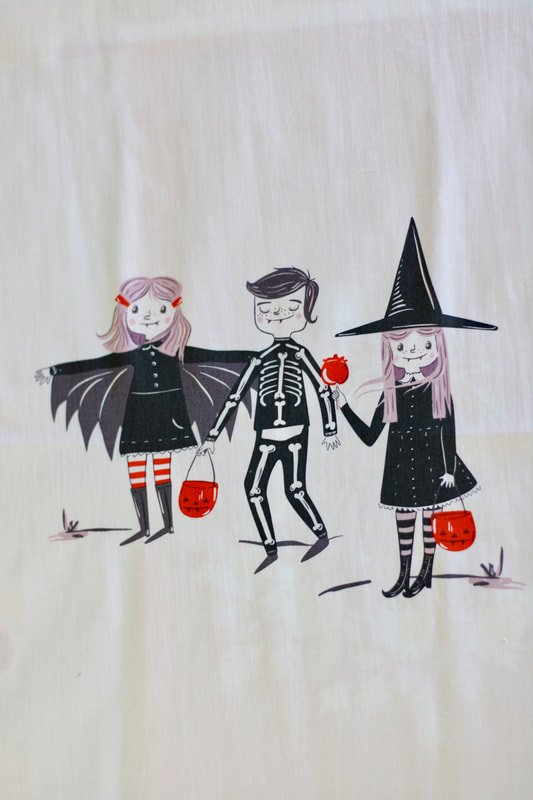
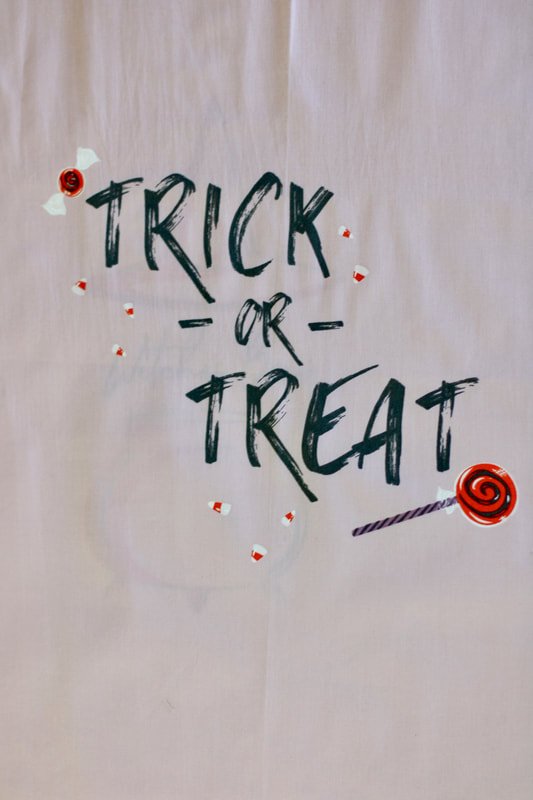
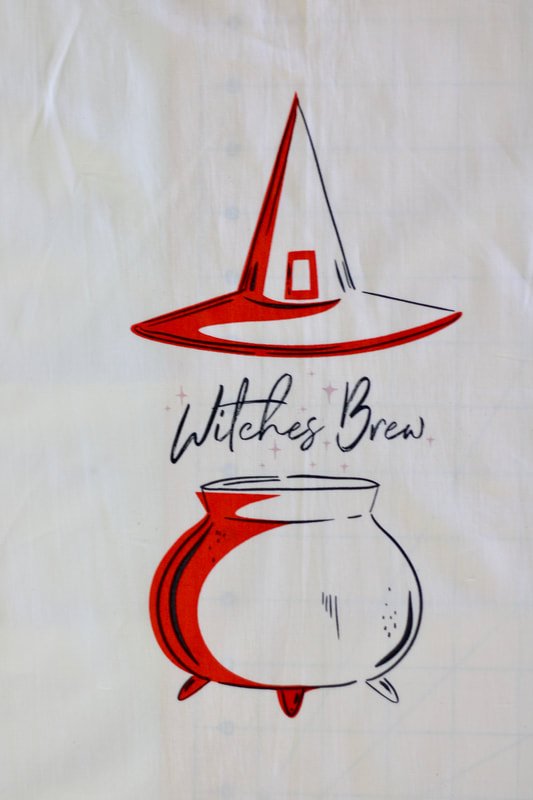

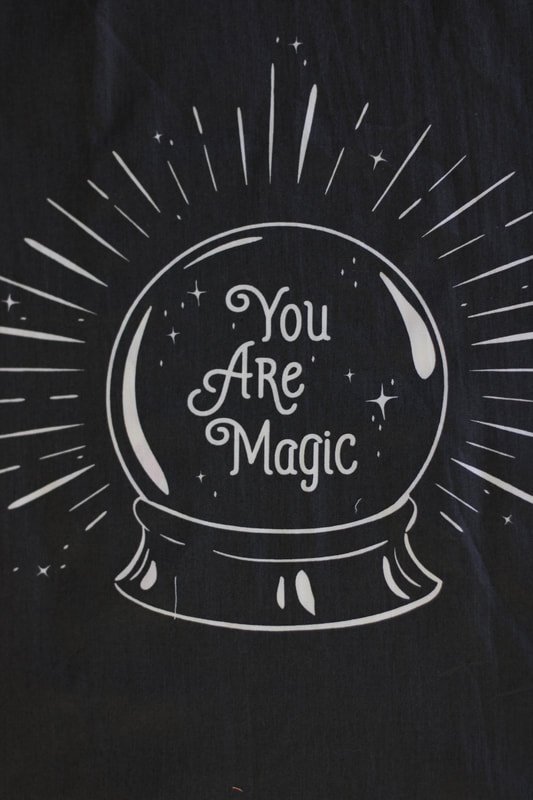
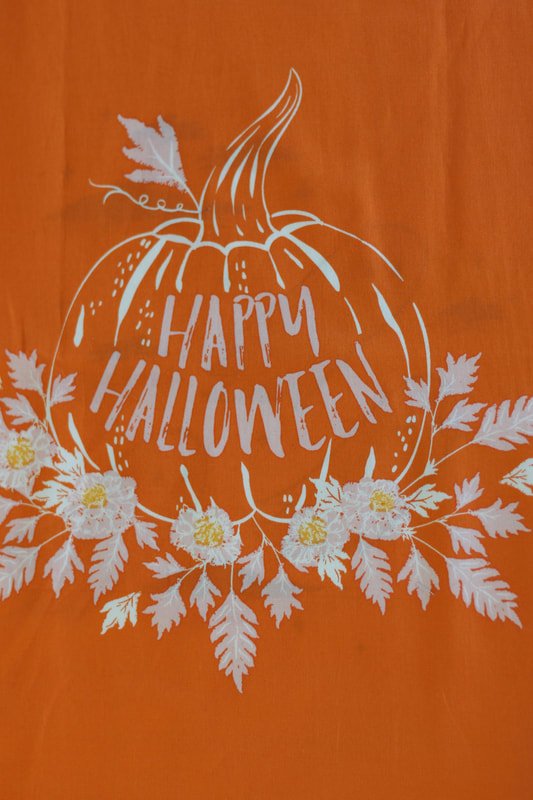
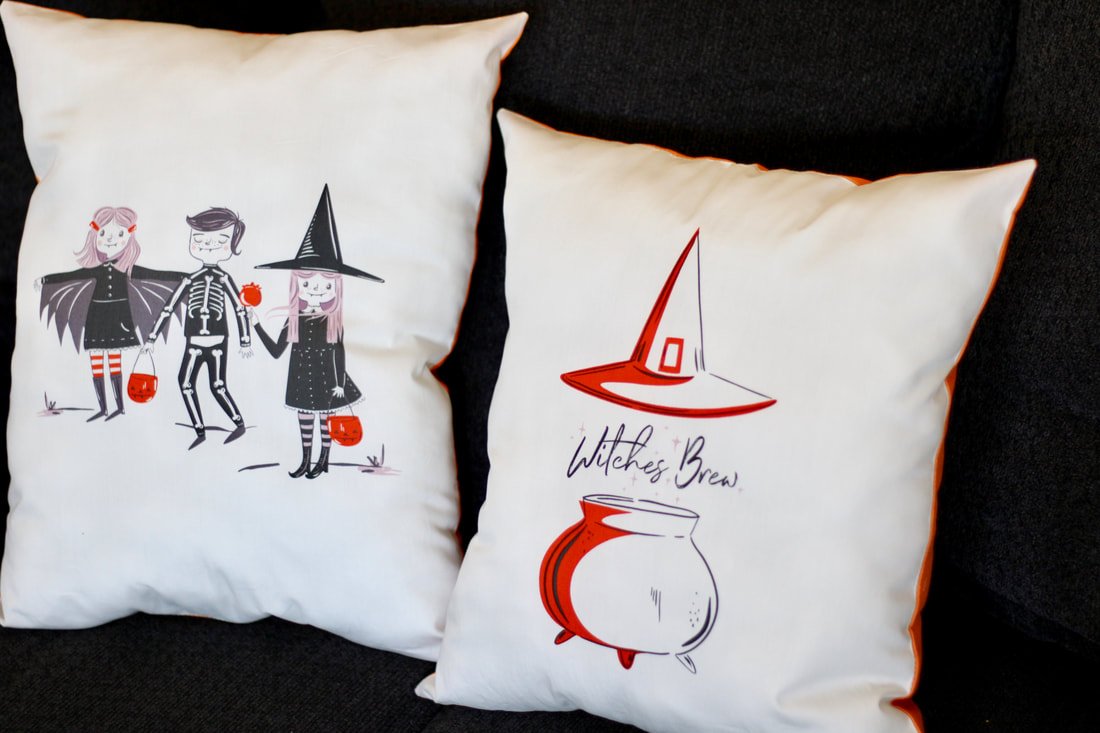
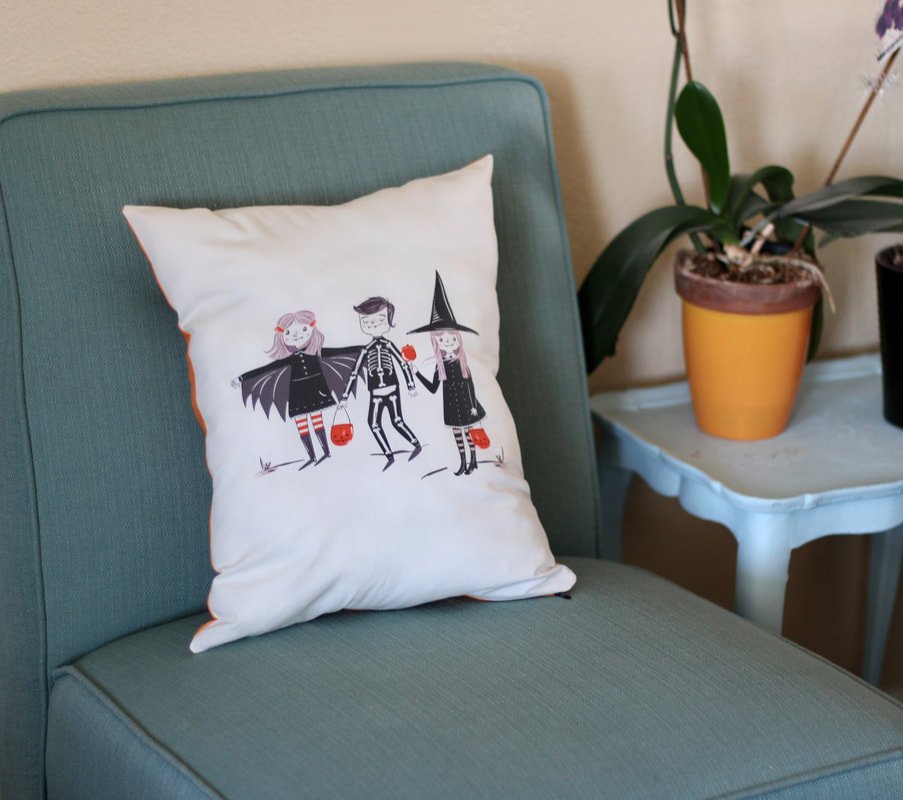
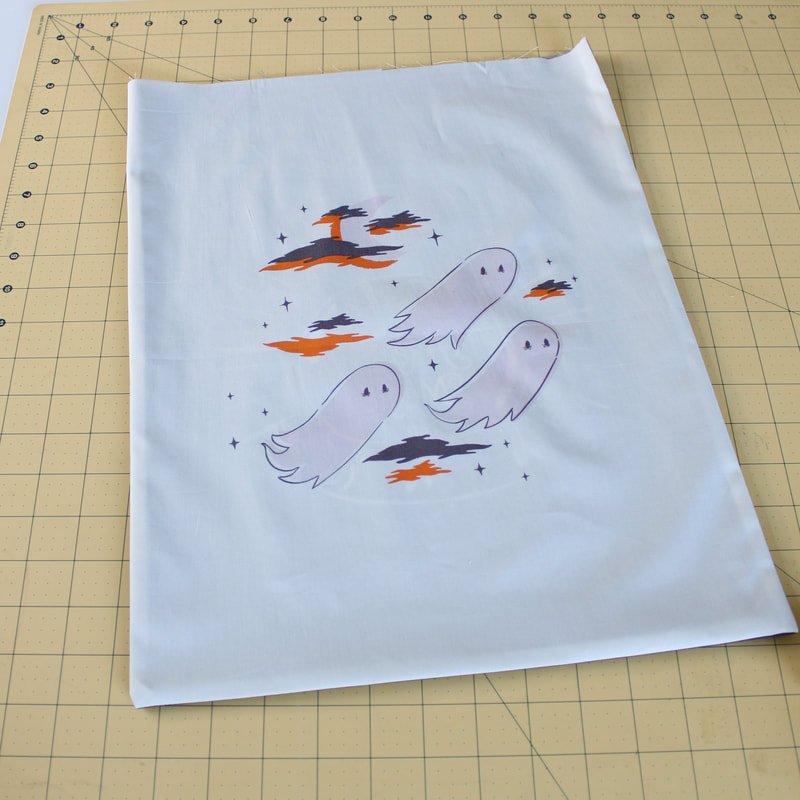
I recently bought a Halloween fabric panel online. The designs were much larger than I anticipated because...online shopping. There are six rectangle designs in the one-yard panel. So, I made two pillows with my favorite ones and trick or treat bags with the other ones. I had orange Kona cotton in my stash which was perfect for the backside of the pillows. These are not lined and are meant to be an easy sewing project.
The fabric is Art Gallery Fabric and from their Spooky and Sweet line. Which one is your favorite design?
Halloween Pillows
You will need:
1/2 yard of Halloween fabric
Bag of fluff to stuff the pillow or a pillow form
Sewing machine and notions
Invisible zipper (or regular if that's what you have on hand)

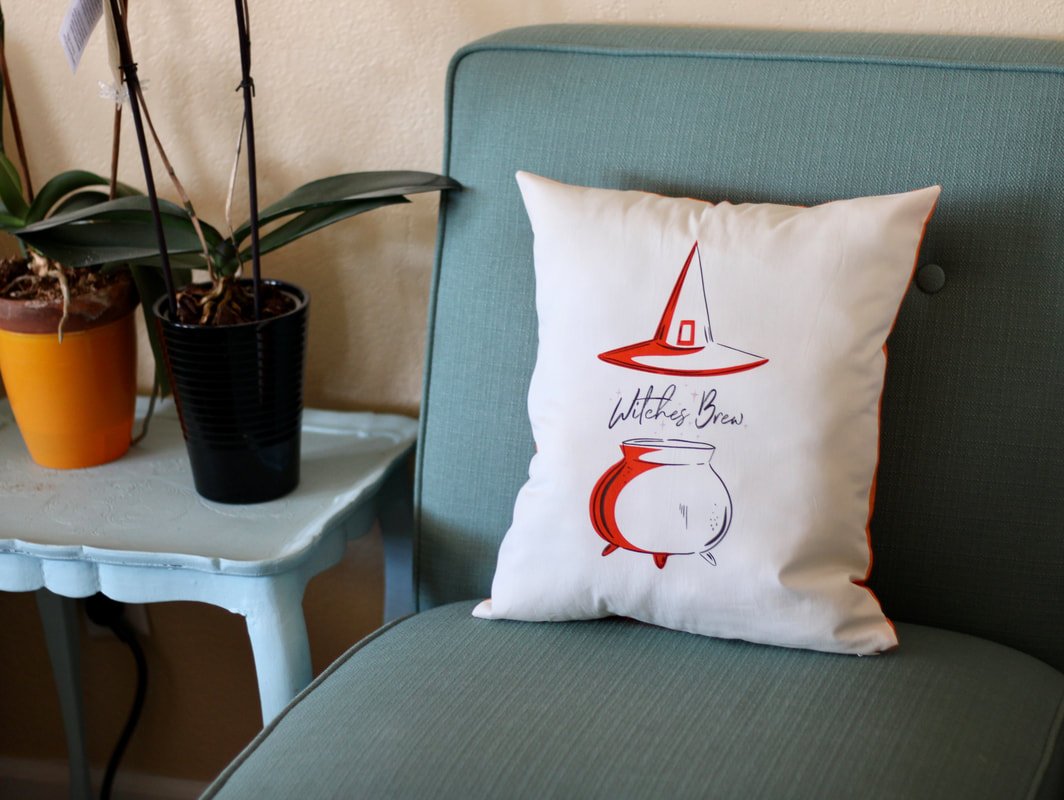
Witch Hat Pillow
I chose the witch hat for one pillow. Pinned a matching invisible zipper in place. See those cute pumpkin pins? My friend made them for me. Squeee!!

Cutting out the large pieces. Ignore the wrinkles. It was easier ironing each piece individually.
If you have a panel like this, it makes pillow making easy. Just cut out the design you want to make the pillow with. Place it on top of the fabric you want to use for the back, using the rectangle as the pattern. Trace and cut.
If you don't have a design piece like I used, grab a couch pillow and measure it. Write down the measurements on paper and add a 1/2" seam allowance. Use your ruler, chalk marker, and scissors to mark and cut out 2 pieces of coordinating fabric. Place your zipper on the bottom end of the pillow. I used an invisible zipper but, you can use what you have on hand. Buttons are always cute too. Just be sure to add extra length if you choose that route.
This is Halloween sewing, it doesn't have to be fit for a queen. It's supposed to be spooky fun! Turn on some Halloween music and just enjoy the process.

Invisible zippers are supposed to be hidden. This one turned out perfectly, whew!

Sewing the invisible zipper.
After your zipper is in, check to make sure it is smooth and not catching any fabric. Open it up about halfway. Fold the pillow with RTS (right sides together) matching corners and edges. Pin or clip together. Depending on how long or short your zipper is, you may need to sew the seam a few inches at each zipper end. *If using an invisible zipper, stitch 1/8" away from the zipper seam. This keeps it from puckering and gives a nice finish.
Clip corners and seam allowances if needed. Turn right side out, gently poke out corners with your fingers or blunt end of a chopstick. Go grab the pillow form or bag of fluffy stuffing. I give this job to one of my kids. They love to stuff the pillows. The pillow will turn out like a limp noodle or a stuffed pig, depending on the child. LOL
Trick or Treat Bags
You will need:
1/2 yard or so, of Halloween fabric
Webbing for handles (you can use grosgrain ribbon if you have that)
Sewing machine and notions

Sew the sides and bottom together.
These are quick and painless and I did not line these. They only hold candy for one night so, they don't really need a lining. If you're unsure about the weight of candy from trick or treating, we're reinforcing the seams. You're going to use a french seam finish. Let's get started.
Cut out a rectangle the size you want. Make sure you add a 1/2" seam allowance in your measurements.
My pieces were 14" wide by 17.5" tall. A perfect size for a trick-or-treat bag. Long gone are the days of the pillowcases.
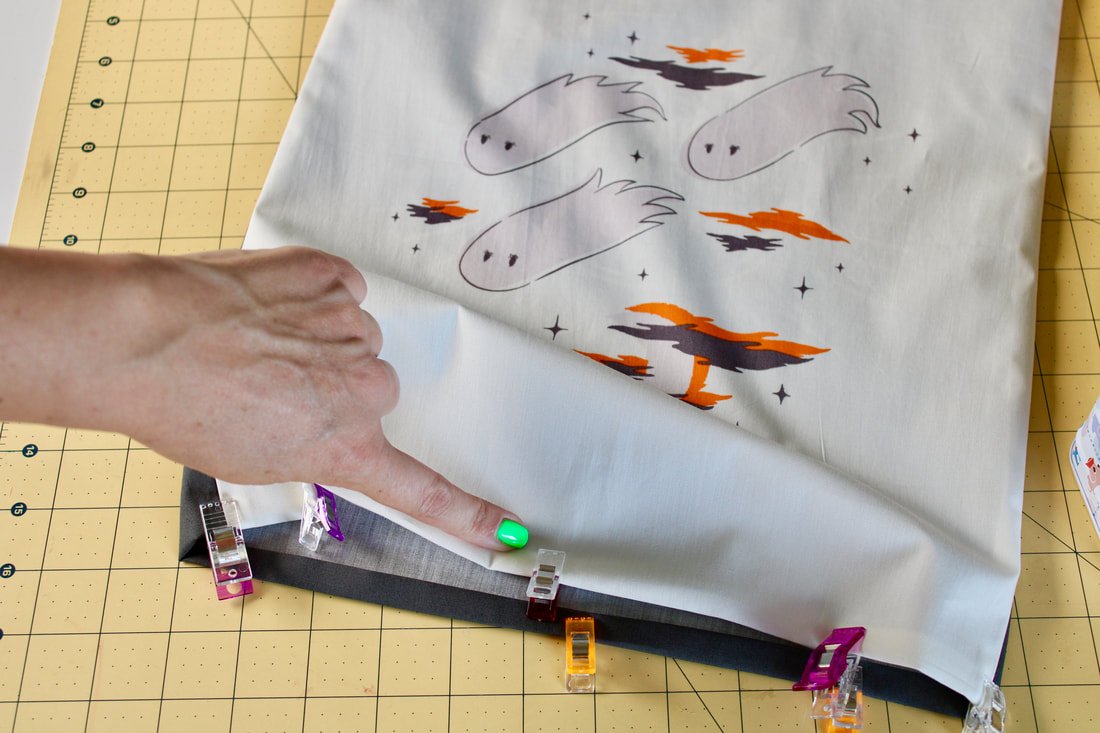
Lay your two bag pieces WST (wrong sides together), I'm not crazy, stay with me. You're going to sew a French seam. It's easy, I promise.
Pin or clip the two sides and bottom edge. Sew with a 1/4" seam allowance, backstitching at the start of one side and finishing up all the way around to the next side.
Turn it inside out (your bag should be inside out). Trim the seam allowances as close to the seam line as you can. Press the seams flat. It's very important to trim the seams allowances, otherwise, you could end up with the raw edges poking out.
Stitch 1/4" seam around the sides and bottom, backstitching at the beginning and end. The raw edges should be fully enclosed now. Press flat.

Turn under, and under again for the top of the bag opening.
Take the top edge and fold under 1/4", then under 1/4" again. Topstitch around the whole top. I like to use a 3.0-3.5mm stitch length for this. Press flat.
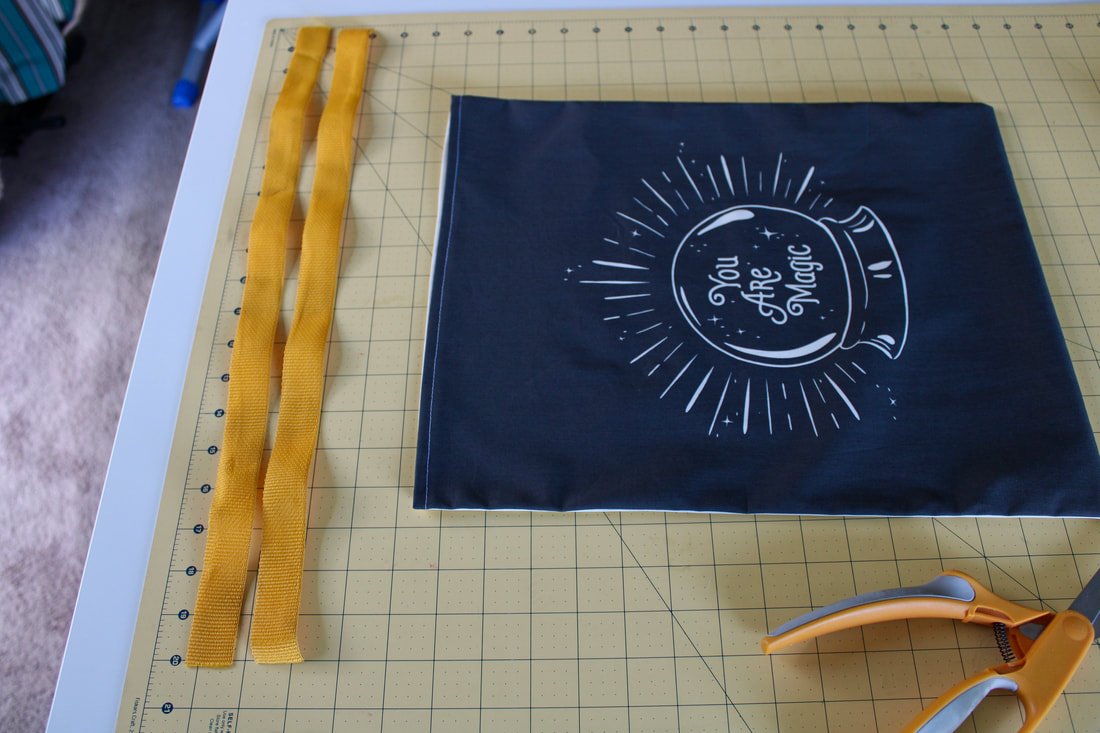
Now for the bag handles.
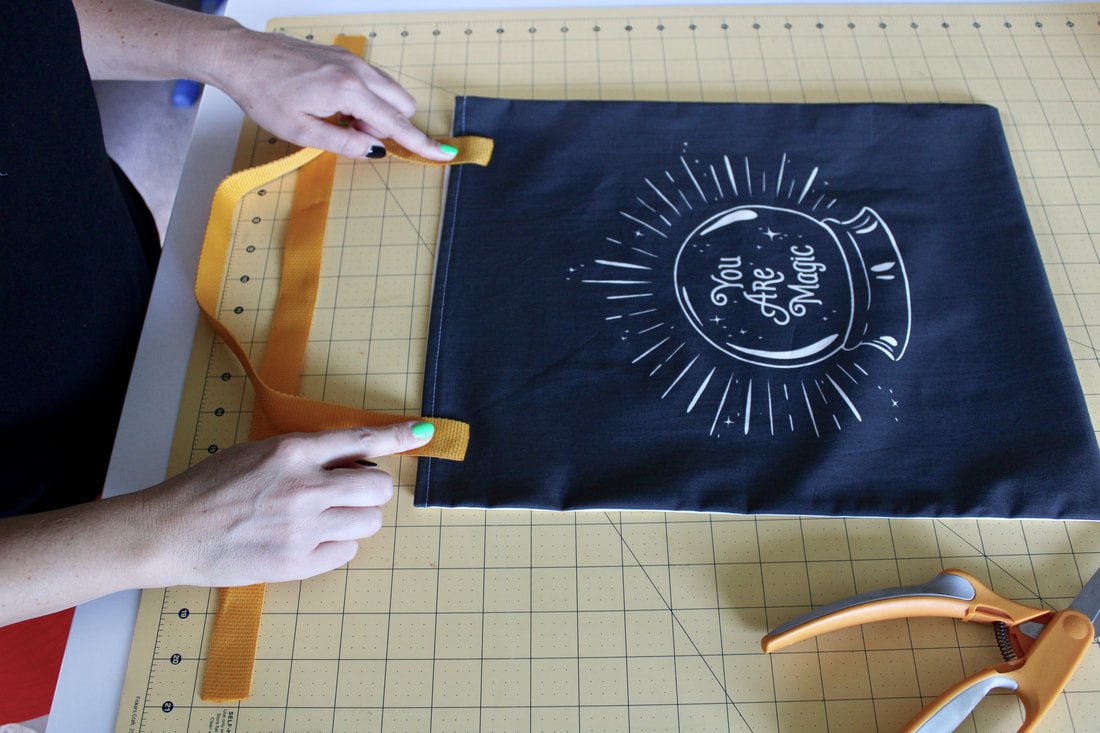
Measure on your child how long or short you want them. Does your child want shoulder length or handle length only? I cut my handles 20.5" long.
Position the straps about 1.5-2.5 inches in from side seams and pin. Sew a box and X to secure the handle to the bag.
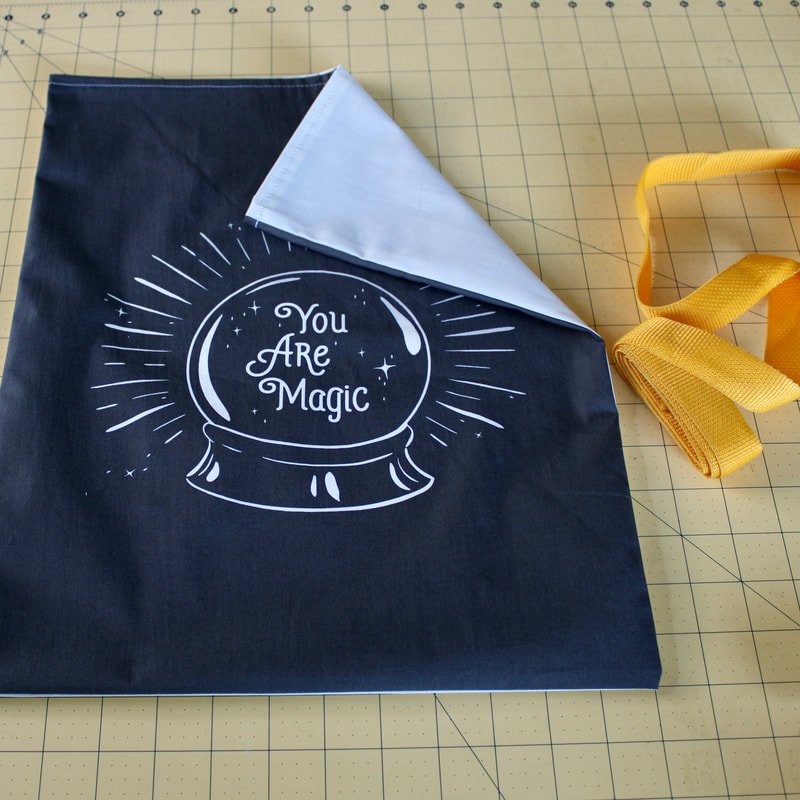
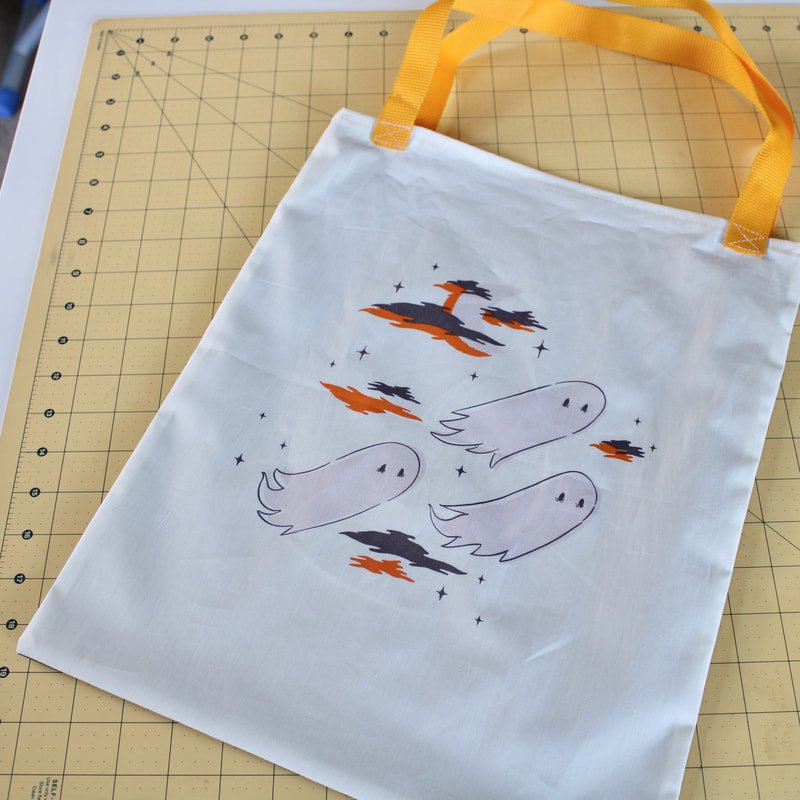
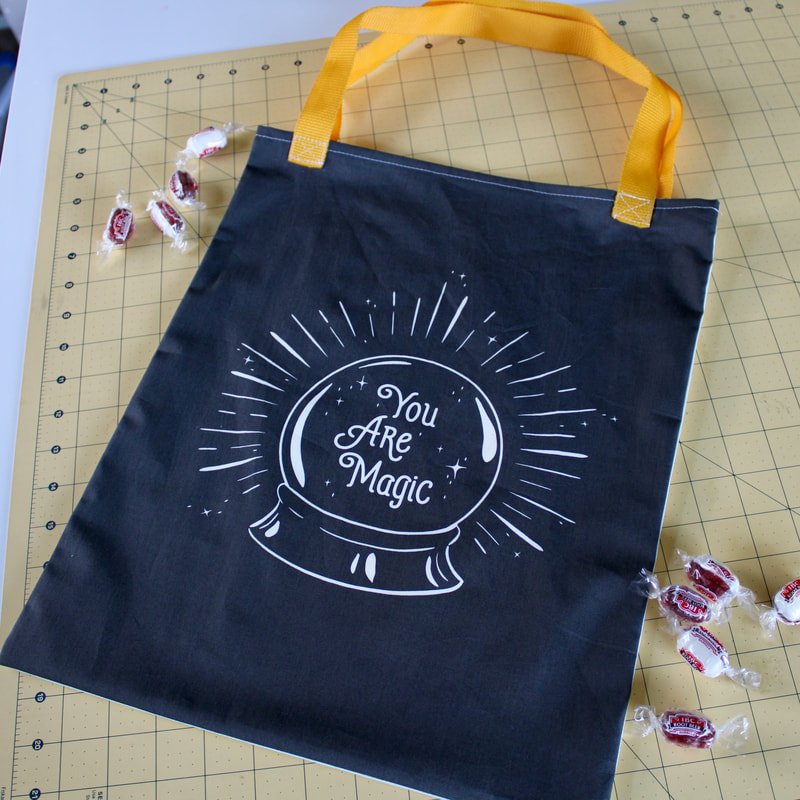
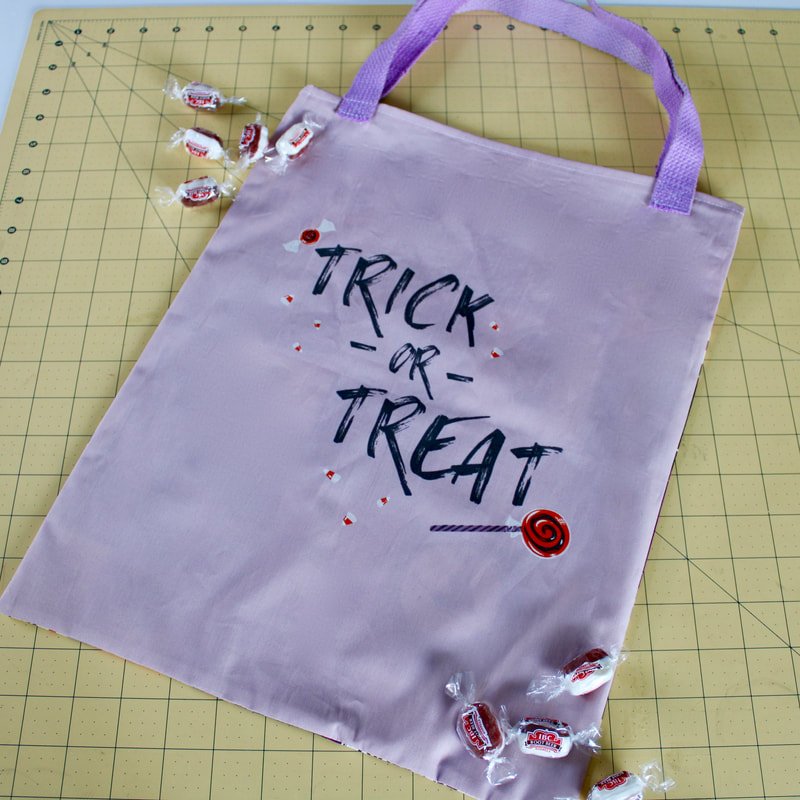
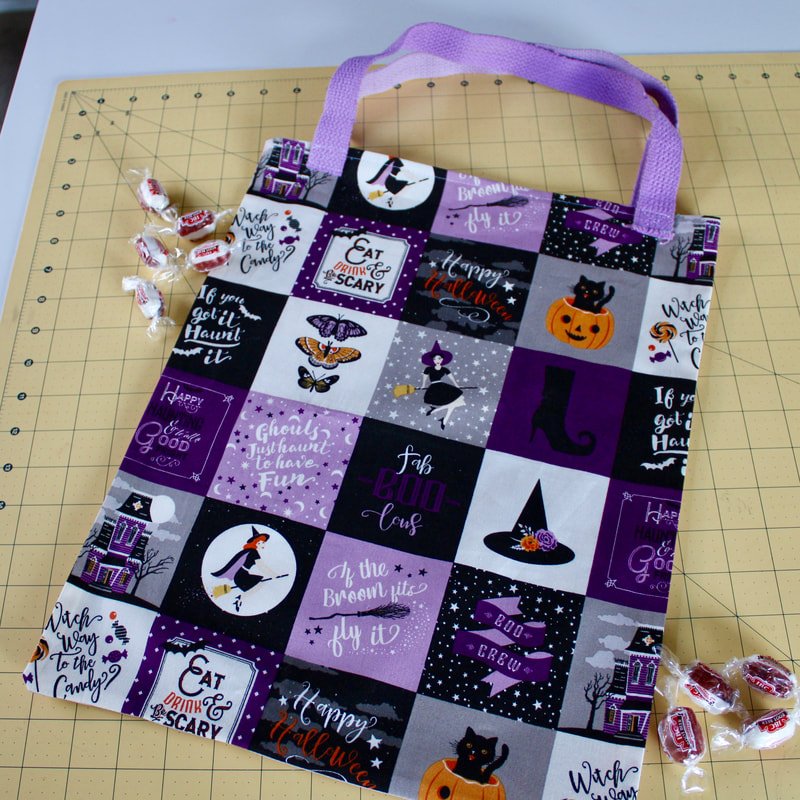
Now you have a sturdy bag to head out and fill with candy with!
If you have smaller pieces of Halloween fabric you could make a crossbody bag or self-tie headband. Or, even a fun little purse. And, if you want a wardrobe piece and have two yards of fabric to use up, check out my skirt post. I have 5 Halloween skirts in my arsenal now. Yikes!!
Halloween looks a little different this year. But, keep the spark alive by finding new ways to celebrate. We're going to do trick-or-treating with an Easter twist. Buckets of candy will be hidden around our property and have a glow stick inside. My kids will have to hunt for their candy this year. My older kids plan on dressing up to scare us as we walk our property. We'll have our usual chili and cornbread dinner and watch a Halloween movie outside unless the weather doesn't participate.
What are your Halloween sewing plans? Please share in the comments below. We all could use some new ideas.
Happy Halloween, sewing friends!
XO,
Annette