
Pattern Reviews, Sewing Hacks, Tips & Free Patterns
Sewing Blog Besties

Sewing the Ginger Jeans
Sew your own high waisted pair of jeans. The Ginger jeans sewing pattern by Closet Core is great. It’s beginner-friendly as well.

Ginger Jeans! I made a pair and love them. These were fun to sew and I learned a few things along the way.
Living in comfy clothes seems to be the new norm. Cozy pants especially. Fleece-lined leggings, flowy lounge pants, soft cotton harem pants, and PJ's of course. Gimme all the couch surfing pants.
Jeans don't really fit into the cozy pants category but, I'm going to talk about them anyway. Jeans are something I rarely reach for when I get dressed in the morning (afternoon?). If I do wear jeans, I reach for my Calvin Klein high-waisted skinny jeans. They fit my body like a leather glove. So, when my friend told me about the January Jeans sew-along, I jumped on board!

The Jeans Fitting Journey
This post is a little different than my usual pattern posts. Hundreds, if not more, Ginger Jeans tutorials already exist. So, I wanted to do something different. I'm taking you through my jeans-fitting journey. Beware though, it's gonna get ugly before it gets pretty.
The January Jeans sew along was hosted by some lovely ladies in the UK, on Instagram. They set up a Slack app group for all of us to post and share photos to. We had live Zoom calls every Monday and then we were put into smaller Zoom groups. It was a whole jeans journey. We helped each other with fit issues and got feedback on our own jeans.
If you've ever wanted to dabble in jeans sewing, you really need to get the fit correct. Here we go!
Materials Needed
First, you need a pattern. I chose Closet Core's Ginger Jeans pattern in View B. It's a skinny leg, high waist pattern. My favorite style of jeans. But, you might want a low rise, wide-leg style. Scour the interwebs for a pattern that fits your specific taste.
2-3 yards of Denim (check what % of stretch you'll need too)
Cotton fabric for pocket linings
Interfacing
A jeans zipper (*it needs to be a metal jeans zipper so the pull will lay flat against the pants/ your body)
Denim thread, regular thread, topstitch thread (optional)
Jeans needles
Fabric for a muslin (preferably denim)
Jeans button
Rivets (optional)
Awl and hammer for inserting buttons and rivets
Rulers, a chalk marker, scissors or rotary cutter, etc.
Sewing machine
Patience and time
Serger for finished seams (optional)

Make a Muslin
Jeans sewing is an easy process. I've made a few pairs of “jeans” from Gertie's book, Gertie Sews Vintage Casual. However, this was my first time making a zipper fly and I was a little bit intimidated. Sewing your muslin fabric is a great way to practice a new skill or technique. It wasn't hard at all!
I really do recommend sewing a muslin first. It's a trial run. You can rip out seams, cut fabric to make space for your hips and legs, and practice topstitching. Use it as your "scratch piece of paper." Through my first muslin (that I made with 0% stretch fabric), I found that the so-called high waist wasn't high enough for me. My first adjustment would be to add length to the rise.
The first muslin fit, almost. I cut out a straight size 12. I like to cut one size that is the closest to my measurements and go from there.
The jeans were snug around my bum and tummy area. An easy adjustment would be to grade up to a size 14 or 16 in the waist area. However, I knew I was going to add height to the tummy area.
Here’s what I did:
Added 1.5" to the length of the rise, to create an authentic high-waist pair of jeans.
Full tummy adjustment. This adds room for those of us with mom bellies or bloaty bellies -that's a very technical term. ;)
Took out length in the legs but, not more than an inch. I'm short but, I have long legs. Thanks to weird genetics!
Low bum adjustment. Although, I didn't end up needing this in the end.
Second Muslin
Yes, if your first muslin was a total bust, do a second one. You could easily unpick seams and go from there. However, I was changing the pattern, so I needed a second muslin. The second would be a wearable muslin pair of jeans. I grabbed some clearance denim, made my adjustments to the pattern paper, cut the new fabric, then sewed the second pair with the adjustments.
And WOW! What a difference from the first muslin. I loved the waist height. I loved what the full tummy adjustment did for me. I did not love the low bum adjustment because it added excess fabric in my rear and in the back of my thighs. You can see all the bulk in the photos below. This pair was cut in a size 12 just like my first muslin. You can see how my pattern adjustments really changed the fit.
Leg Twist Hack
I had a serious leg twist issue with one leg. I followed the cutting directions to a T, too. I cut on the single layer and alternated each leg just like the pattern recommended. Ugh!
I unpicked the inseam and side seams and sewed them back up. No more annoying twisty leg. So, if you do have this issue, I recommend unpicking the seams. Sew the inseam by starting at the cuff of one leg and go up. Backstitch at the crotch seam. Then, sew the other leg by starting at the cuff and sew up to the crotch. This may or may not be the correct way but, it fixed my issue.
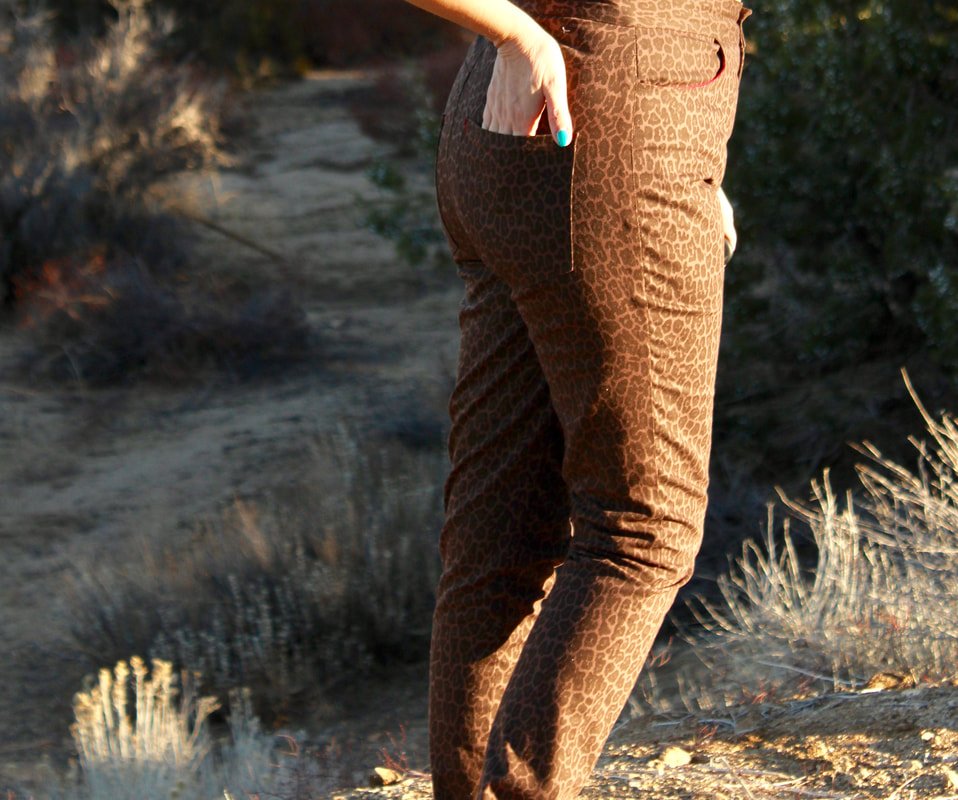
Photos below are of my wearable muslin pair of Ginger Jeans. I've worn these around a few times and they fit well enough. The denim only has 1% stretch while the pattern calls for a 2%. They are a little stiffer than I'd like but, no seams have popped open when I bend over. Yet! LOL
I actually like the fit of these better than my final pair. Shhh, don’t tell anyone.

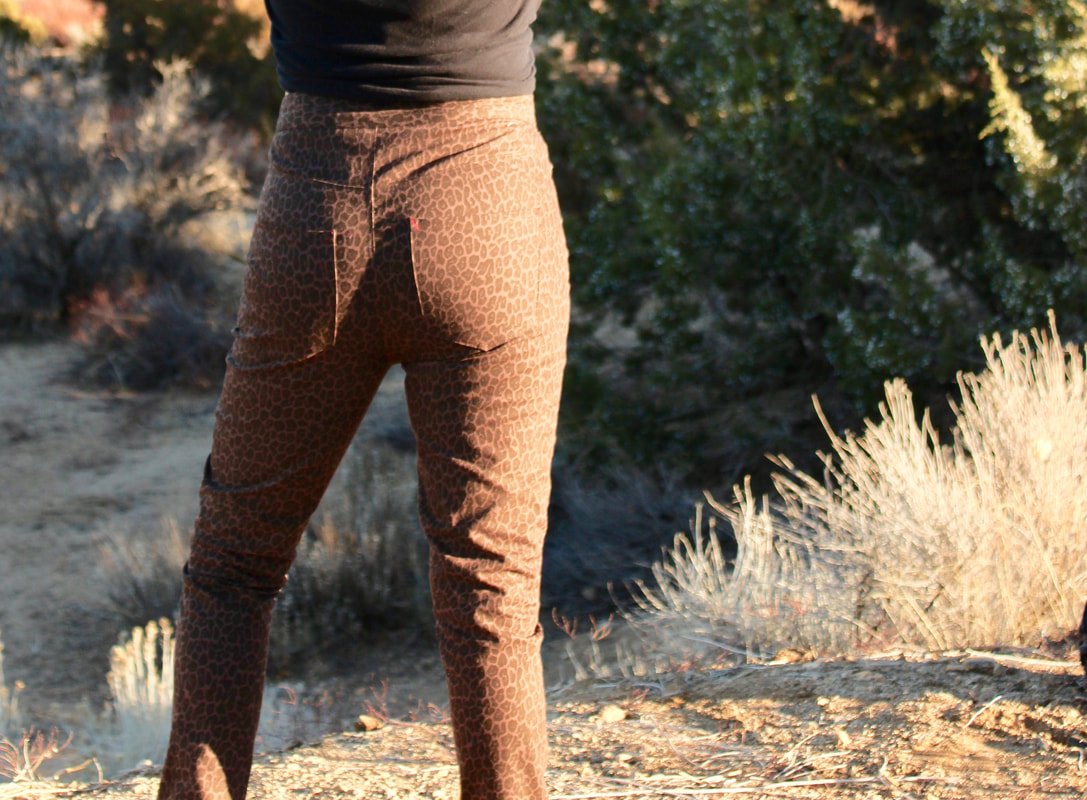
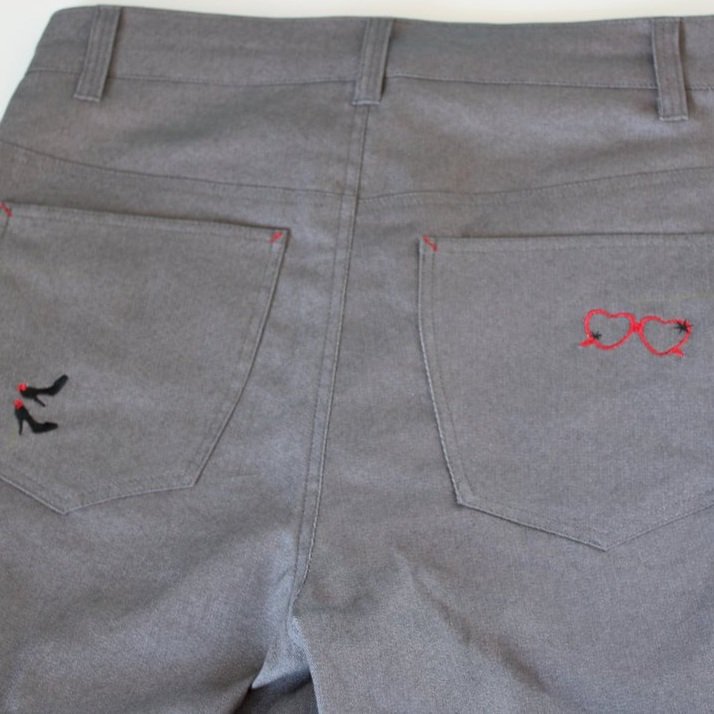
One back pocket is lower than the other but it didn't bother me enough to re-do it. Shhh, it'll be our little secret. ;-)
There is extra fabric and bagginess on the back thighs because of the low bum adjustment. It wasn't needed. I guess I have a high bum. Who knew? Hahaha!! And again, it didn't bother me enough to rip open the seams and fix it. This pair was supposed to fall into the "good enough" category. And they do just that.
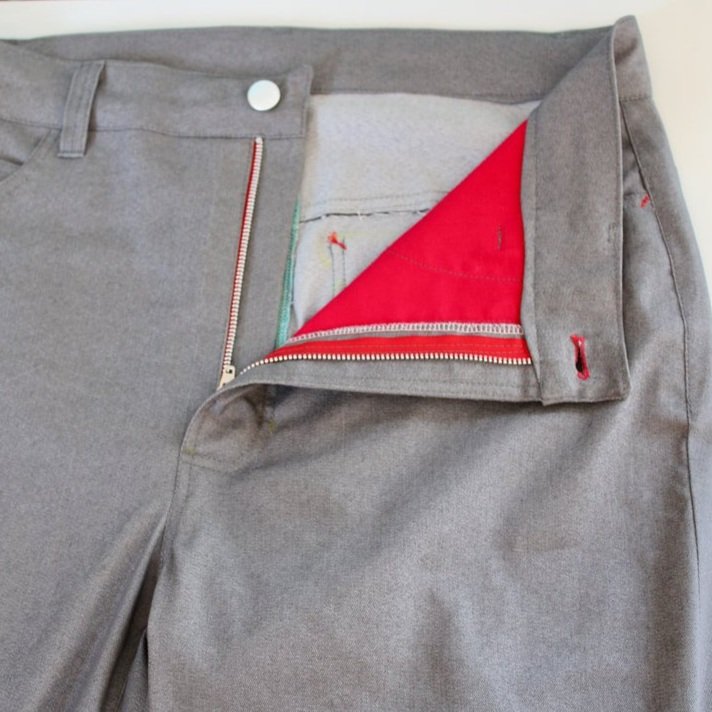
Red cotton fabric was used for the pockets, you can see it peaking out a bit. I also did red bar tacks in place of rivets.
Whew, I hope you're still with me. Now, it's time for the final pair!
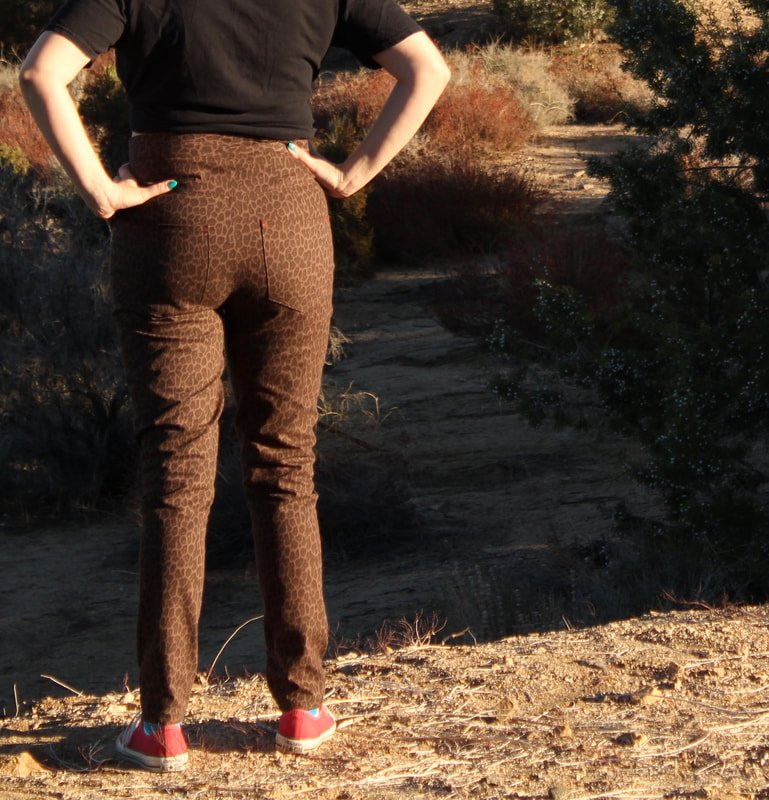
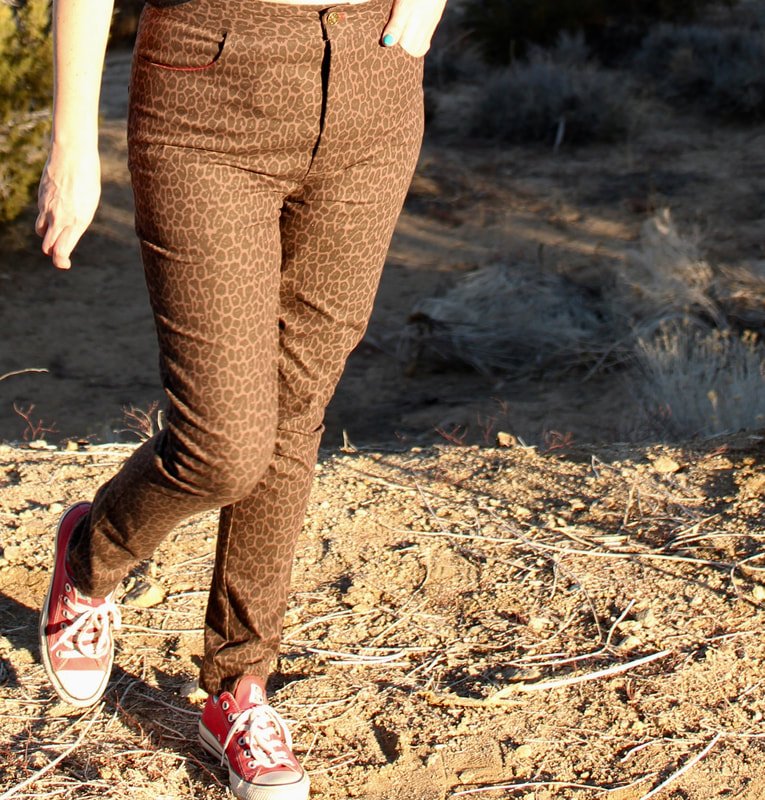
Final Pair of Ginger Jeans
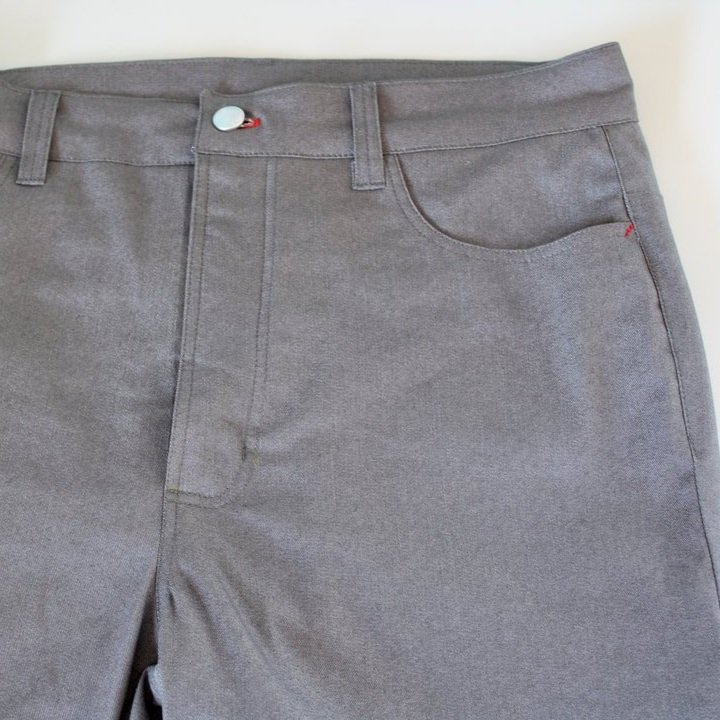
I chose dark grey denim for my final pair of Ginger jeans. I love a red accent too so, I used red topstitching in place of rivets and made red pockets again.
For the final pair, I did the adjustments that seemed to work best for my body.
Full tummy adjustment
Added 1.5" to the rise to create an authentic high waist
Shortened my leg length by 1 inch
Placed the pockets higher to accommodate the rise adjustment
I love the fit so much! My bottom half isn't very curvy due to my apple-shaped figure. Therefore, these jeans fit so much better than any RTW pair I've ever owned. They fit my legs and waist perfectly. I'm truly happy with the fit.


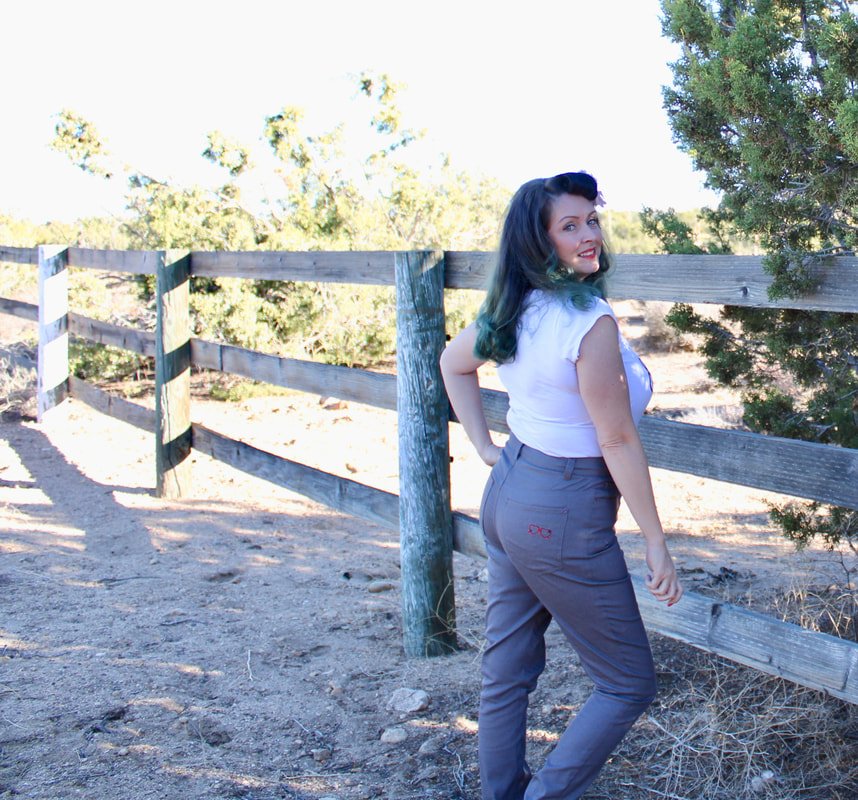

I’m pretty excited about my new jeans!!

Pastel Denim
This pastel peachy denim will make a perfect pair of Spring jeans. I might even roll the hem up and wear them with flats. A flowy white top and large straw hat too, yes, please!
I love the 3D stitching on this denim. It's not something I've ever seen. I'm not sure if I'll do a white or pastel yellow contrasting thead.
Now that you followed me through my fitting fun, are you going to make your own jeans? I really do encourage you to make a pair. I've made pants before but they didn't have all the stitching detail. These taught me more about fitting your own body and how perfecting the fit really does make all the difference.
If you're still on the fence about jeans making, maybe these trousers are more your speed. They're wide-legged and flattering on everyone.
Or, would you rather stick to an easier project? Sew up a little something here, here, or here.
Either way, go sew something! You deserve it! :D
Happy jean sewing,
Annette

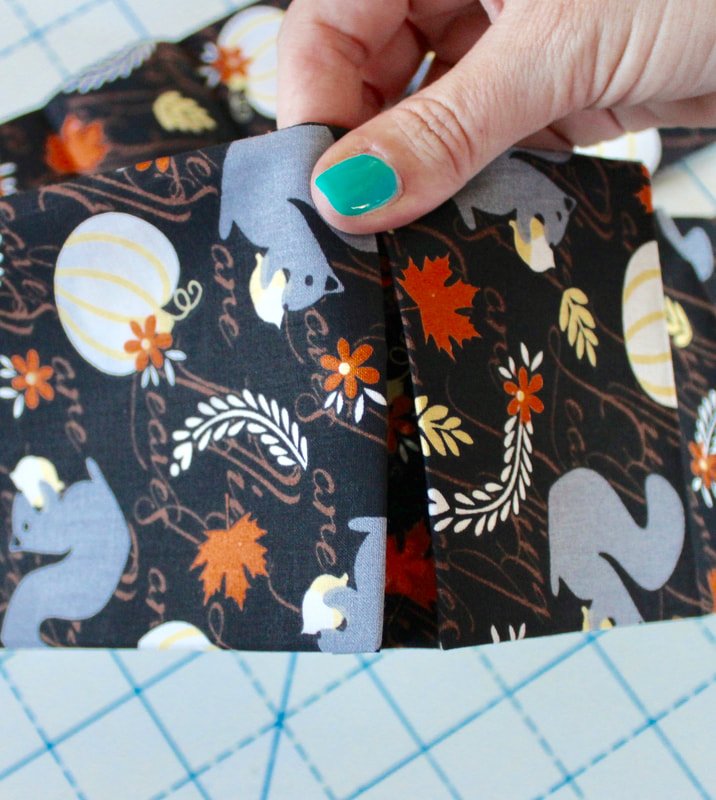
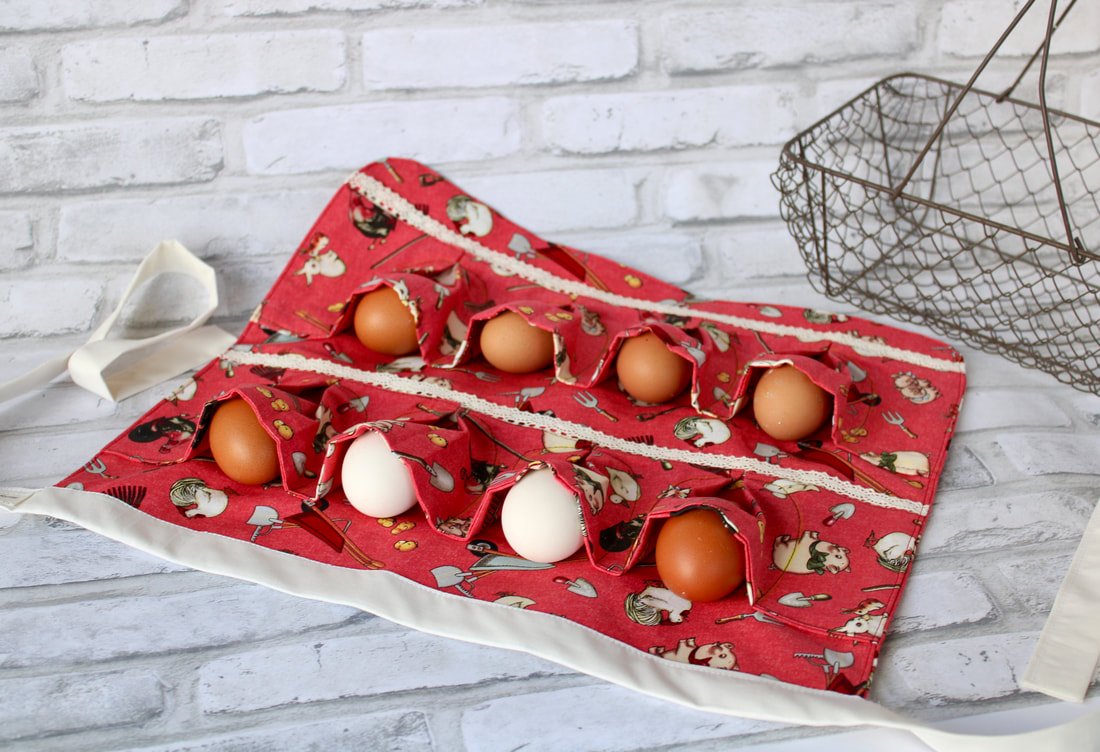
Egg Gathering Apron
Collect your chicken eggs with a cute apron. The pockets keep the eggs safe and snug inside. Free sewing pattern for backyard farmers.

Got eggs? If you have a hobby farm or small homestead, you probably have hens. And, if you have hens, you have eggs. So. Many. Eggs.
Well, you need something to gather all those eggs with. A bucket works, a basket is cute, and in a pinch, you can use your hands and coat pockets. We've all been there. ;)
But, wouldn't it be fun and albeit easier to use an egg apron? Yes! You can live out your farm life dreams with a sweet egg-gathering apron.
So, it's decided. You're going to make an apron for collecting those little breakfast nuggets. Besides, buckets are only made for livestock grain and treats anyway.

Supplies
Swoon Patterns Egg Gathering Apron pattern. This is free on their website. Grab it here.
Sewing machine, thread, and notions
1/2 yard medium weight fabric
1 1/4 yards contrasting fabric (I didn't use a contrasting fabric)
1 1/4 yards lightweight fusible interfacing
Chalk pen or erasable pen
Ruler
Clips and pins.
I chose to use the Swoon Patterns egg gathering apron. This was the coolest egg-collecting pattern I found while scouring the internet. I collect about a dozen eggs every morning and wanted an apron to hold eggs and keep them safe. It also needed to be comfortable for me to wear.
Many patterns had pockets that were sewn in a way that didn't seem secure. If you were to bend over (to pet the cat, or clean out the coop) the eggs would fall out. Swoon Patterns created an egg apron that is pure genius! It involves a little extra sewing but, is well worth it in the end.
I promise!
Let's Make an Apron
Grab the FREE pattern, print it out, and tape it all together. Decide on the size(s) you're going to make. Simply fold over the pattern for the different adult sizes. You don't have to trace off a new pattern, and it'll work perfectly. For this tutorial, I made the child size.
Let’s Get Sewing
First, apply your interfacing to the pieces following the pattern instructions. I used canvas as interlining because I was short on interfacing. I skipped using it on the main pieces. Secret lazy sewist tip. You're welcome.
After the pieces are cut and interfaced. You're going to make the pocket portions. Sew the long pocket panel RST (right sides together) along the long edge to form a tube. Turn out and press. Repeat with the other pocket panel.

Sewing the apron
My littlest sewing buddy making her own egg gathering apron.

Mark the fold lines.
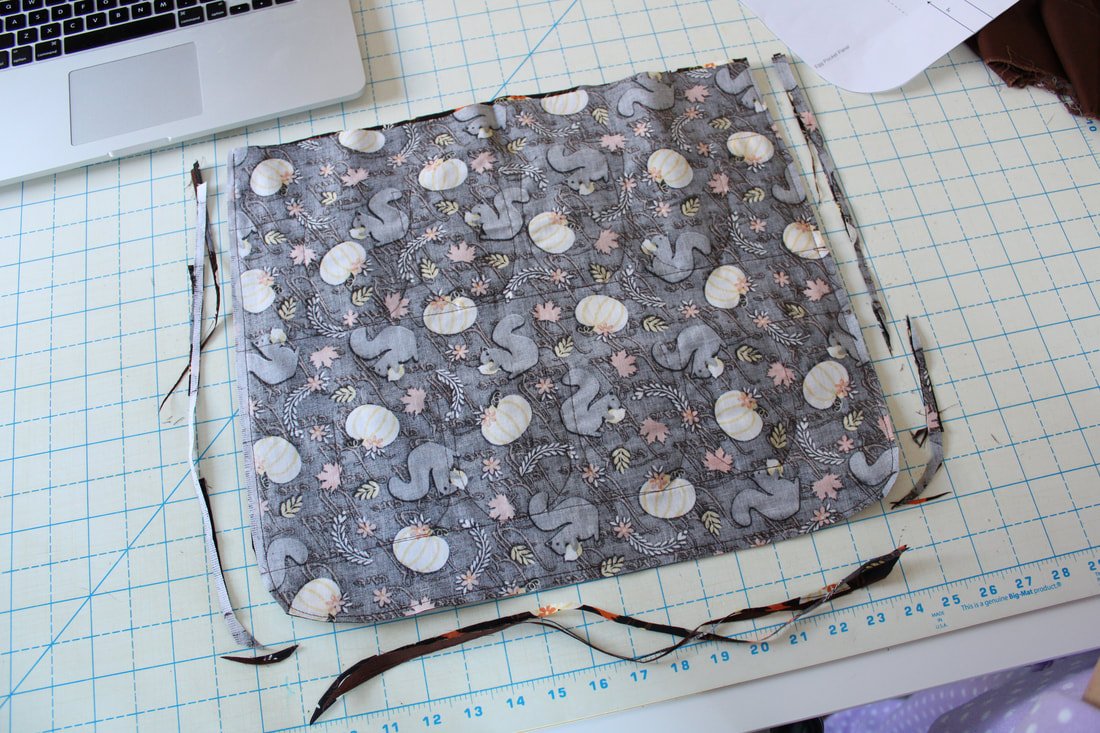
Next, grab your chalk or erasable pen, and ruler. Mark the heck out of the pocket tubes. Per the instructions, use your ruler to measure the distance from the edges and between the pockets. It helped to make the vertical lines a few inches long. You'll then take these tubes to the iron and press them.
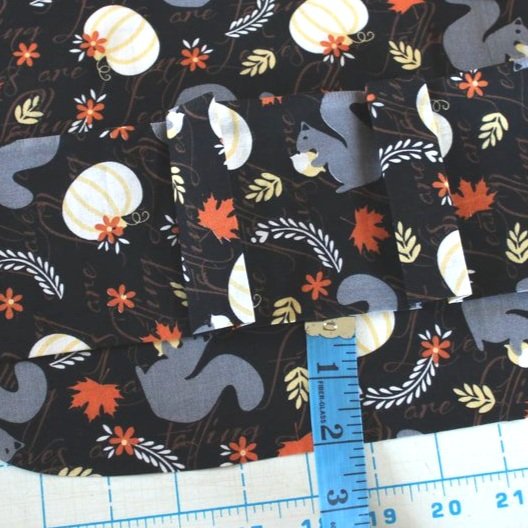
Once the pockets are pressed, grab clips and pins to pin and clip the panel in place. I used pins to keep the pocket tubes attached to the apron. Clips kept the pocket folds together. I used a tape measure and the pattern to place the pocket panels in the exact places.
Topstitch the bottom edge of the pocket panel to the apron, removing pins as you go. I took this part very slowly. No pedal to the metal here.

Use pins to hold the bottom edges down. Clips keep the pockets folded together.
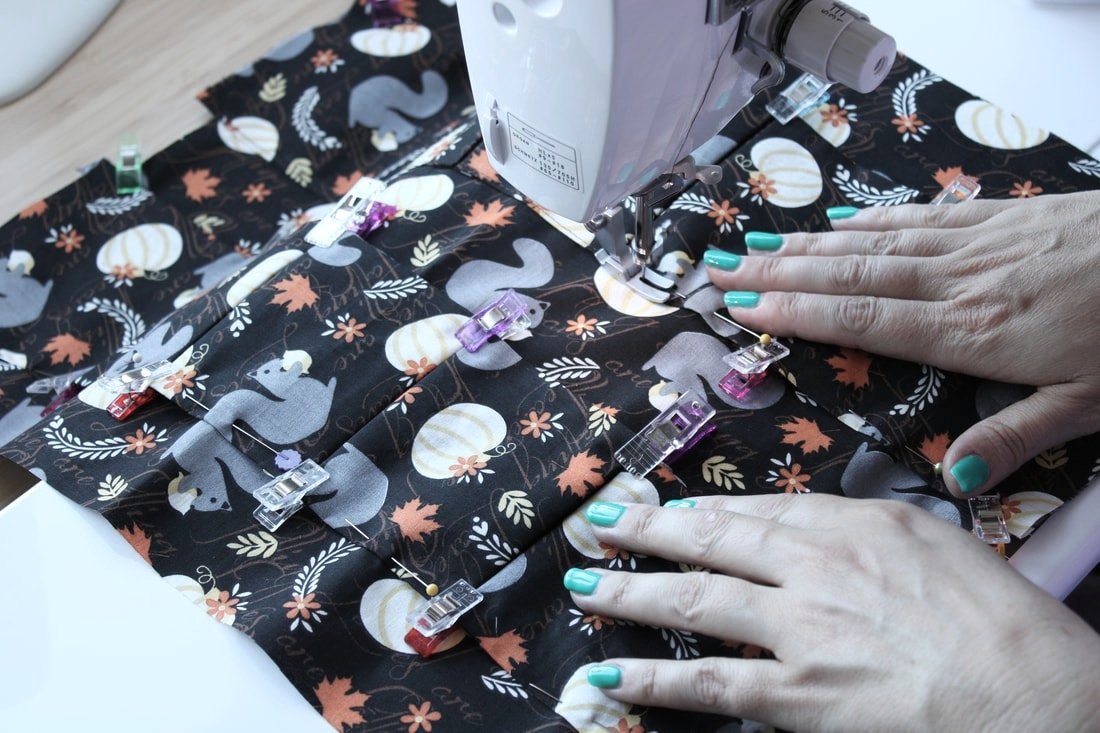
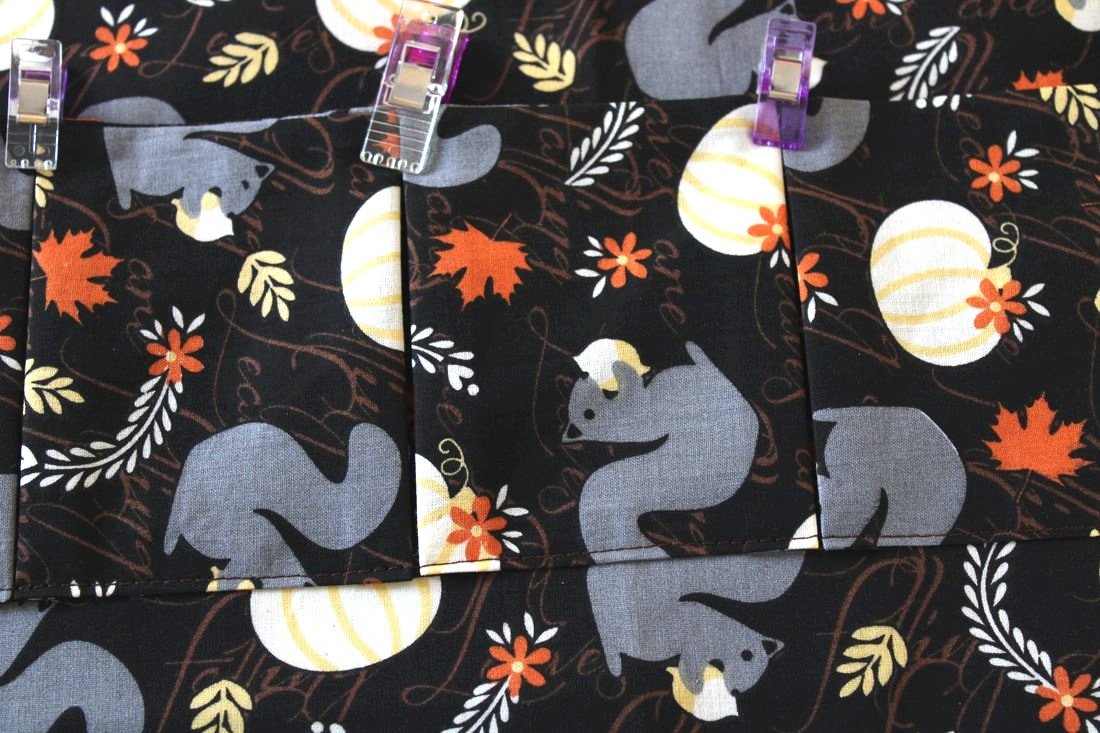
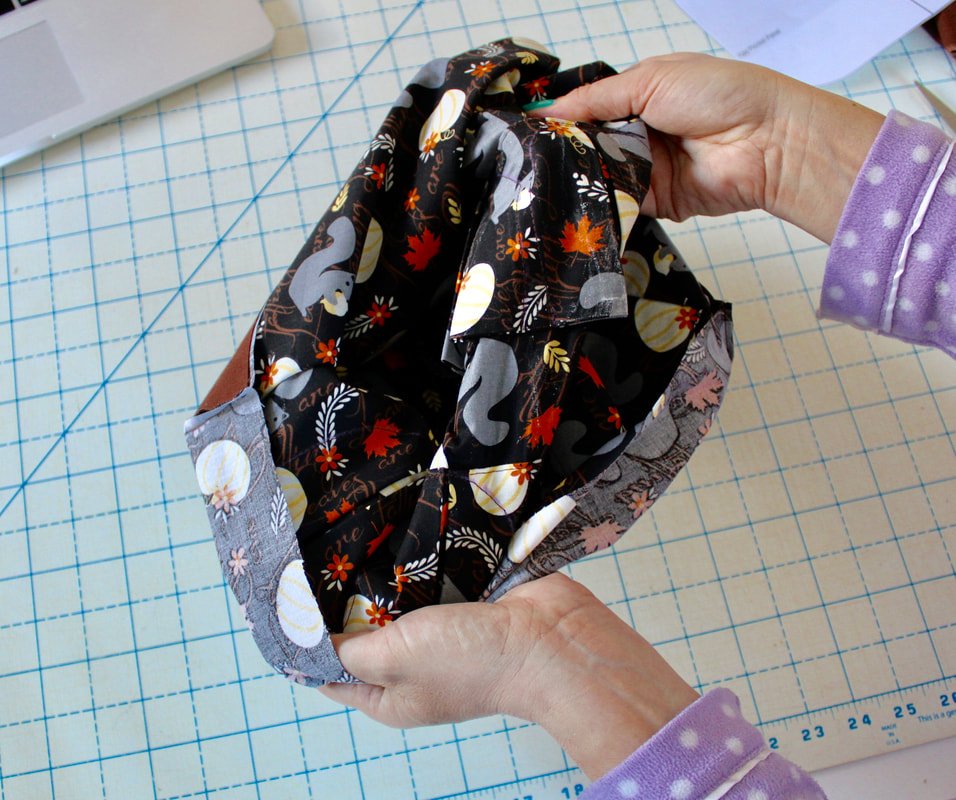
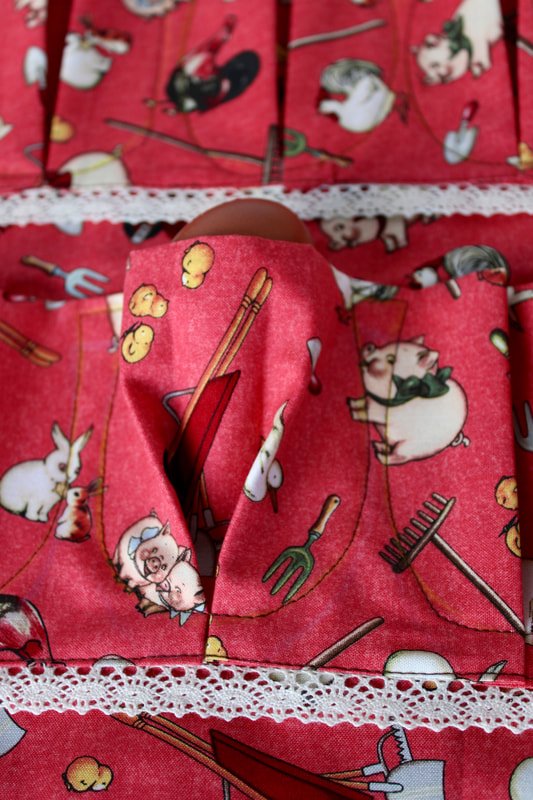
The Egg Shaped Pocket

Now it's time for the fun part. Grab the pocket stitching guide piece. Choose chalk or erasable pen to trace.
Line the top and bottom fold with the pattern piece. Trace the shape to create the egg pockets. You'll make 8 for the child size and 10 for an adult-sized apron. I found that clipping the piece helped to keep it in place while I traced.
This part is where the Swoon Pattern really shines! The egg shape cradles the egg like a cup, inside the apron. Unless you're hanging upside down, they can't move around.

Continue tracing the pattern shape onto the apron for both pocket panels.
Starting on one side, sew around each egg shape pocket. Go slowly, this is a lot of circular sewing. I hand cranked the wheel a few times around the edges.
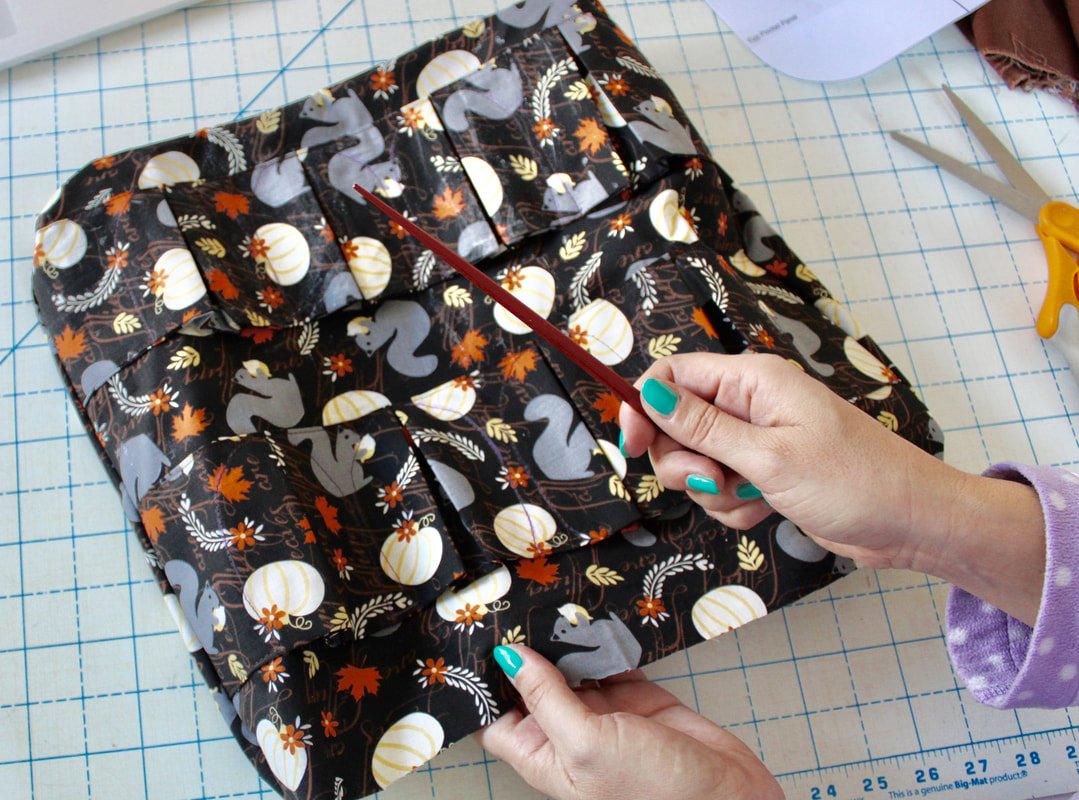
After the pockets are finished, it's time to sew the apron back and front pieces together, RST. Sew the sides and bottom only. Clip your curves. Trim seam allowances.
Yes, I made this apron while wearing jammies. Aren't they considered fashionable apparel these days? Haha
Turn the apron right sides out. Grab your chopstick or other turning tool to push out the corners
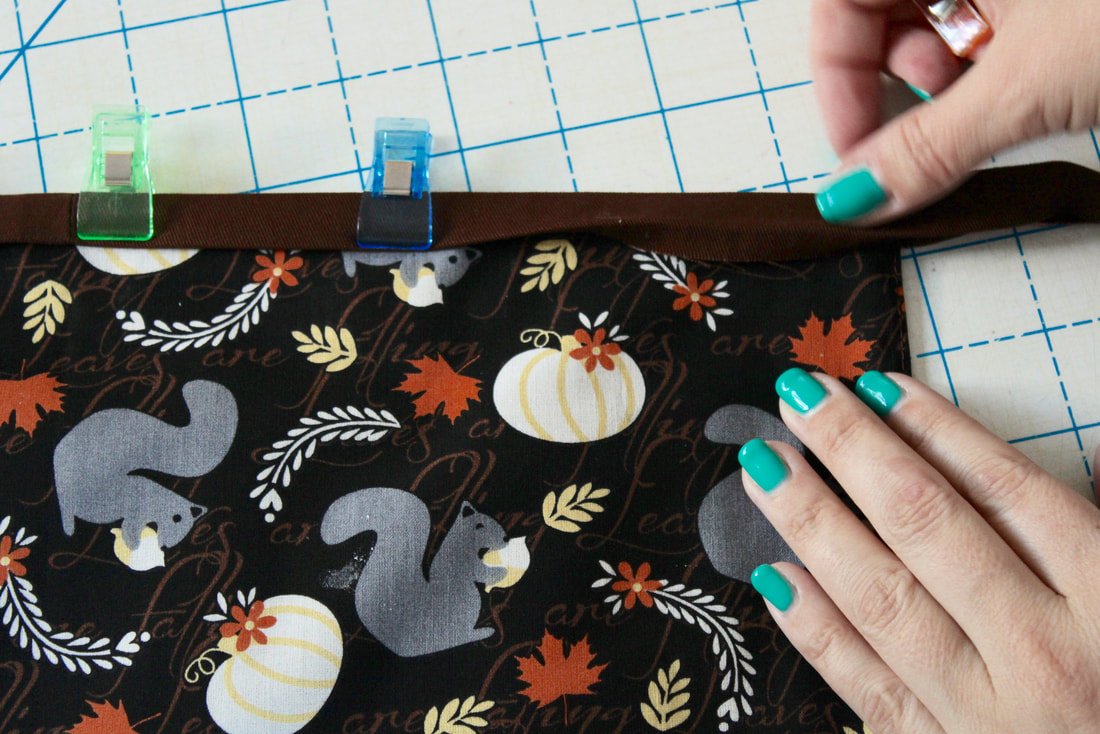
Waist Strap

Sew the waist tie like you would with any other piece of bias binding.
Make the waist strip following the instructions. Match the raw edge of one side to the top edge of the apron. Sew in the folded area where I'm pointing.
*You can see my chalk marks on the egg pockets still. They'll go away when I brush the fabric with my hand and spritz some water on the area

Fold the other side over. Use clips to hold in place.

Your apron is finished! Hooray!!! Now, go gather some eggs and don't forget to take treats with you. The girls work hard for their eggs.

Notes on the Pattern
I didn't really change anything. This pattern was great. In the instructions, they tell you to baste the raw top pieces together. I skipped that because it seemed unnecessary. If a child or beginner is making this, then maybe that step shouldn't be skipped.
I prefer a narrower waist tie than what was called for. But, that's a personal preference.
After making the first apron, I was commissioned to make a few more as gifts. I sewed them the same as well. There wasn't anything I wish the pattern had or didn't have. It's a wonderful pattern and I'm thinking of making a few to add to my shop. I think every chicken mama and papa needs one of these aprons!
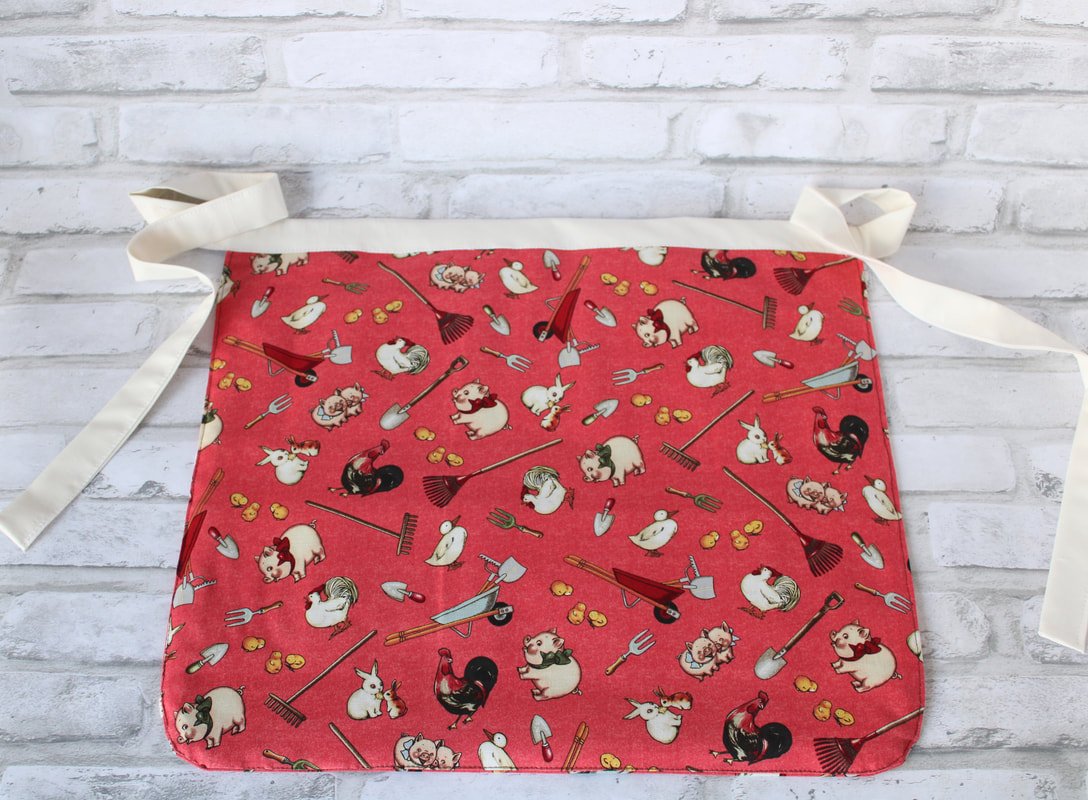
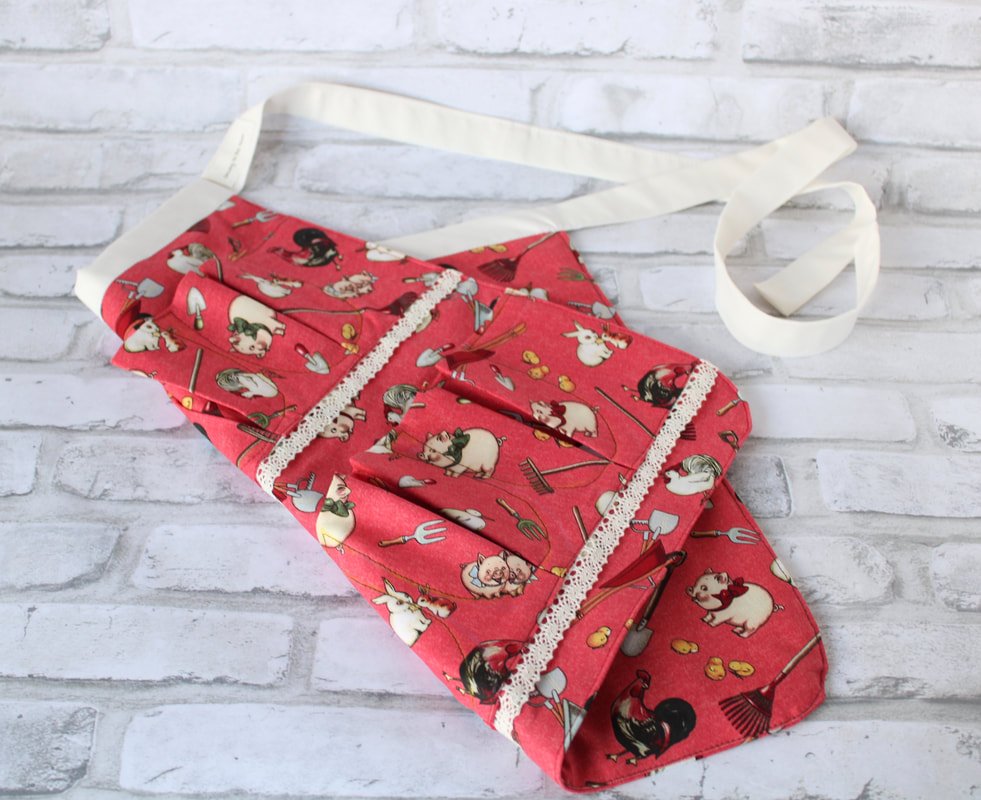
I took close-up photos with another one I made. The light-colored fabric makes it easier to see all the details.
UPDATE: This apron is the best egg-collecting apron in my opinion. I can usually put 2 small eggs in each pocket. It keeps the eggs safely inside the pocket while I change bedding, change water buckets, and refill the feed buckets.

This is the child sized apron. It holds 8 eggs. I am in love with how this turned out. I love the lace detail, it’s so sweet.
Now that you've made an apron for the eggs, I am curious...
What do you make when you have oodles and oodles of eggs? We usually opt for a frittata or an angel food cake. Those seem to disappear pretty quickly in our house.
I hope you make one of these aprons. It's definitely a useful farmer’s tool. And a cute tool at that!
Happy farming!
Annette

Shop Handmade This Season
Shop handmade shops this year, gifts that are made by an actual person will be treasured for years.

We're all home more than usual this year so, lets make the most of it! Shop from the couch in your PJ's, while supporting small businesses.
I've compiled a list of handmade shops for you, to shop from this season. Whether you need a hostess gift or a holiday gift, there's something for everyone. Jewelry for mom, a toy for little Johnny, holiday party supplies, or a new mask. There are so many choices! The holiday season is here, let's get shopping.
The shops below are listed in no specific order. I share the shop name, where you can find them, and what they have to offer, along with a little info about the owner. Happy reading and happier shopping!

Celebrate + Smile
Christina makes sparkly paper party goodies for any occasion. She's had her Etsy shop shop since 2015 but, has enjoyed crafting since she was a little girl. Her shop is a side hustle but, that doesn’t mean she doesn’t pour lots of time, love, and energy into it!
Christina makes personalized/custom confetti, cake toppers, party straws, drink stirrers and banners. She can make just about any decoration to fit your event needs. Just send her a message to start your custom order. :)
Find her Etsy shop here.
Follow Christina on FB and Instagram @Celebrateandsmile

Zamavi
Zainab is a hand letter artist and printable designer. She creates feminine wall art with her designs. She hopes to turn your home into your very own happy place.
Zainab offers funny and punny quotes, love notes, and simple, calming designs.
Find her Etsy shop here.
Follow her on Instagram @Zamaviprints

Emily Gutman Quilt Shop
Emily has been sewing since she was a little kid. Although she focuses mostly on making garments, quilting offers a space for her to play with colour and form. She loves anything and everything rainbow, which feeds her quilting obsession perfectly!
Emily offers quilts mostly but, also has face masks and occasional sewing patterns/kits.
Find her shop here.
Follow her on Instagram @Emilygutman

SunRae Doll Vintage
Alisa enjoys sewing clothes from vintage patterns. She often ends up with smaller pieces of fabric that she has no idea what to do with so, she opened an Etsy shop!
Alisa sells face masks with matching scrunchies, aprons, and plus-size dresses. She also has vintage patterns, jewelry, and housewares.
Find her Etsy shop here. Her Poshmark shop here.
Follow her on Instagram @Sunraedolls
Motley Toucan
The Motley Toucan is a shop that specializes in adorable plush animals with bright colors and patterns. Each item is handmade with love by Carianne. She creates in her spare time outside her full-time job and graduate classes. She started sewing in 2019 and loves to share her progress on each project, on Instagram. Her goal is to one day be able to offer, design, and build custom plushies!
Carianne sells plushies mostly. She also sells decorative pillows, bags, pouches, and clothing/ accessories.
Find her shop here.
Follow her on Instagram @Motleytoucan

Pierced Leather
Pierced Leather is a rustic earring boutique. Handcrafted genuine leather earrings with brass, copper, and wood accents.
Karen is just a "boy mom" whose boys are now men. She wanted something creative to pass the time and supplement their income. She loves creating statement pieces that are lightweight! The bigger and lighter, the better.
Find her shop here.

Stralixa
Lula is based in the ancient city of Athens, the capital of Greece. Her love for vintage clothing and vintage items in general has always been there. She loves watching films, listening to music (she's also a DJ) and a fanatic coffee drinker. She has a husband and two young children that she doesn't match at all! LOL
Stralixa vintage shop is an e-shop that Lula runs along with two colleagues. The shop opened in August 2017 and since then, the vintage collection has grown tremendously. All the items are handpicked, one by one. Their ability to distinguish which garment should get a second chance and which shouldn't, is well known between the three of them. They all love what they do so much, and do it with passion and devotion.
Find her shop here.
Follow her on Instagram @stralixa_vintage

Sewing to the Moon
Sewing to the Moon opened on Etsy at the very end of 2016. It offers bright color items and quirky patterned fabrics. Annette adores the 1940s and 1950s and makes her items with a nod to those eras.
Annette offers top knot headbands, make-up bags, keychains, fabric buckets, and funny embroidered tea towels. She also makes custom tea towels if you have something in mind. The fabrics that are used come from various shops and corners of the internet. She aims to provide quirky with a pinch of nostalgia.
Find her Etsy shop here. Or click on the shop tab above.
Follow her on Instagram @Sewingtothemoon
I really hope you find some gifts for loved ones in these shops. Remember, when you support handmade, they do a happy dance. We all need a little more happiness in our lives right now.
Thanks for supporting Handmade! Happy Holidays!!
XO,
Annette


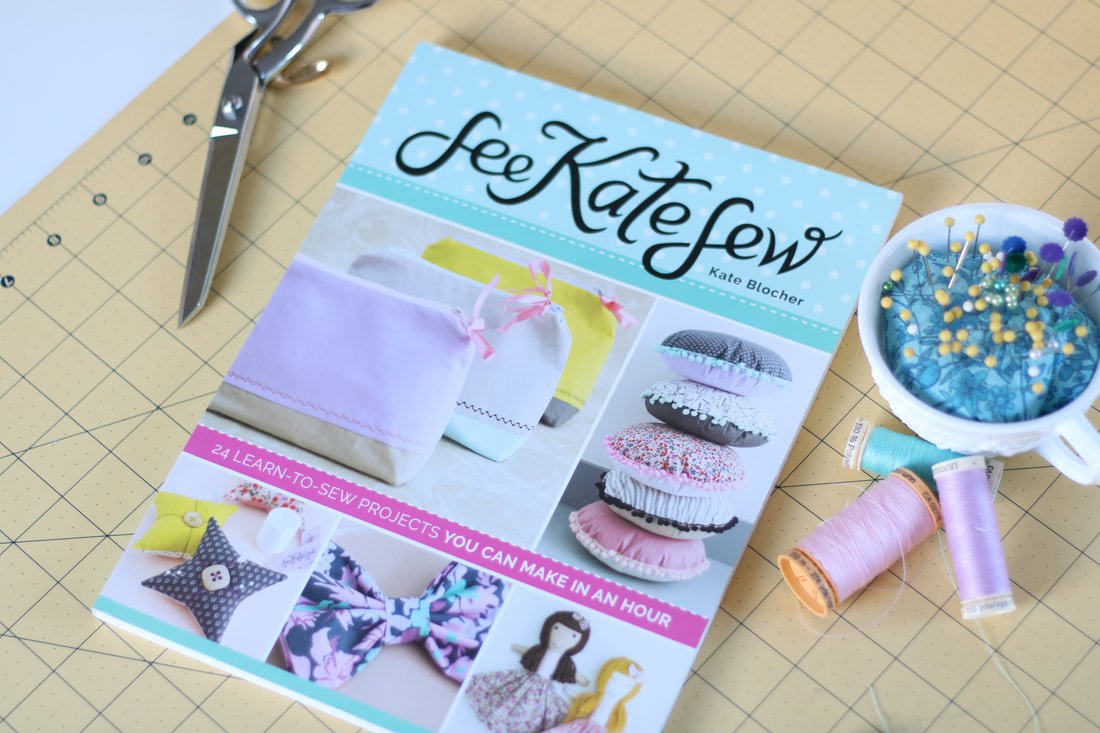
Sewing Books Every Sewist Needs
Sewing books for beginners and seasoned sewists. Books are full of techniques, free patterns, and so much more.
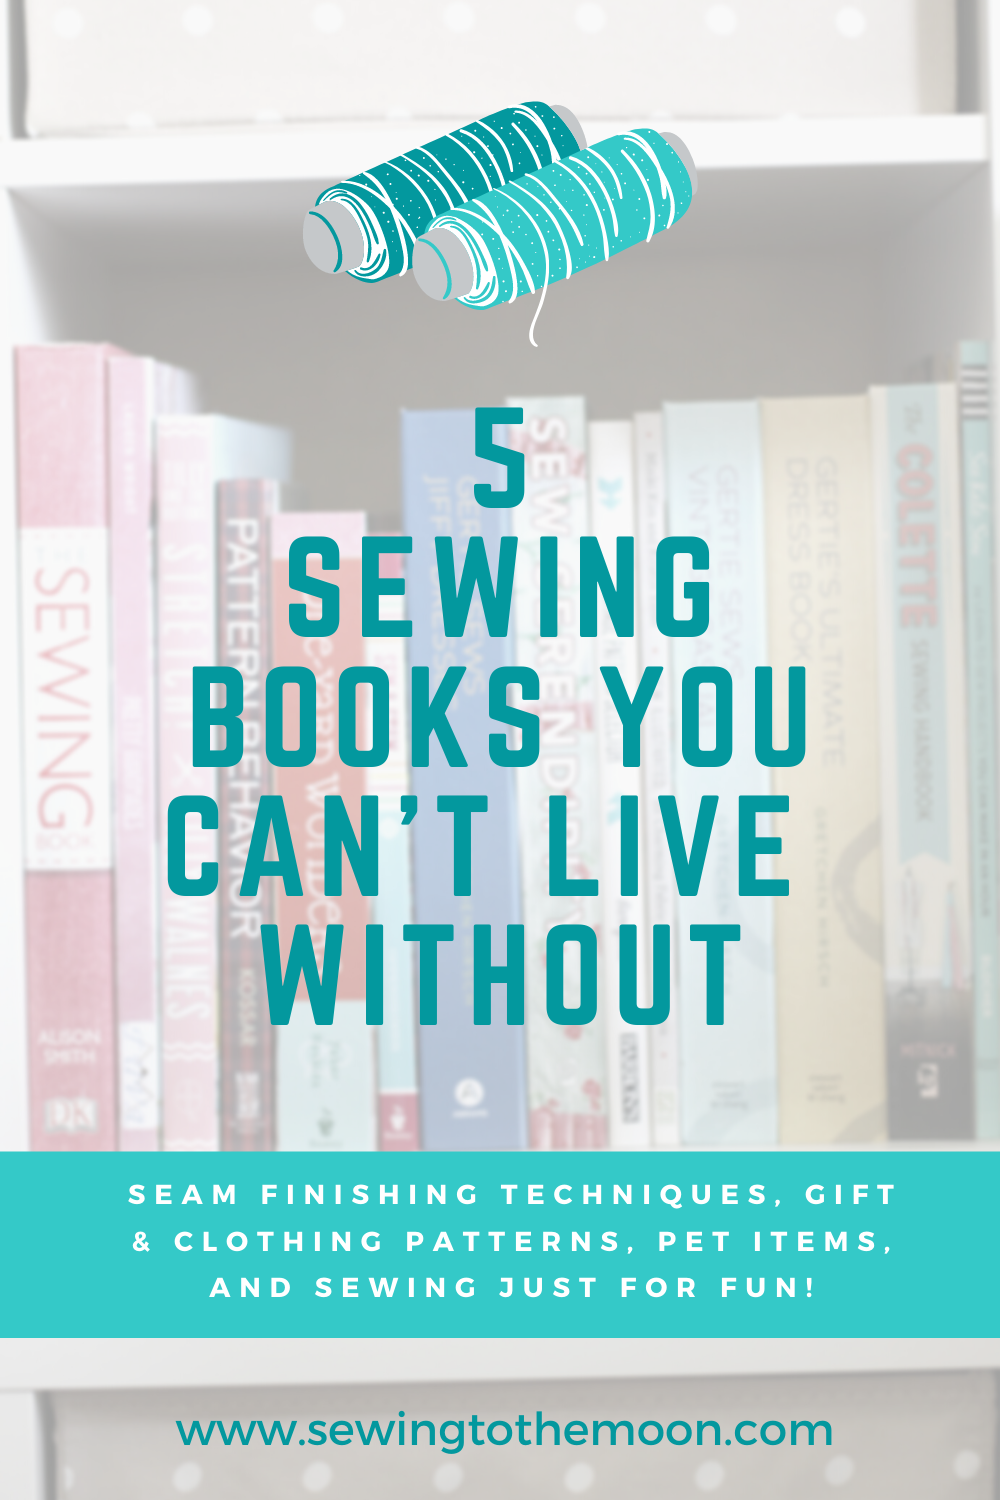
Let's talk books. Sewing books, that is. Big books, little books, tall books, small books. Whether you're new to sewing or a seasoned seamstress, it's a good idea to have a few books on the subject. This list may even spark your sewjo. These 5 are the ones I reach for most often. The internet is a great source however, if you need to refresh your memory on a specific technique, I urge you to reach for a book. Time is precious and you shouldn't spend it filtering through blogs or Youtube videos. The answer is going to be within one of these books. Each book in this list offers something different. Let's dive right in.

1. The Sewing Book by: Alison Smith
This is the first sewing book I bought when I first started. Well, I think I asked for it for my birthday, but it was my first sewing book. It is the go-to sewing bible if you will. It has information on all the things. Tools, fabrics, techniques, and seam finishes, it's all in there. It is a little older so, you'll have to ignore the dated photos.
Bonus: It has patterns at the back of the book for you to make as well. Yay for patterns!
The images are clear and concise and it's a top choice for many sewists. If you're a visual learner, grab this book, you won't regret it.
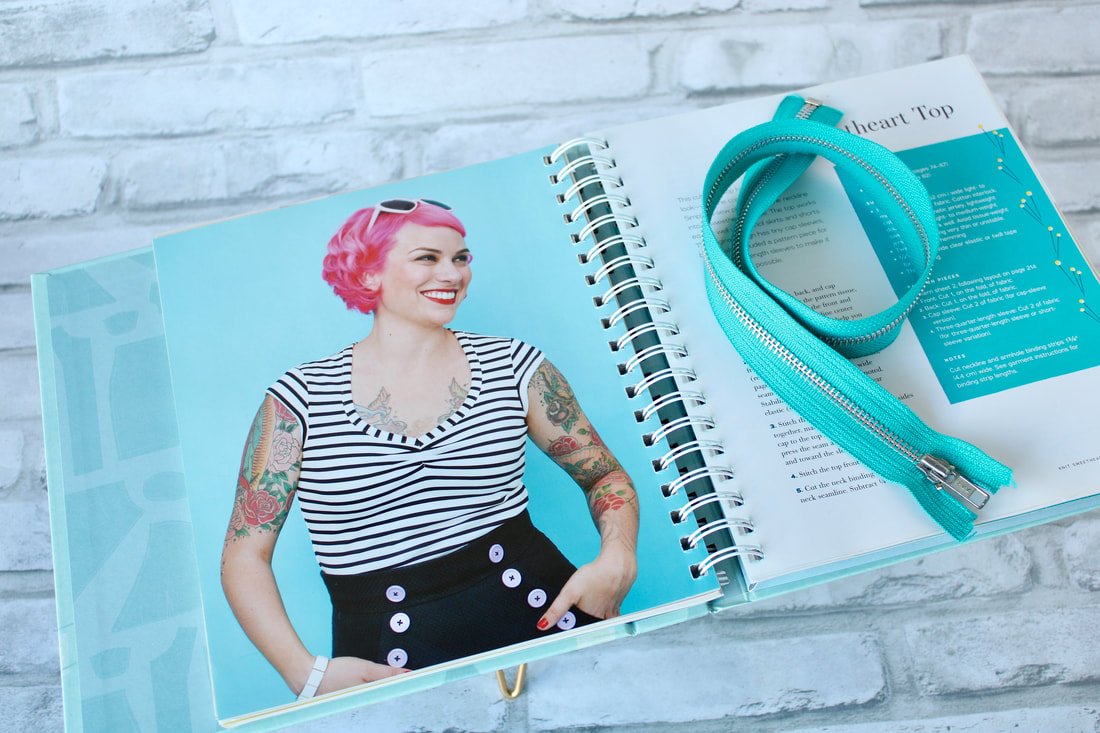
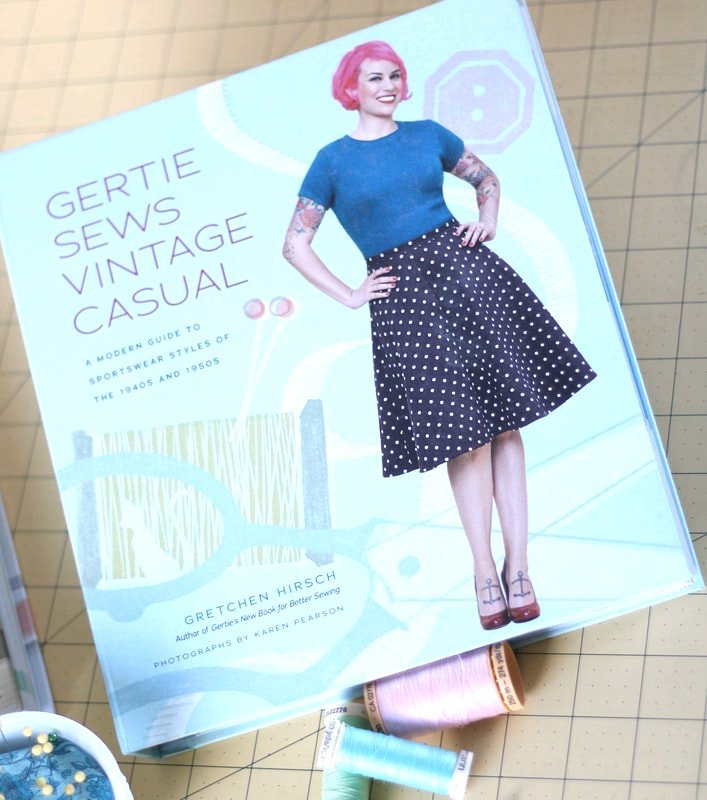
2. Gertie Sews Vintage Casual by: Gretchen Hirsch
You knew I'd have to throw a Gertie book in, right?
This is my favorite pattern book. If you've hung around here long enough, you know I'm a huge Gertie fan. HUGE! If she had a band, I'd be a groupie. No joke. I have all of her books but, this is my favorite by far. I have kids and can't always wear big, fluffy, glittery dresses to live my best life. I usually wear more casual 1940s styles. High-waisted pants and a tucked-in top are my go-to style pieces.
I've made multiple patterns from this book and will continue to do so until I can't sew anymore. LOL
She shares sewing techniques and guides you through fabric choices. If you're a 1940s and 1950s fan, you need this book. It's her best!
You can check out her old blog here. Her new blog is over here.
Click here for a post on a few things I've made from her book.
3. One Yard Wonders by: Rebecca Yaker and Patricia Hoskins

Need a gift for someone? Only have a yard of fabric to use? This book is your best bet. It has 101 patterns for things to make with only 1 yard of fabric! Yep, you read that correctly, only one yard of fabric.
We all have at least one yard of fabric in our stash, waiting to get used. This book has patterns for aprons, toys for kids and pets, other pet items, and even clothes!
It's a great beginner-friendly book too. I've had this for years and pull it out whenever I need a quick handmade gift idea. The holidays always creep upon us. Grab this book and start making gifts now. This might give you new ideas for everyone on your list. And, why not pick up an extra copy for your niece who recently learned to sew?

4. The Colette Sewing Handbook by: Sarai Mitnick
This is another pattern designer sewing book. I love Colette patterns. They are feminine without the fuss. The 5 patterns in this book are sweet and simple. She shows you how to create a scalloped hem, which you will love. The patterns are beginner-friendly as well. This book makes a wonderful gift for any sewist, new and seasoned.
Sarai has a blog that she is no longer on but, everything is archived.
She has, however, created an online sewing community and is very active in it. Seamwork, have you heard of it? It's is a great membership sewing community. It also has classes and patterns too.
5. Tilly and the Buttons: Stretch by: Tilly Walnes

If you love wearing cozy knit fabrics, you will love this book. Tilly's style blends modern with vintage to create something for everyone. If you've never sewn with stretch fabrics, she shows you how. From picking out the perfect fabric to the seam finishing. You don't even need a serger! She includes patterns for dresses, overalls, tops, and bottoms. The patterns aren't difficult and you can wear the clothing every day.
This book is also beginner-friendly. She will walk you through needle choice and stitches as well.
I've recently made a Freya dress with star and moon fabric. It was such a fun pattern to sew!
Tilly Walnes also has an active blog, chock full of great information and more patterns.
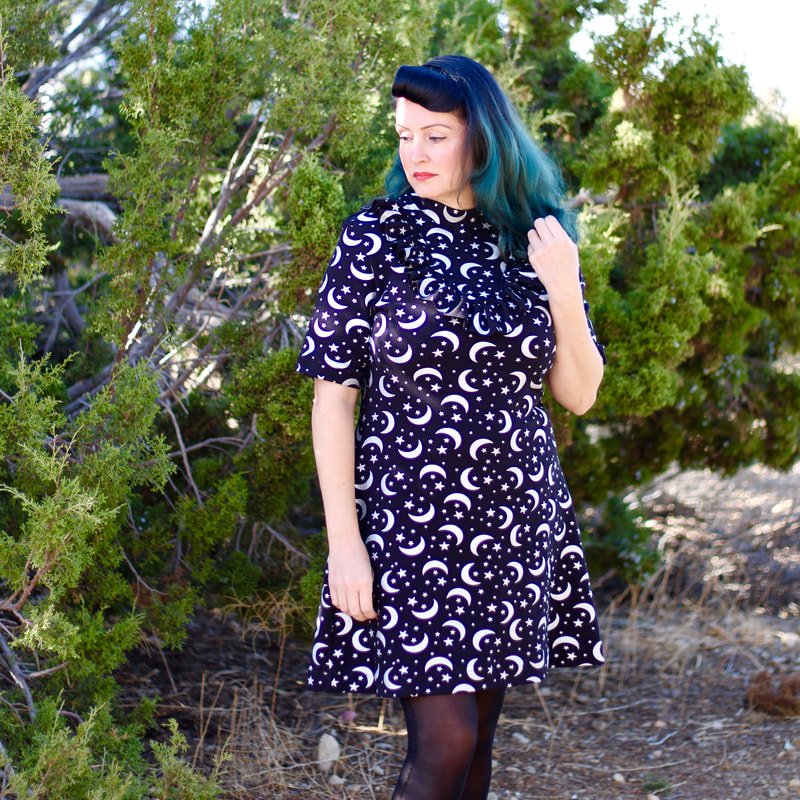
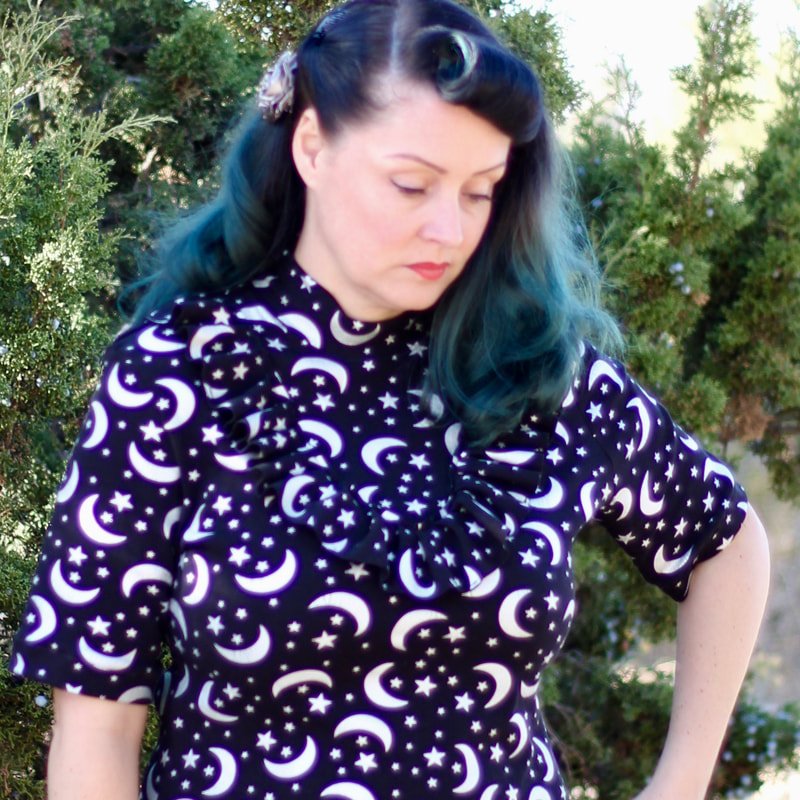
I’m wearing my Freya dress with 3/4 sleeves made with Starry night knit fabric from JoAnn. Such a fun and easy pattern from her book.
Other Books You Might Enjoy:
You can find all these books online and in bookstores. You may even score a copy in a used bookstore.
Each book pictured below offers different options. I love visiting the bookstore and rifling through all the sewing books. I never leave empty-handed.
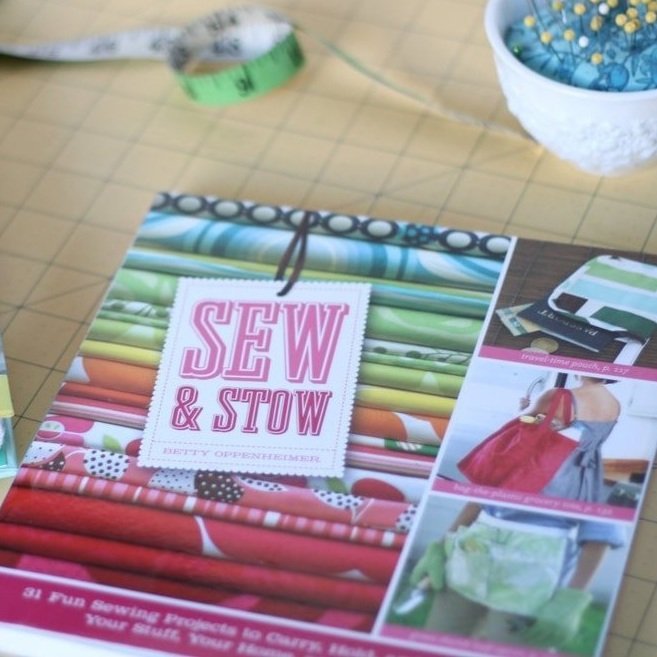
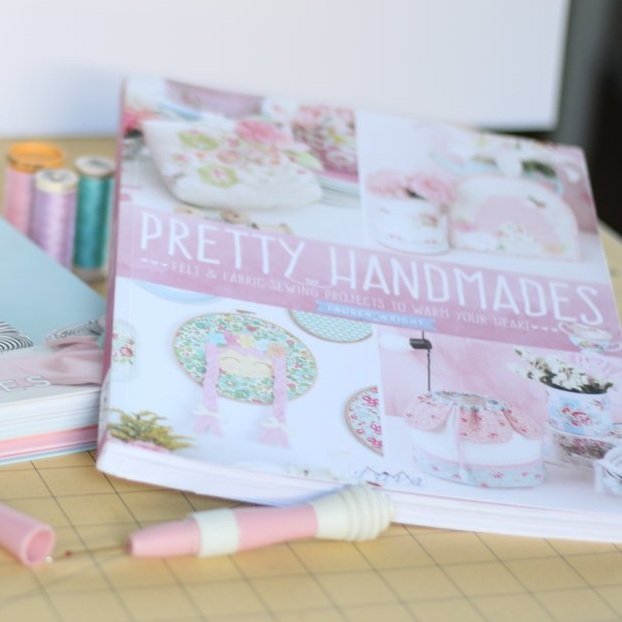
Hope this gave you some sewing inspiration. When I want to sew but, don't have a project in mind, I grab a small stack of books. Plop down on the couch with a warm beverage and just look through them. Flipping through the pretty pictures seems to get my sewjo train started. Toot-toot!
Let me know in the comment section if you have any of these books. Or, share some of your favorites instead.
Happy reading,
Annette

How to Organize Sewing Patterns
How to organize your sewing space. Store all of your sewing patterns in an easy way so you can find everything quickly.

Do you get the organizing bug after the holidays? I know I do. Remember Kon Mari? Yep, my closet and dresser clothes are still organized and folded with her method. It's been a couple of years and I need to revisit my dresser. But we'll save that for another day. Today I want to share with you how I organize my patterns.

I have quite a few patterns for sewing although, not nearly as many as other sewists, I know. I have friends who have bins upon bins of sewing patterns.
In my stash, I have PDF ones, traced-off ones, patterns that have been adjusted and re-adjusted again, and of course regular pattern envelopes. I keep all of my patterns intermingled. However, they get separated by category. I'm not completely crazy. Ha!
Start with your PDF Patterns
Here's what you'll need:
Box of envelopes
Marker and washi tape
Clips (optional)
Boxes or bins to fit the patterns inside

The Process
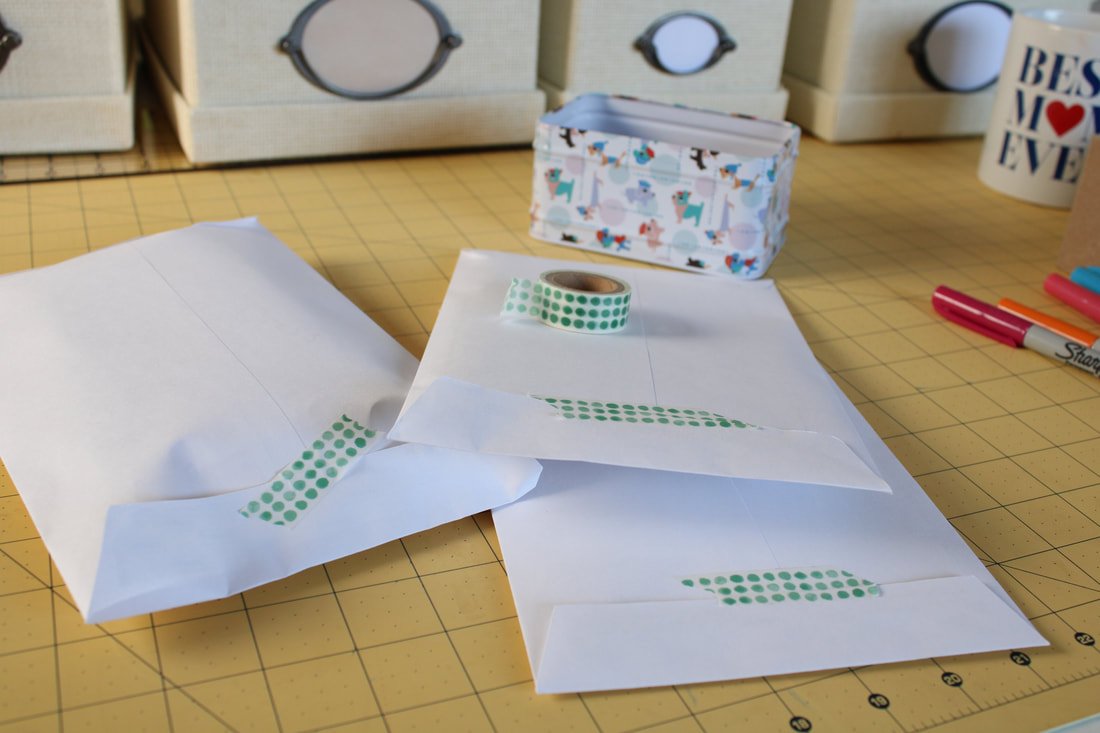
Go to your local office supply store and grab a box of 6x9 envelopes. They had white and manilla colors to choose from when I went. The box was about $15. It may cost more or less depending on how many are in the box. White seemed to be more expensive but, I liked the clean look of white so that's what I bought. You could order online too, I'm sure.
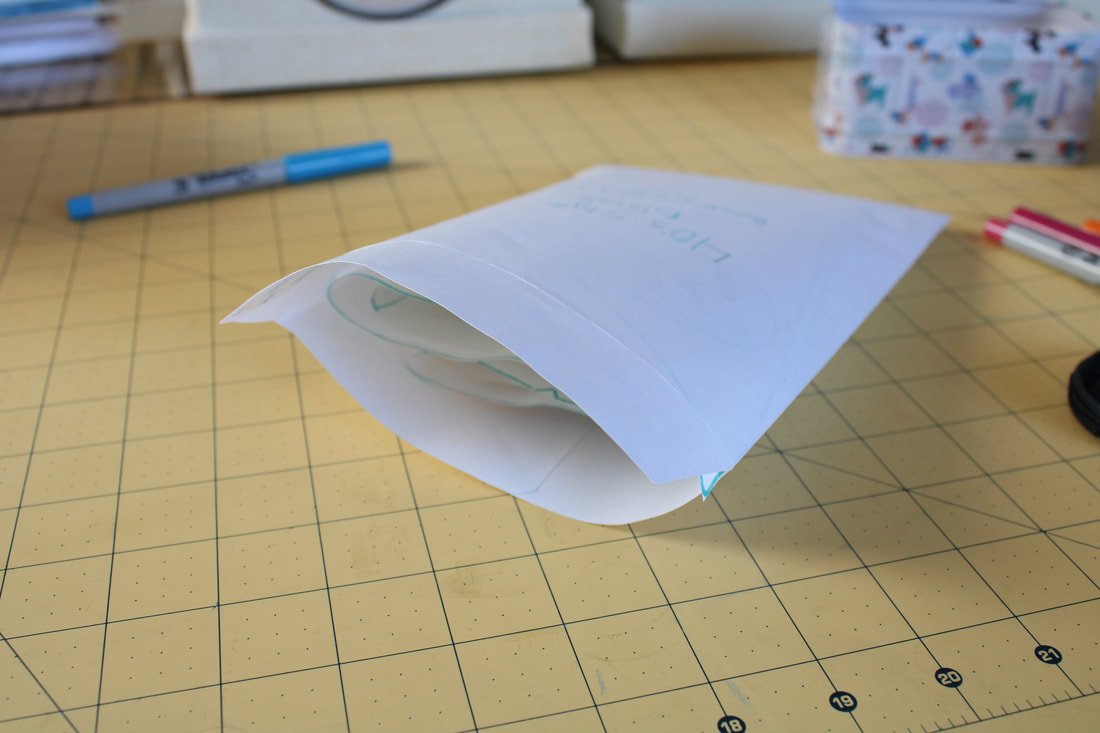
Grab all the PDF patterns you have. If they aren't printed and are still living in the eternal bliss of your computer, don't print them off. Save that for another day.
Fold each pattern into a 5 x 8 size. Include every piece to that pattern in the folding process. I used a wonder clip to keep all of the pieces together and folded up. And, then I stuck them in a big pile, as you can see above. I chose to fold first, then stuff. But, you can tackle it however you'd like.
Grab a pattern from the pile. Write that pattern number, brand, size, etc. on the front of the envelope.
Then, stuff the folded pattern pieces inside the envelope. I used a piece of washi tape to close the envelope. There were a few patterns that needed a few pieces of tape. ;)
Repeat until all the PDF's are in envelopes.
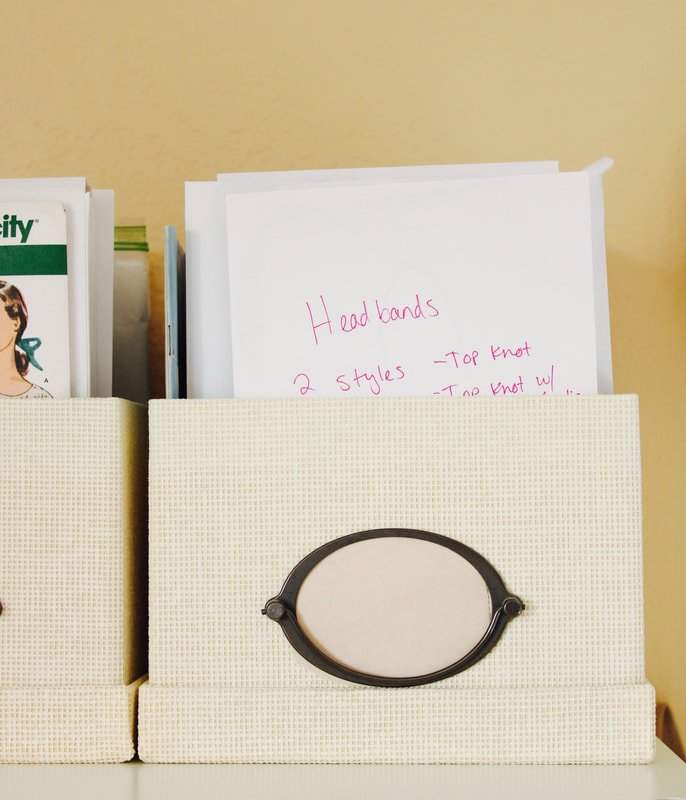
I had a bunch of cute boxes with lids that I purchased years ago from IKEA. They kept crafty items organized inside them. 2 years ago, I took out the built-in shelves and redid our bonus room. The boxes were no longer needed. But, I didn't want to throw them away because I knew I'd use them eventually.
Fast forward to eventually.
They were the perfect size for my patterns!! I tucked the lids under the boxes and my envelopes fit inside. If you have a few shoeboxes lying around that are empty, cover them with pretty paper, spray paint, or wrapping paper. Your envelopes will fit perfectly inside

Pattern Envelopes
Now that your PDF's are neatly organized, stick your other pattern envelopes inside the boxes too. I chose to organize mine by category.

My patterns used to live in a huge bin (the blue box) and I couldn't easily find what I was looking for.
Just an FYI, the organization day got uglier before it got pretty. Sorta like most organizing, right? LOL
I ended up using 4 boxes. I stuck all the tops in one box. Dresses and rompers are in another box. Bottoms, skirts, and pants in one box. And, everything else went inside the last box. I put the boxes on top of my Kallax shelf and can now see them all the time. If you'd like to organize all your sewing fabric next, read this post.
It's been so easy to find exactly what I'm looking for. I will add more pattern envelopes as I print off or create new patterns.
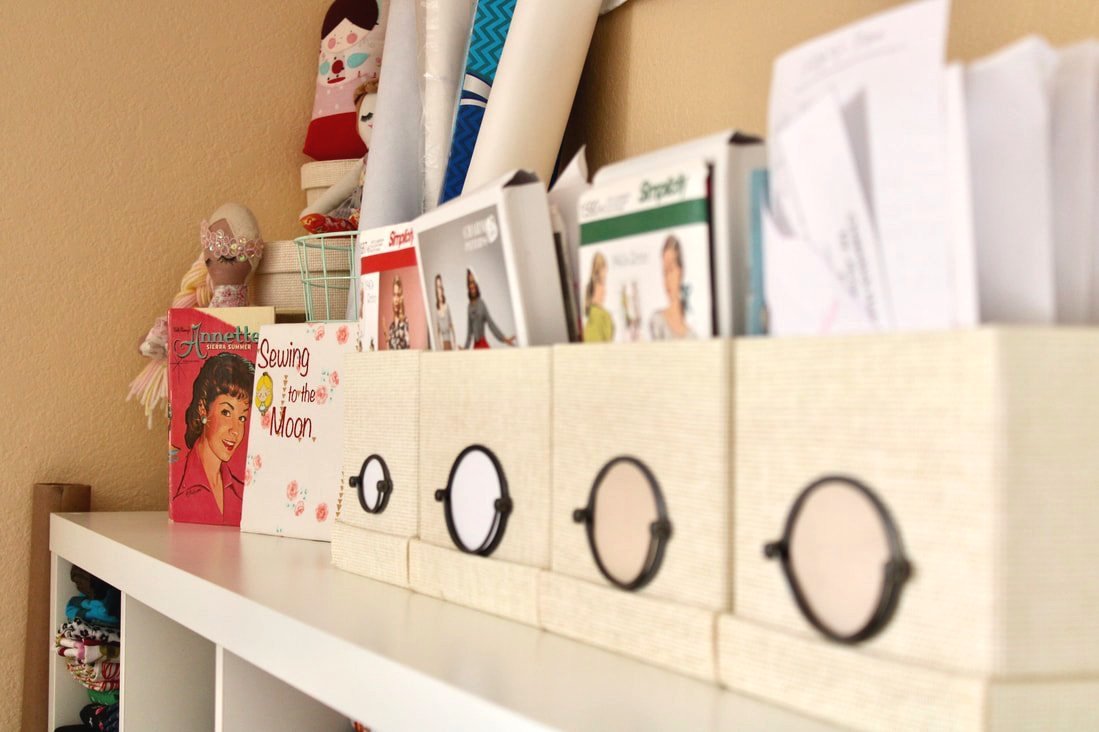

Sewing space
I recently moved my Kallax shelf because my fabric started fading in spots! YIKES!!!! So, this is a photo of where it is now and the pattern boxes on top.
So, are you off to organize your patterns? Please tag me if you do any sewing organization. I love seeing sewing rooms/corners and all the pretty things inside them. Share this post with anyone you know who needs a little motivation too. Thanks in advance!!
Happy organizing,
Annette