
Pattern Reviews, Sewing Hacks, Tips & Free Patterns
Sewing Blog Besties

Sewing Challenges to Participate In
Fun sewing challenges and hashtags to follow. Find new friends in real life or virtually by following these tips.

The new year is here and in full swing! Do you want to do some selfish sewing after making gifts for the months leading up to the holidays? Yes? Same here. I want to make a few things for me, nobody else. Never feel guilty about sewing for yourself. It's YOUR hobby and YOUR time. ;)
I got to thinking about all the things I planned on making last year that never happened. :/ This year, I want to have a plan of attack! I decided to make a deadline to kick my rear into gear. Joining a sewing challenge or 2, or 3 will help with this. Fingers crossed!
There are tons of great sewing challenges happening every year. You may have heard of some, and some might be completely new to you (me, too).

Just reading a book and wearing my Zombie babe gathered skirt.
I've linked a few below:
Sew the Precious- it's a challenge on Instagram hosted by The Sewcialists. You are supposed to make something with that precious fabric you are scared to cut into. Sounds fun, right? Count me in! I signed up, you should too. :) Be sure to use #sewtheprecious when you post your pic.
Next up is the Make Nine challenge hosted by Rochelle over at Home Row Fiber. You plan on 9 items to make for the year. This is right up my alley because I know I need to make a new purse. As I'm typing up this post, I'm planning my makes for this year. Again, use the hashtag #makenine2020 on Instagram.
Me Made May- I have a post about doing this last year. It's hosted by Zoe at So, Zo..what do you know? You wear something every day that was made by you. I usually wear something I've made every day of the year. So, this wasn't as challenging, although I did learn a few things from it. But, you'll have to wait for that post as we get closer to May. ;) This can be as simple as a pair of earrings you made to a formal dress.
There's a #sewover50 challenge on Instagram. Go follow Judith @sewover50 for more info. Sounds fun!
#dresslikeyourgrandma challenge. I've just recently heard of this and it sounds fabulous! I love vintage style and clothes, so I'll have to check this one out.
There's also a #sewyourstash challenge. It's where you only sew things from your fabric stash. You're not allowed to buy new fabric. I have been doing this one, sorta. I have tons of fabric and honestly don't need to buy anymore until I sew through my own stash!
#memadeeverday is just what it says. You post pics on Instagram of what you made and are wearing every day. It's a take on Me Made May but a yearlong challenge. I like this one because it is easy and doesn't take much thought.
#Sewthefrosting is another challenge. You make something that is positively fabulous just for you. It's supposed to be more fun than utilitarian. This is right up my alley!
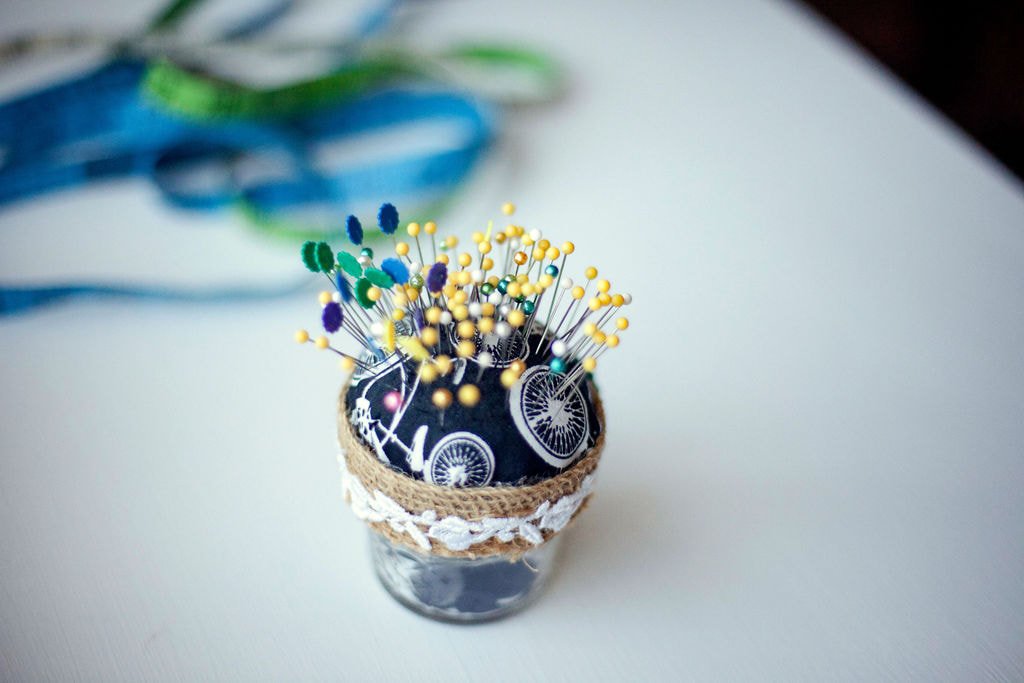
This cute pin cushion was made for me, by my friend. Photo by Erica Lancaster.
Are you going to partake in any of these challenges? I know there are quite a few that I didn't list. If you know of any, share them in the comments below. I'm doing the make 9 and #sewtheprecious. I think these will be fun and a good challenge for me.
Happy Sewing!
Annette

Quick and easy baby gift
Sew a quick and easy baby gift. Burp cloths, blankets, and more.
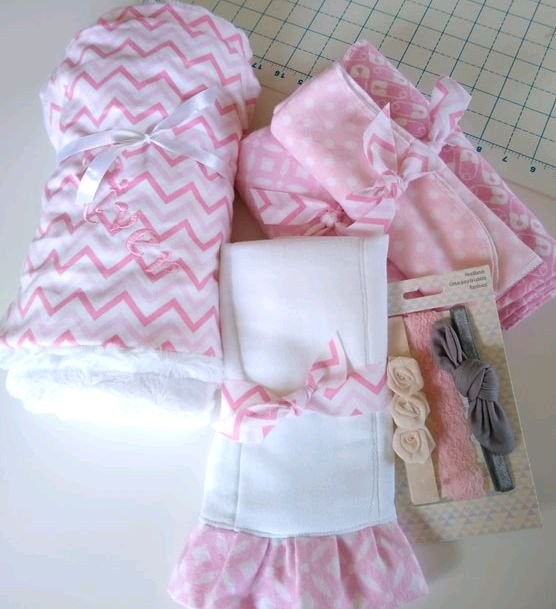
Embroidered blanket, burp cloths, swaddling blankets, and headbands.
Spring is in the air and this lady is ready for some porch time. I love waking up, going outside, and enjoying my coffee on the back porch with the birds.
I'm a simple person. Ha!
Babies and weddings usually go hand in hand with Spring. Don't you agree? I've been to a few baby showers lately and thought I'd share some easy handmade gift ideas for you to make and take to your next shower.
As sewists, we always have extra fabric that we're dying to use up. This gives you an opportunity to use it up or go shopping for new fabric. Win-win!
Let's get sewing, we've got a shower to attend!
Here’s what you'll need:
3-4 yards of soft flannel, cotton, minky, and/ or faux fur.
Matching or contrasting threads/ matching bobbins
Ribbon
Store-bought cloth diapers. I use the extra thick ones (optional)
Bowl or plate
All the sewing things
Sewing machine
Serger
After you have your fabrics picked out, it’s time to make some baby gifts.
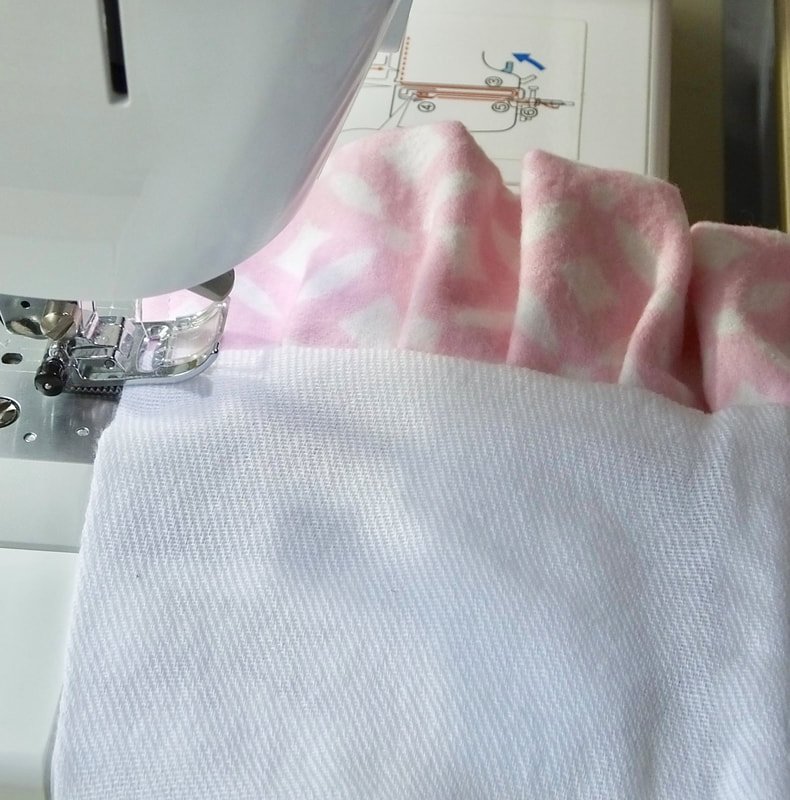
Swaddling Blanket
Grab a chalk pen, or water-soluble pen to mark the rounded edge.
Square up a yard of soft baby flannel. I like to cut the swaddle blankets 40"x 40".
Take a bowl or plate and trace the curved edge at each corner. Or, fold the blanket in half and half again so you have all corners on top of each other. Then trace and cut.
Cut and make a few of these blankets using different patterns of flannel fabric. These are quick and they will be well-loved.
Serge around the entire blanket edge making sure to go slowly around the corners. If you don’t have a serger, zigzag over the edge. (You can fold over and under, then topstitch, but don’t round your corners if you do that.)
After you have all the swaddle blankets you want, set them aside.


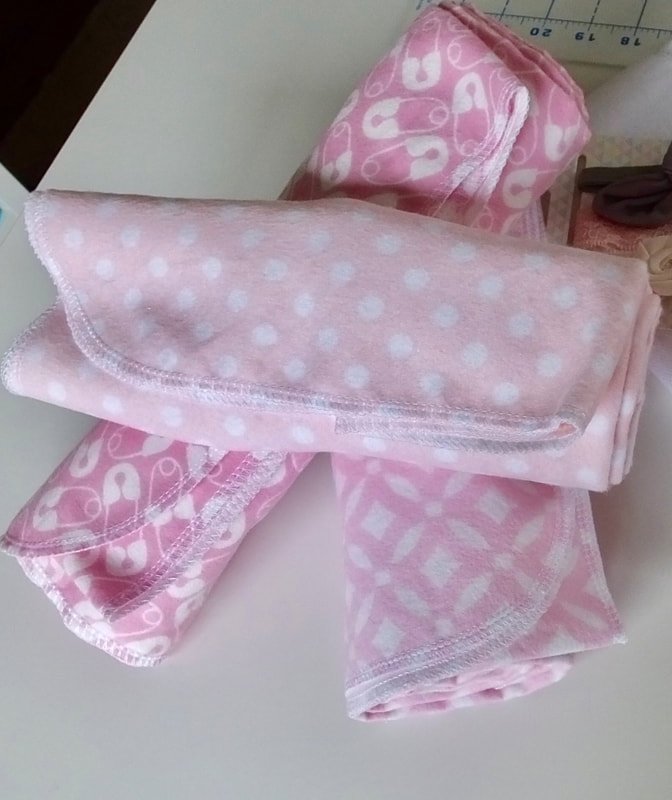
I made 3 different swaddle blankets. They are great to keep in the diaper bag, car, and nursery.
Burp Diapers
Every new parent needs burp rags. Buy a pack of store-bought cloth diapers, I prefer the thicker style ones. Measure the width and multiply that number by 2. Cut a strip the length by 4 inches wide. Fold in half like a hot dog. Serge the raw edges together or use the zigzag stitch if you don't have a serger. This is supposed to be quick and easy. Don't stress over edges that aren't perfect.
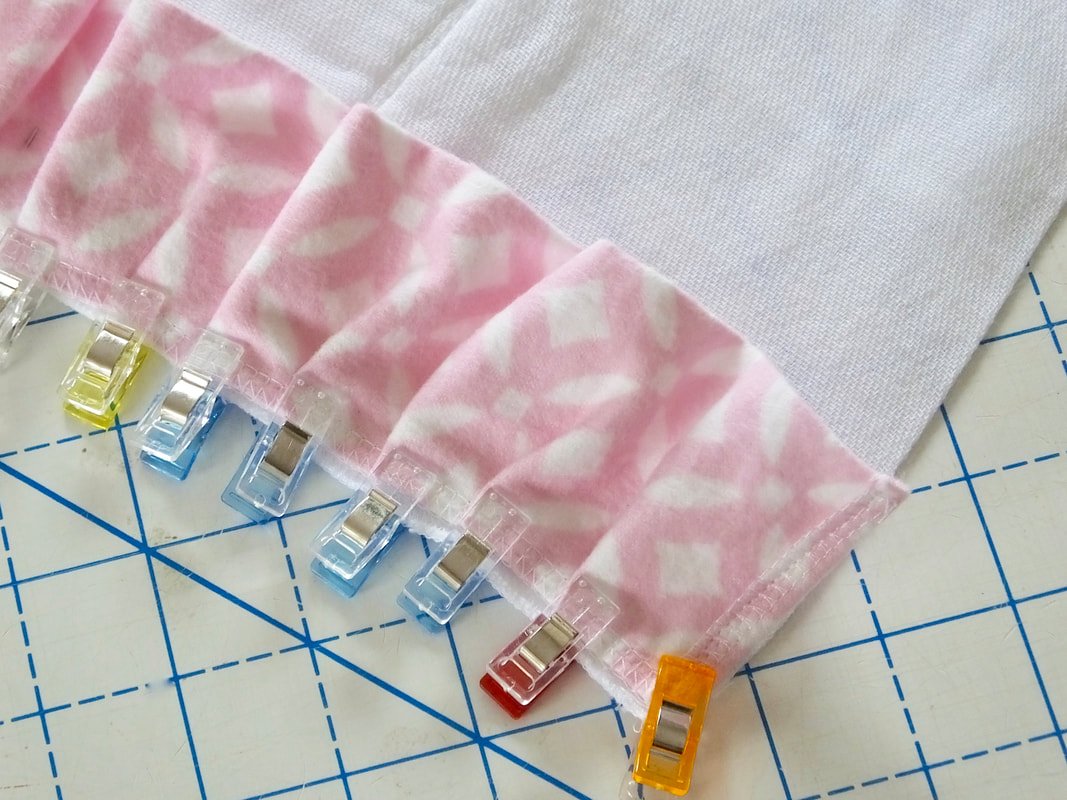
I didn't gather the strip for the ruffle before I attached it. I folded the strip in half and used clips to attach it at the midpoint and each end of the burp diaper. Then, just eyeballed the gathers.

You can see the raw serged edges above.
Sew 1/4" from the bottom edge of the burp diaper making sure to catch the ruffle.
Use clips or pins to hold the ruffle in place and remove as you sew.
Topstitch the ruffle.
After you attach the ruffle, press the seam up toward the burp diaper. Topstitch the top 1/8-1/4" from the edge. This adds extra security to the ruffle and burp cloth seam. Go slowly, the burp cloth fabric may want to shift.

Grab a cute headband set or some baby bath items to add to the gift set. Or not. Keep it super simple.

I loved having thin blankets when I had my babies. They're great for diaper changes, sun shields in the car or stroller, swaddling newborns, wiping up spills, etc. Blankets make the best gifts because they're so versatile.
If you're feeling adventurous, make a nice blanket with a layer of faux fur and flannel. I make these as well and embroider the baby's name on the flannel side. The new mom might not use the fancier blanket for the baby right away, but it will be special for the baby as he/she grows into a toddler.
Sew the blanket with right sides together leaving a 3"-5" gap opening for turning. Slip stitch the opening closed or top stitch around the whole blanket. And you're done.
Handmade gifts for babies are the sweetest. With a little fabric and some time, you can create things that baby and mama will both love for years and years.
Other easy ideas to make:
Burp cloths. Sew 2 or 3 layers of flannel together in a rectangle.
Pacifier clips
Doll or stuffed animal
Embellished store-bought baby bodysuits. Add ruffles or applique
Baby carrier cover
Diaper bag
Quilt
Baby outfits/ dress
Playmat
Cart cover for shopping
Sun hat
Do you make gifts for baby showers or do you purchase them instead? I do a little of both.
Thanks for hanging out today and enjoying all the sweet baby things we made.
Happy Sewing!
Annette

Vacation Sewing. Do you do it?
Sewing for a vacation can be so much fun! Make some new bags or sew a whole capsule wardrobe. If you start early enough, it won’t be stressful.

Summer is here! It's hot and I'm loving it. Well, until I get sick of the heat. Then, I'll cry for cooler weather. I'm as bad as the kids I tell ya.

Ventura, Ca
But, for now, I'm enjoying the warm days and cool evenings. We like to sit outside at night counting stars and the occasional airplane.
Also, summer is a time for vacations. Whether you take the whole family or just a solo weekend away.

Yellowstone. We camped for a week and it was gorgeous.
My question for you is, do you sew for vacation?
Vacation is perceived differently by everyone. For me, its anywhere that isn't home. Head up to the mountains and camping in a tent. A week long trip at a nice resort. A quick weekend getaway. Those are all perfect vacations.


Things I've made for vacations in the past:
Travel bags for your clothing. Make sure you use a good-quality zipper.
Simple tops such as the Charms Pattern Rita Blouse by Gertie.
Maxi skirts are a must. Comfortable clothing is great when you're away from home. Knit fabrics work best for maxi skirts.
Hair scarf or headband. Make a few. They’re great for camping too, think dirty hair.
Toiletry bags like the one pictured above. Make one for yourself and your family members.
Make an eye mask. These are really easy. If you have problems sleeping anywhere but at home, this is an ideal make.
A fun pillowcase! Do you always take your own pillow with you when you travel? Make a fun pillowcase for it to use only while you travel. Satin fabric ones get extra points.
Straw bag. Do you love your stainless steel straws? Sew a quick and easy rectangle snap pouch for them.
A vacation purse like the one above. If you hand embroider or have an embroidery machine, make a fun quote for it. Tell everyone you're on vacation. You deserve to be there!
Infinity scarves are a great travel item. You can wrap it around your arms when you get chilly. Use it as an extra layer during cold weather. They take 2 yards of fabric and you get 2 scarves out of the fabric. Make one for a friend and yourself.
Skirts! These are my favorite vacation staple for warmer weather. They even work in cooler weather, just add tights.
If you don't have time to sew up something new, you can pack something from your arsenal that you've made in the past. It's always fun meeting a fellow sewist while out in the world. I can usually spot a handmade bag or clothing item and it sparks a fun conversation.
If you make anything for traveling, I want to know. Leave me a comment below and tell me what you make or plan to make for your vacation. If you don't make anything ever, tell me why.
Happy stitching and happier vacationing!
Annette
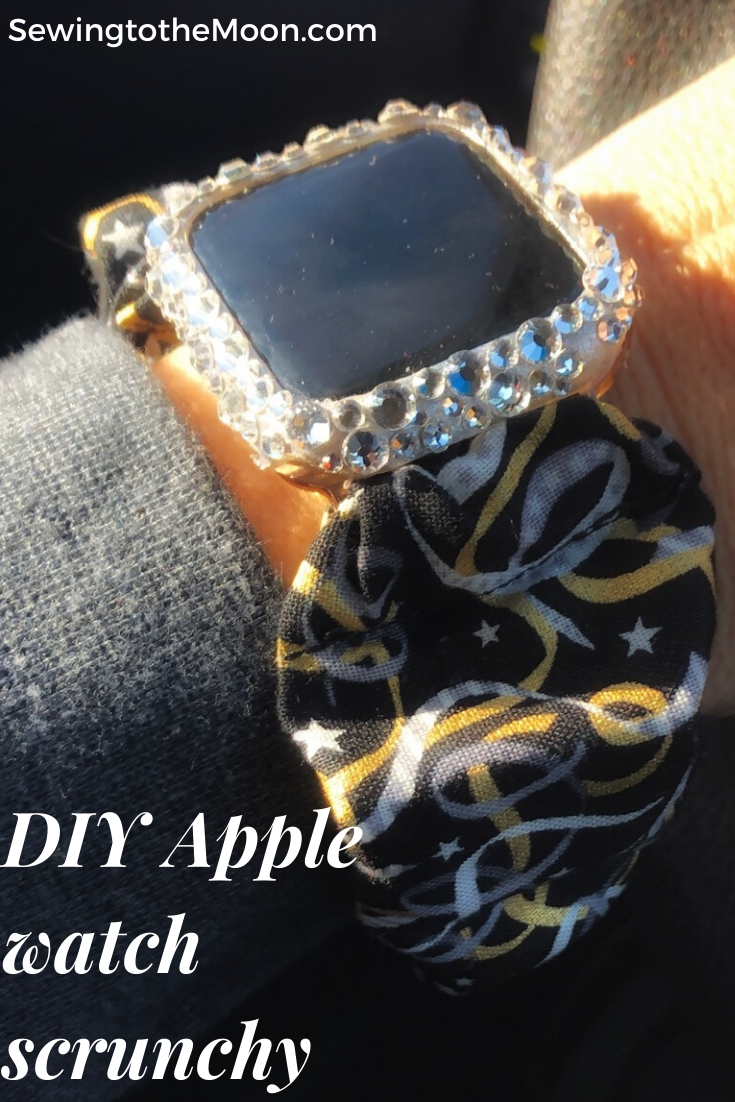
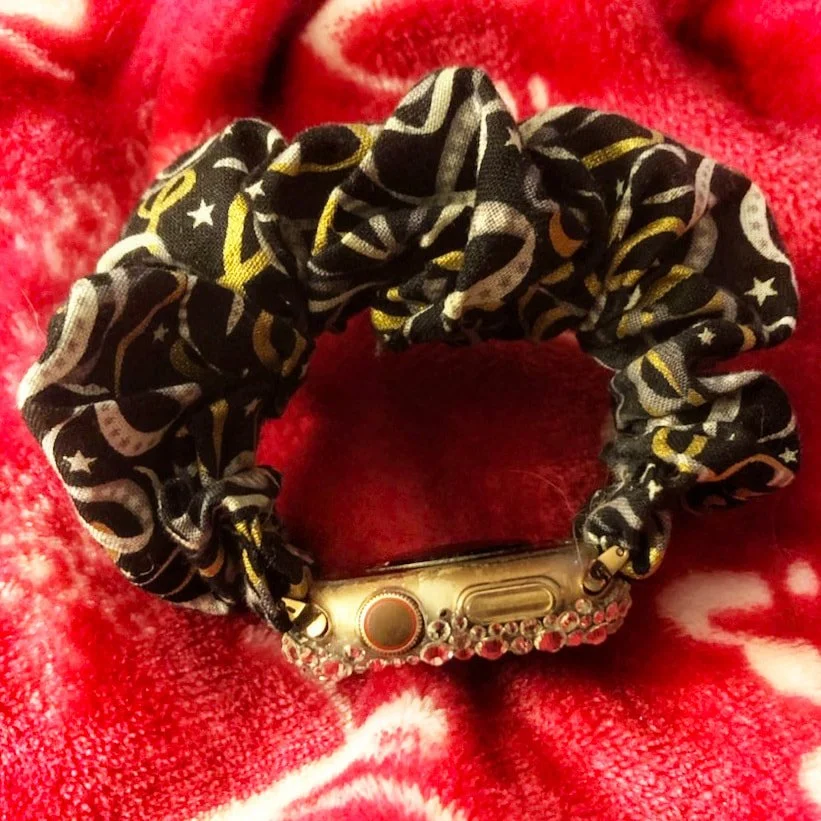
Apple Watchband Scrunchie DIY
DIY an apple watchband or smart watch wrist scrunchie.

Now that the holiday hustle is over, life can get back to normal. Whatever "normal" is, right?
Happy New Year!!
Do you make New Year's resolutions? I do easy ones. I tell myself I'll make dinner 5 nights a week, exercise more, give one room a make-over (the main bathroom), simple and doable things. And of course, I fell off the wagon 2 months in. LOL Ahh... life.
Anywho, what fun things did you give and receive for the holidays??
Perhaps you or a loved one received an Apple watch? If so, I have the perfect tutorial you need to scrunchify that watchband. Scrunchify is a technical term btw. ;)
Before we dive in I want to say this is a perfect scrap-buster project. Yay for those! You just need a strip of fabric, no stabilizer is needed. This is meant to be floppy.
As far as fabric choices, choose something with a small print or a solid. I have made them with knit, quilting cotton, and shirting, they all seem to work great. So, be creative and have fun!
Supply List:
1/4" elastic
1/8 yard of fabric or a fat quarter (smaller prints work best)
Pair of magnetic clips for the watch
Sewing machine
Matching thread, bobbin, notions, etc.
Sewing machine
Rotary cutter
Ruler and cutting mat
Safety pin or other object for turning tubes
I don't have an Apple watch, but my friend does and she asked if I'd make her a few scrunchy wristbands for it. I searched all over to find a tutorial, and it was hard to find one. I honestly didn't even know the scrunchie wristband was a thing, but the 80s and 90s are back in full swing, so...
I found a tutorial and made 3, but I wasn't happy with them. I figured if she wanted more after the first set, I'd fiddle with a pattern and make them differently. Well, she asked for more and I created a whole new pattern. The end result was much prettier, fluffier, and more like an actual scrunchy. Yay! So, I wanted to share how to make these with you. If you do make one, tag me so I can see them. These make great scrap-busting projects as well. Win-Win!

Instructions
Step 1. Cut your fabric into an 18" by 4" strip. If you have a rotary cutter, ruler, and cutting mat, this makes the process easy. If not, use chalk or invisible ink and scissors to mark and cut the strip.
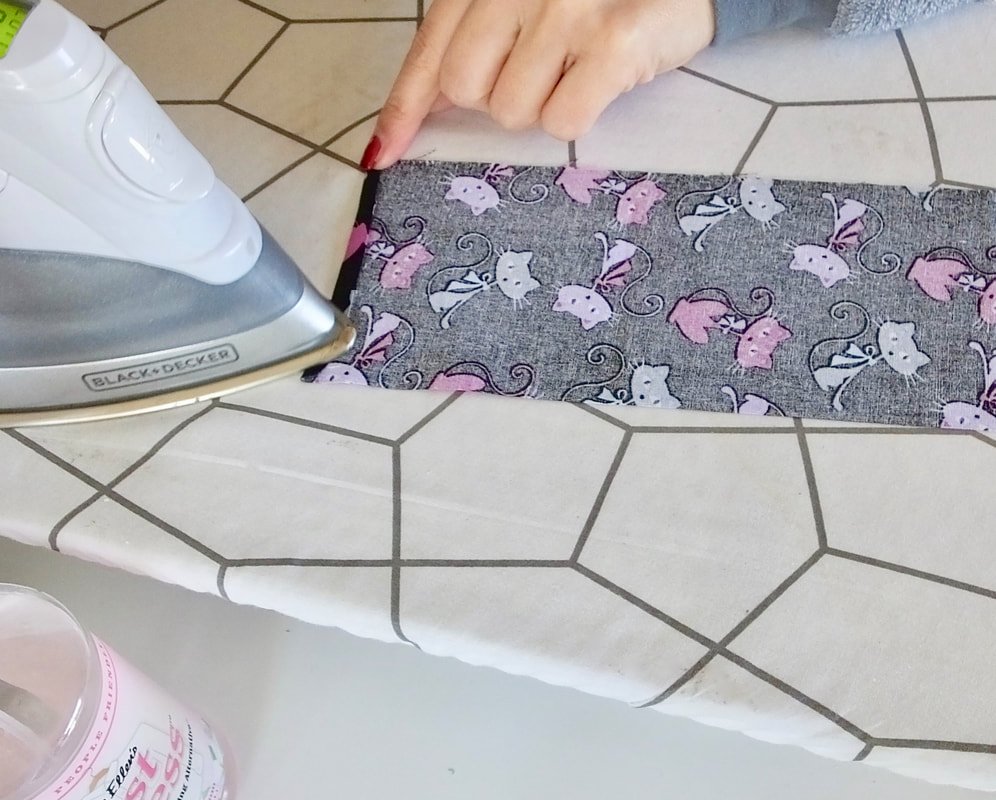


Press the strip flat, and fold down a 1/4" strip on each short end, wrong sides together. Press.
Sew a 1/4" seam down the strip. Backstitch at each end.


Grab your safety pin and attach it to one of the tube ends. Or use whatever method you like for turning tubes.
Feed the safety pin back through the tube until it comes out the other side. Gently pull it through and take off the safety pin. Go back to the iron to press the seam.
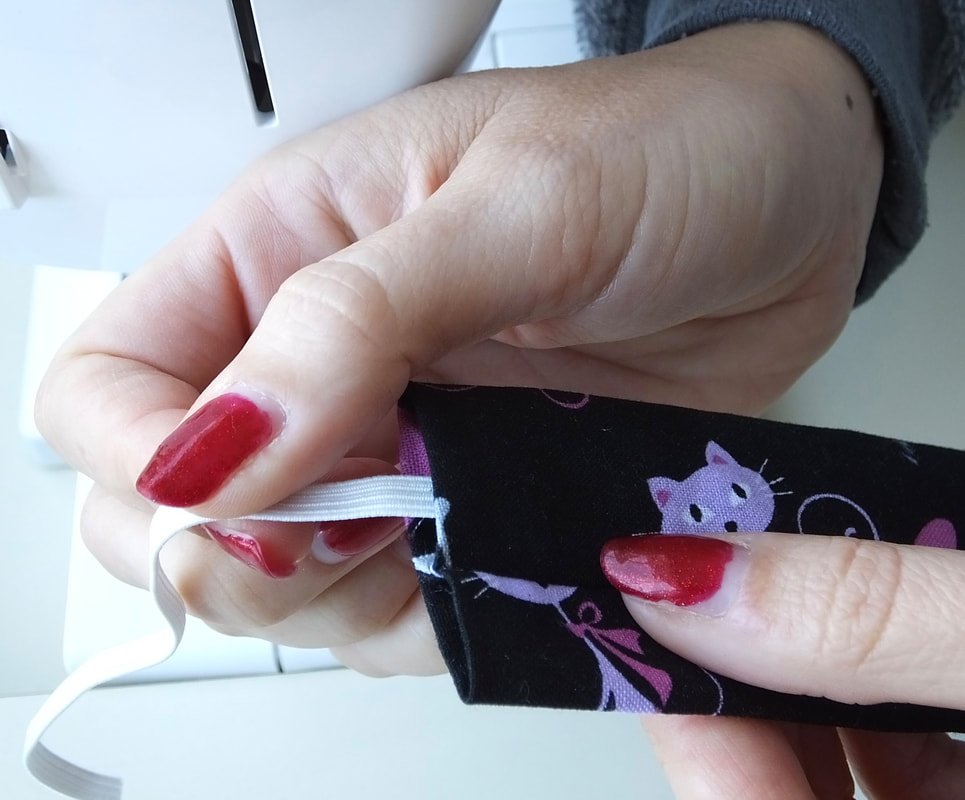
Measure your wrist and figure out how much elastic you'll need. My friend has a smaller wrist, so I cut a 6" piece. If you have a larger wrist, you will want to cut a 7-8" piece.
Stick the safety pin or a bodkin at the end and feed the elastic through the tube.
Use another safety pin or clip to hold the elastic at one end while you feed the elastic through to the other end.
Feed the elastic through the tube. I prefer to have the seam in the middle, but you can push it to one side if you like.
Sew one end with a scant 1/4" seam and go over the elastic 2 or 3 times, being sure to backstitch. Repeat on the other end.
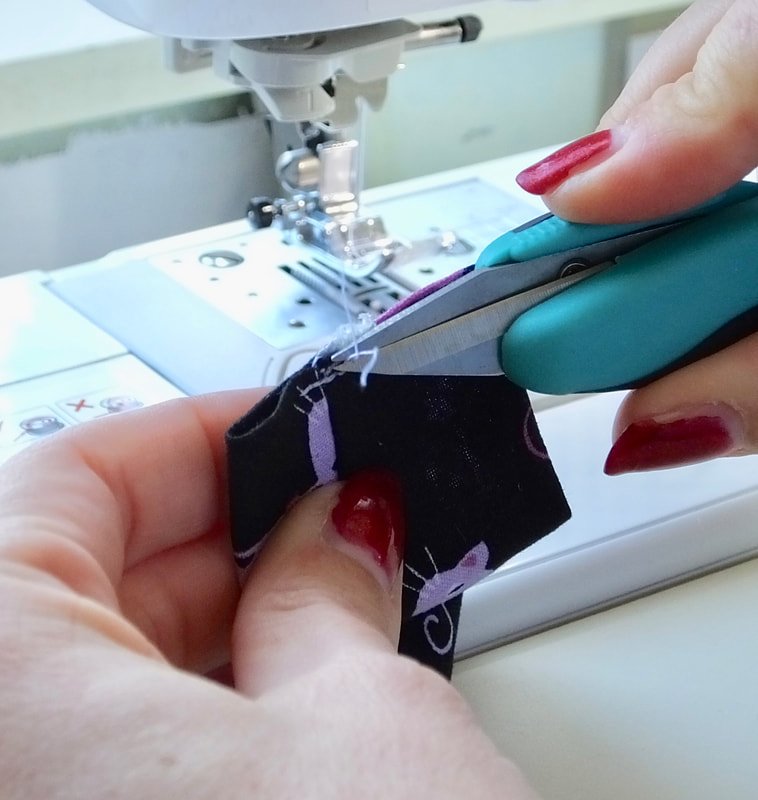
Snip those threads.
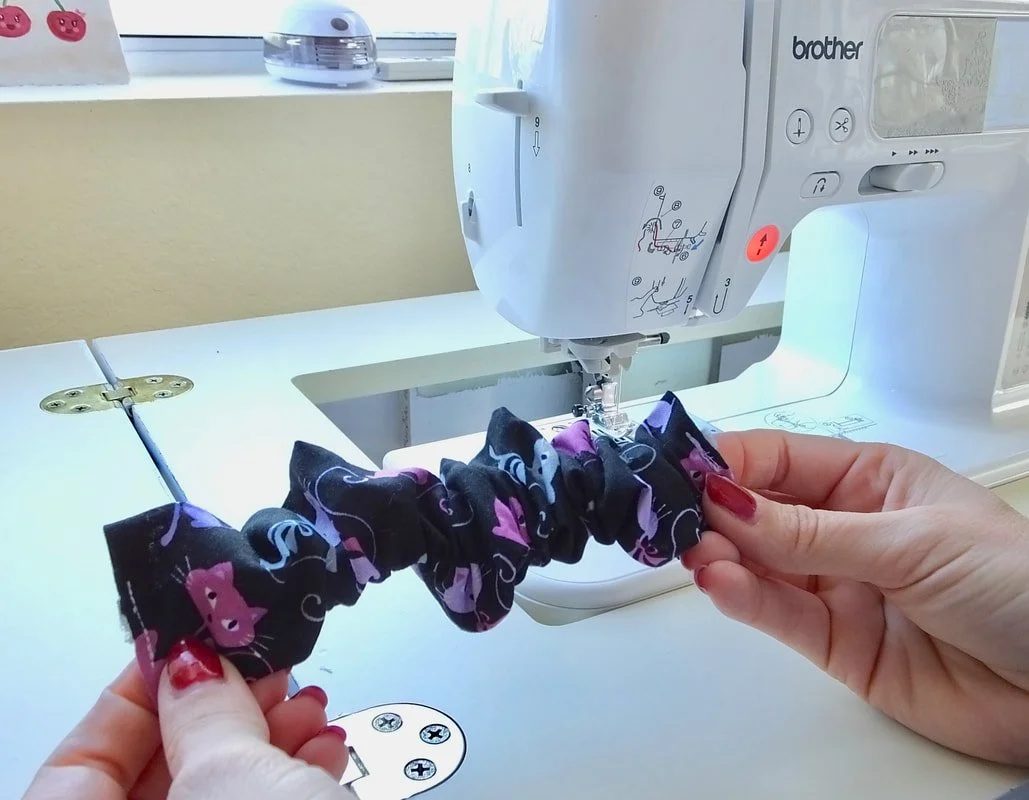
Ta-Da! You're almost done.
It should resemble something like this. If not, get that seam ripper and go back a few steps. My elastic slipped out from one end and I had to redo the elastic twice. Make sure you clip the end to keep the elastic from popping out.
Now grab those magnetic clips. The easy part is done. They come in a little box like this. I saved the boxes to reuse for something. Buttons perhaps? Or spent needles that need to go in the trash.
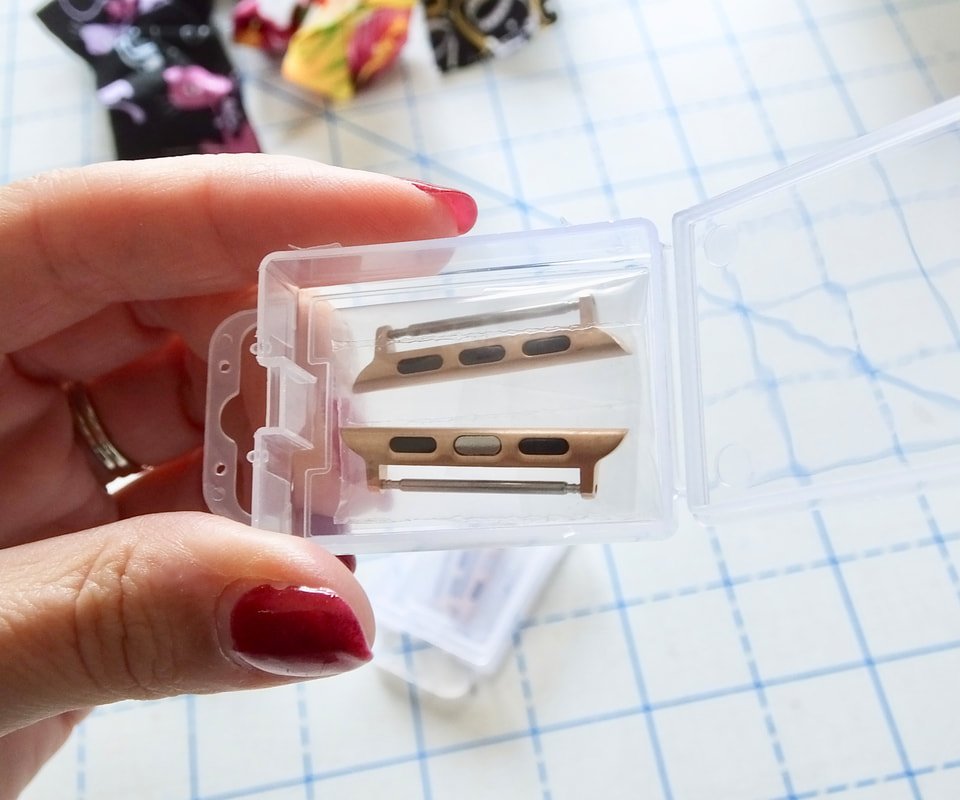
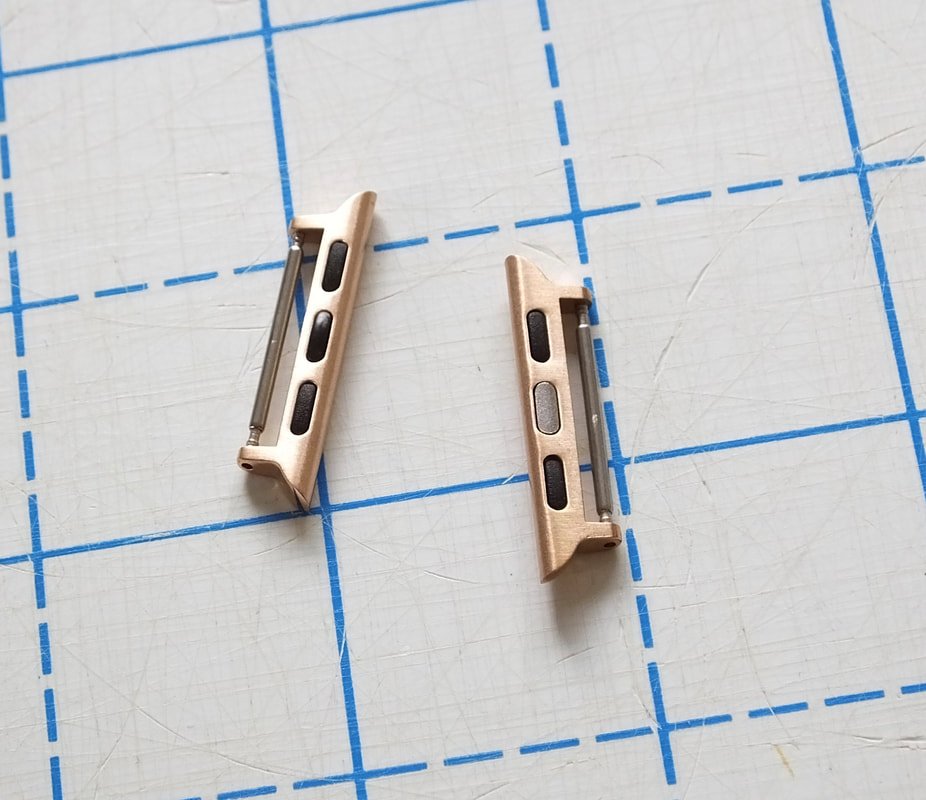
Notice the 2 different sides and magnets. We'll want to use the side with 3 black magnets.
This is honestly the least enjoyable part of making these simple scrunchies. Take a sip of tea, eat a piece of chocolate, or scream into a pillow, and let's do this!
Make sure the clip has the 3 black magnets facing upwards. Then stick a corner of the scrunchy through the back and carefully pull and tug until it's through the itty bitty gap. I pull it until it overlaps about 1/2" or so. Clip or pin this end in place. Do the same thing with the other side. This definitely takes some patience. Don't get frustrated, if you need to use the other corner to stuff inside, do that. This part takes some finagling for sure.
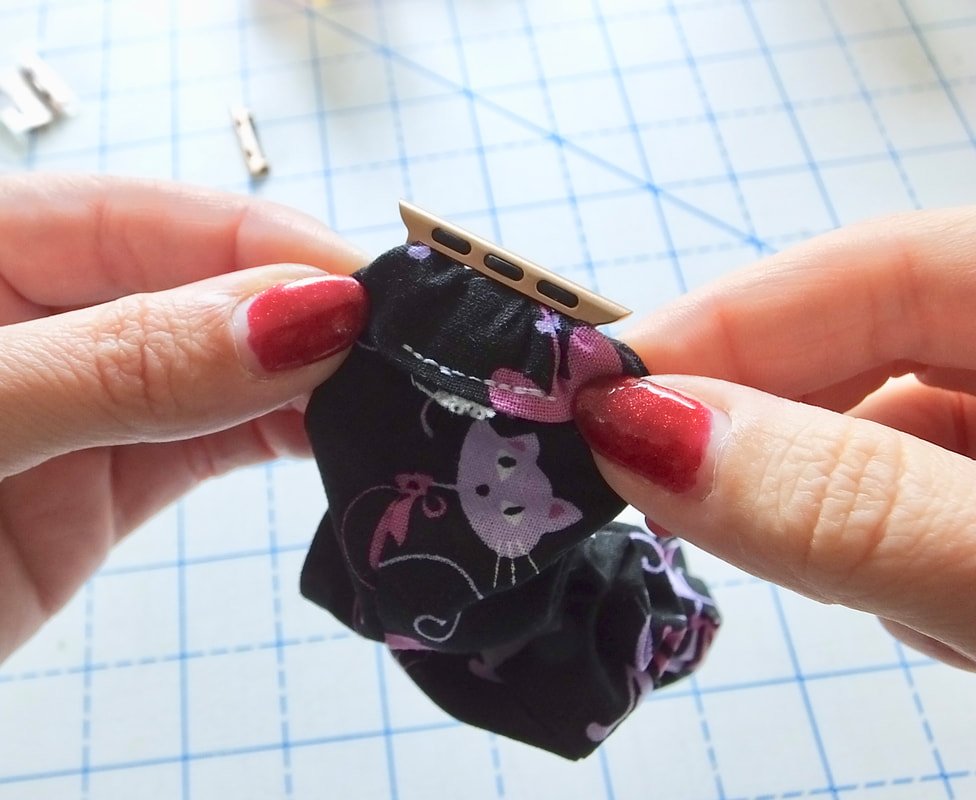
Should look like this when the fabric is pulled through. Make sure you see the black magnets.
I used wonder clips to hold the ends, but pins work too.
Sew the ends closed. Be careful not to stitch through the magnet clips. I found it helpful and easy to have the magnet to the left of the needle. It seemed easier for the machine too. I stitched right over the area that was previously stitched to keep the elastic in place. Backstitch and you're done! Insert it into your watch and go.

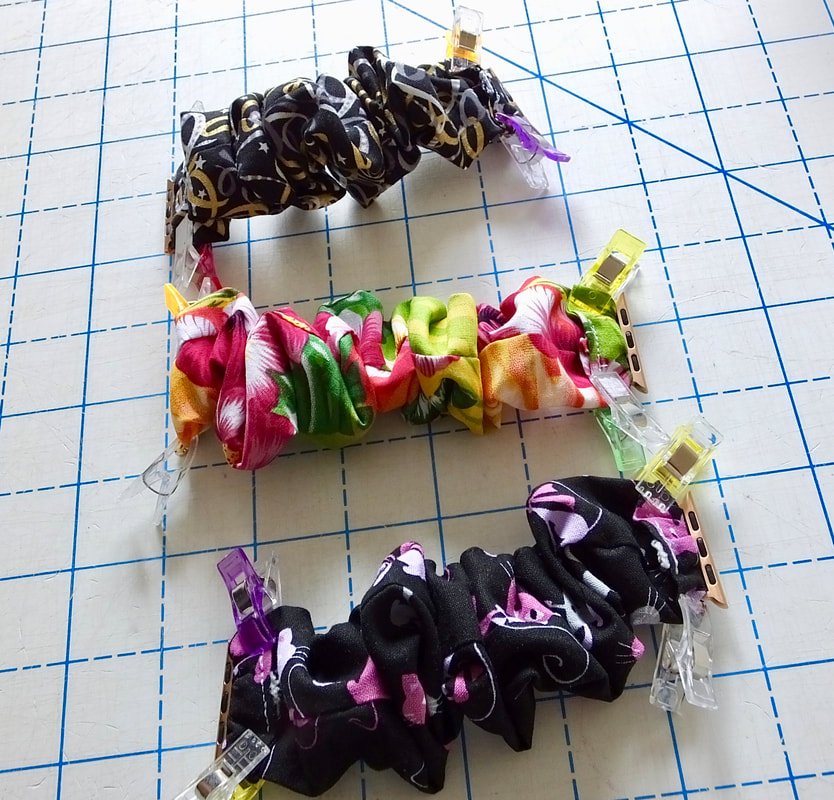
I made 3 different prints. You can do one for every holiday! They're really easy to batch sew.


Thanks for hanging out and if you make one, please tag me on Instagram. I want to see what it looks like. :)
Still wondering if it's a scrunchie or scrunchy,
Annette

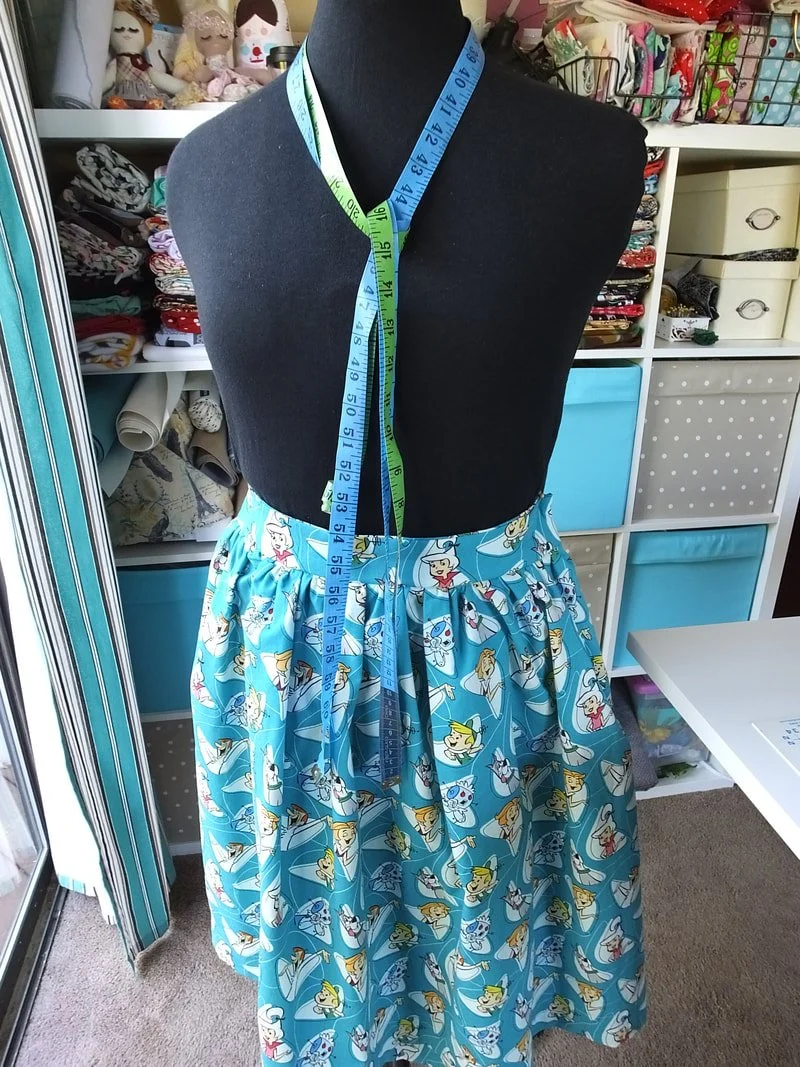
Stash Buster: Gathered Skirts
If you have 2 yards of fabric that you need to use up, sew a gather skirt. They’re easy and beginner friendly too.

I have a silly question for you. Do you ever buy fabric without knowing what you'll make with it?
Quietly raises a hand, I'm guilty of this. #fabrichoarder
Well, boredom set in on a Friday night and I didn't have to taxi kids around.
So, I opted for the ole "cereal for dinner" mantra.
And I took a whole afternoon turned to night, for me. And did some selfish sewing.
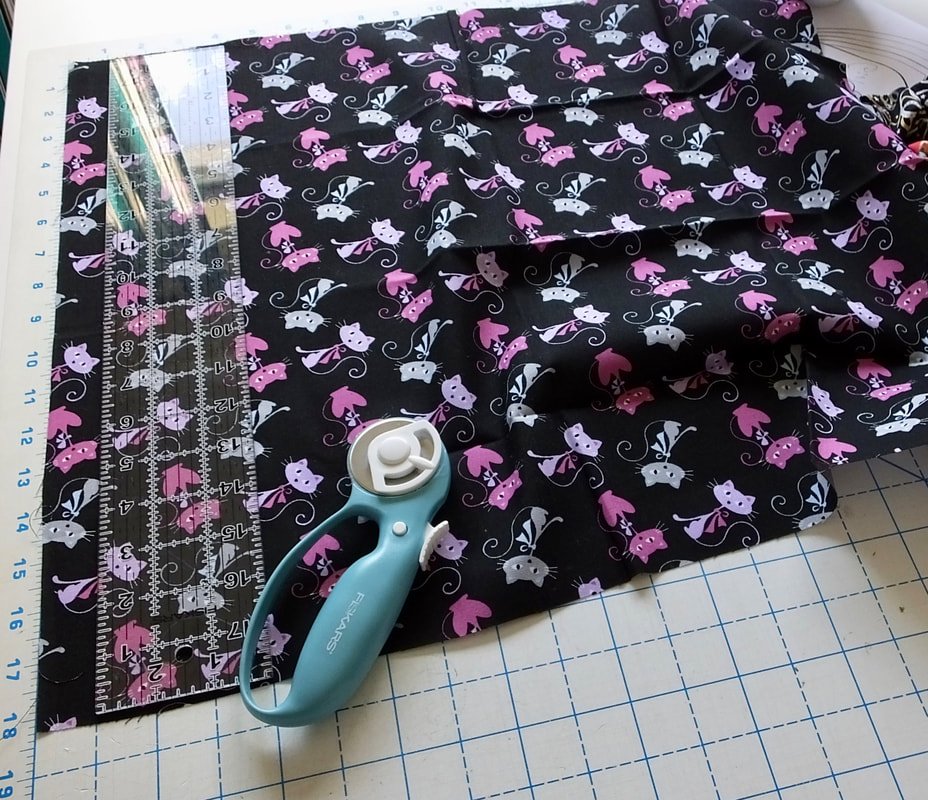
I looked in my stash and had Halloween fabric I bought years...and years ago. I also had some fun with Jetson's fabric. I'm a child of the 80's after all. It was a stash-busting selfish sewing kind of night.
I always buy at least 2 yards of fabric, especially If I'm unsure what it'll get used for. You can usually get a skirt, a top, or a blanket and matching items for a baby gift, etc. out of 2 yards.
All I needed was 2 yards of fabric, an invisible zipper, and coffee.
Jetsons fabric gathered skirt. This is my favorite fabric.
I decided to make three gathered skirts for my wild and crazy Friday night.

Super simple self-drafted pattern and cut them out assembly style. Then, sewed them up. I used an invisible zipper on each and opted out of adding pockets. Although, I regret that decision now. When making your own skirts, always add pockets! Pockets are life!

My pinup zombie Halloween gathered skirt
If you've never made a gathered skirt, do a quick Google search and draft a pattern. They are super easy and fun. Perfect for quilting cotton fabrics too. Yay! We all have those fun novelty prints in our stash. Just make sure you pre-wash that fabric. And... bonus, different fabrics will change the look of the skirt. Velvet and taffeta make great holiday party skirts, as where gingham will create a casual Sunday skirt.
That's it. This was a short and simple post and I hope you enjoyed it.
Now go do some selfish stash busting sewing!
Yours skirt-wearing friend,
Annette